
When I think about true comfort food desserts, my mind immediately goes to warmth, butter, and something that tastes like coming home. Forget fighting with pie dough, folks! I want that glorious, soft-baked goodness that just melts alongside ice cream. That’s why this Ultra Buttery apple cobbler recipe is the one I turn to again and again.
This version focuses entirely on that incredible, soft biscuit topping—it’s easier than rolling out crust, trust me. It comes together so quickly, but the flavor payoff is huge. For me, cooking, even something as simple as this cobbler, is about finding that small moment of harmony in a busy life. You don’t need fancy skills; you just need real butter and good apples to create something wonderful for the people you care about.
- Why This Ultra Buttery Apple Cobbler Recipe Stands Out
- Gathering Ingredients for Your Apple Cobbler Recipe
- Step-by-Step Instructions for the Easy Apple Cobbler Recipe
- Baking and Resting Your Homemade Apple Cobbler
- Serving Suggestions for This Warm Apple Dessert
- Tips for the Best Apple Cobbler Recipe Success
- Storage and Reheating This Simple Fall Dessert
- Frequently Asked Questions About This Apple Cobbler Recipe
- Estimated Nutritional Data for This Apple Cobbler Recipe
Why This Ultra Buttery Apple Cobbler Recipe Stands Out
If you are hunting for satisfying Comfort Food Desserts, stop scrolling right here. This isn’t just another baked fruit dish; this is the definition of a perfect, Sweet and Simple Apple Dessert. We skip the fussy pie crust and aim straight for that golden, tender top layer that soaks up all those amazing cinnamon juices from the bottom.
Honestly, making this is so much easier than waiting for a pie to chill or rolling out dough. We treat the topping like the best biscuit you’ve ever had—rich, soft, and slightly cakey. That’s what gives this particular apple cobbler recipe its magic touch.
Biscuit Topping vs. Crisp: Understanding the Difference
Okay, let’s get one thing straight about this particular bake. When people talk about crisps or crumbles, they mean oats, nuts, and a crumbly streusel top that gets crunchy. Not our style here! We are making an old-fashioned, soft biscuit topping.
This means when you dig in, you get that gorgeous, pillowy bite that soaks up the syrupy apples underneath. It’s less about crunch and way more about that wonderful, melt-in-your-mouth texture. That’s the authentic, homemade feeling we aim for!
Gathering Ingredients for Your Apple Cobbler Recipe
You know I am all about keeping things simple, and this homemade applesauce level of simplicity carries right over to our ingredient list. For this apple cobbler recipe, we’re separating everything into two camps: the gooey filling and the ultra-buttery topping. Pay attention to those amounts because precision is key here for that perfect bake!
For the spiced apple filling, grab 6 large Granny Smith apples. Yes, Granny Smiths are the absolute best for baking; they hold their shape and give you that lovely tartness to balance the sugar. We mix those up with white sugar, light brown sugar, just a touch of flour so the juices thicken slightly, cinnamon, nutmeg, and a splash of lemon juice. Don’t forget the 1/4 cup of butter pieces you dot over the top of the apples before baking—that melts right down into pure heaven!
Now for the topping, which is where the magic happens. You need 1 1/2 cups of flour, a little more sugar, baking powder, and salt. The star, though, is that full stick (1/2 cup) of cold butter, cut into those small cubes we talk about. Finish it off with buttermilk, and boom, you’ve got yourself the base for the Best Granny Smith Apple Dessert.
Tips for Selecting Apples and Butter
Listen, the apples make or break your cobbler experience. I insist on Granny Smith every single time. If you use softer apples, they just turn into mush, and we want tender slices, not apple sauce! The tartness also cuts through all that wonderful sweetness we’re adding.
For the topping, the butter absolutely has to be icy cold. I mean, straight from the fridge, cut into those small cubes. If your butter is warm, you’ll end up smearing it into the flour instead of creating those wonderful little pockets of fat. Tiny, pea-sized cold butter chunks are the secret weapon for that flaky, rich Buttery Cobbler Topping.
Step-by-Step Instructions for the Easy Apple Cobbler Recipe
Alright, let’s get this beautiful, warm dessert into the oven. Even if you think you aren’t cut out for baking, this easy apple cobbler recipe is designed to hold your hand through every step. First things first: preheat your oven to 375°F (190°C) right away. Then, make sure your 8×8 inch baking dish is lightly greased. We want things ready to go when the filling is mixed.
The whole process moves fast once you get started, which is why I love this as a quick apple bake! Remember, while we are focusing on ease, precise prep ensures everything cooks evenly, and we definitely want that bubbling fruit and golden top.
Preparing the Cinnamon Apple Filling
This is where we build the flavor base! In a large bowl, toss those lovely sliced Granny Smiths with both the white and brown sugars, the tablespoon of flour, cinnamon, and nutmeg. Make sure every single slice gets coated evenly. That lemon juice we add isn’t just for flavor; it keeps those beautiful apples from turning brown while you prep the topping. Once coated, pour that mixture into your prepared dish and dot the top with those 1/4 cup of small butter pieces. They’ll melt right down and give you amazing depth!
Mixing and Dropping the Buttery Cobbler Topping
Now for the biscuit dough! Whisk your dry topping ingredients together—that flour, sugar, baking powder, and salt. Here is the most important part: cut in that very cold, cubed butter using a pastry blender or your fingertips until it looks like coarse crumbs, making sure you still have some pea-sized bits of butter visible. That cold butter creates steam in the oven, making the biscuit light!
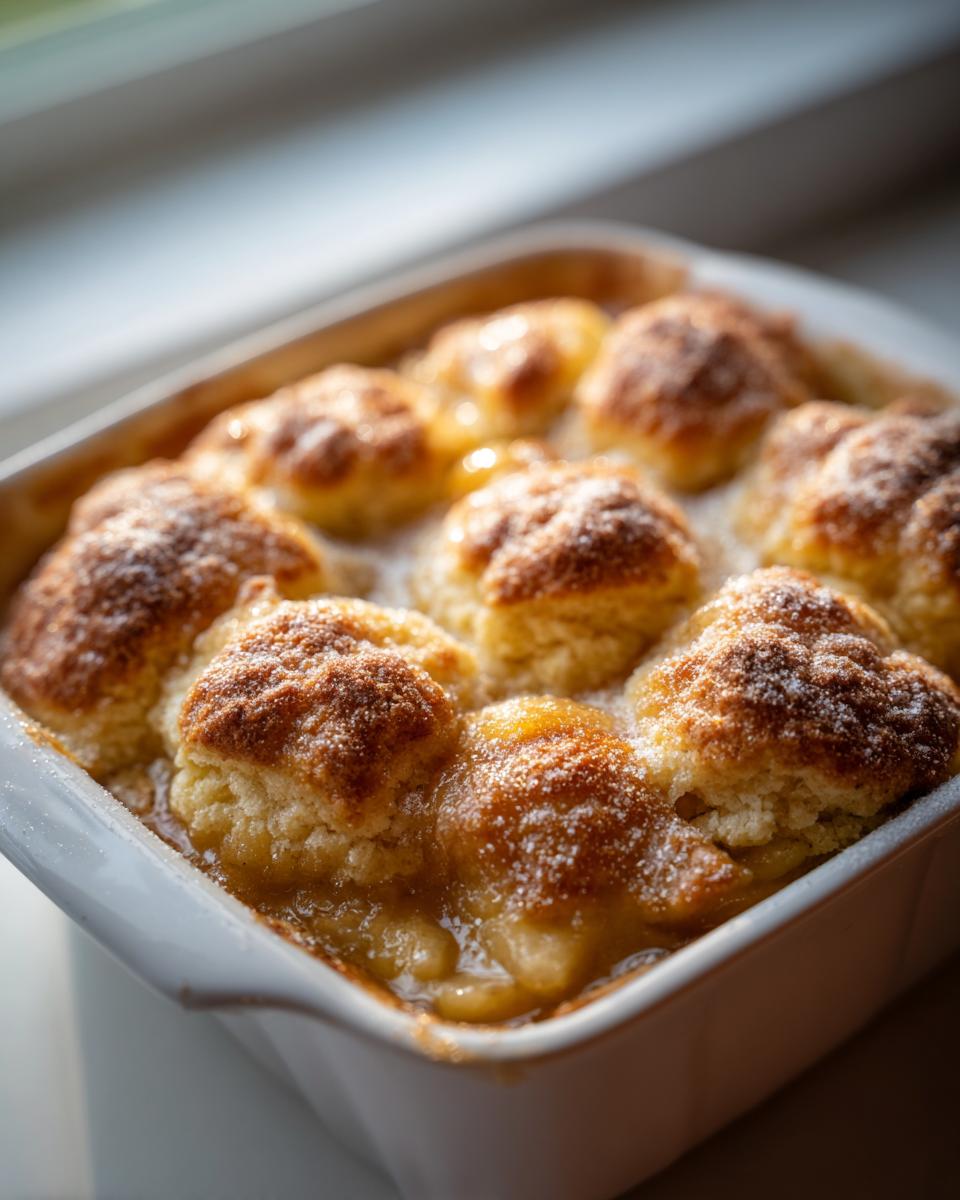
Pour in the buttermilk and stir ONLY until the dough just barely comes together. I mean it—do not overmix! If you mix too much, that biscuit topping toughens up. Now, just drop big dollops of that shaggy dough over the apples. Leave little gaps so the fruit can breathe and bubble up nicely between the biscuit mounds.

Baking and Resting Your Homemade Apple Cobbler
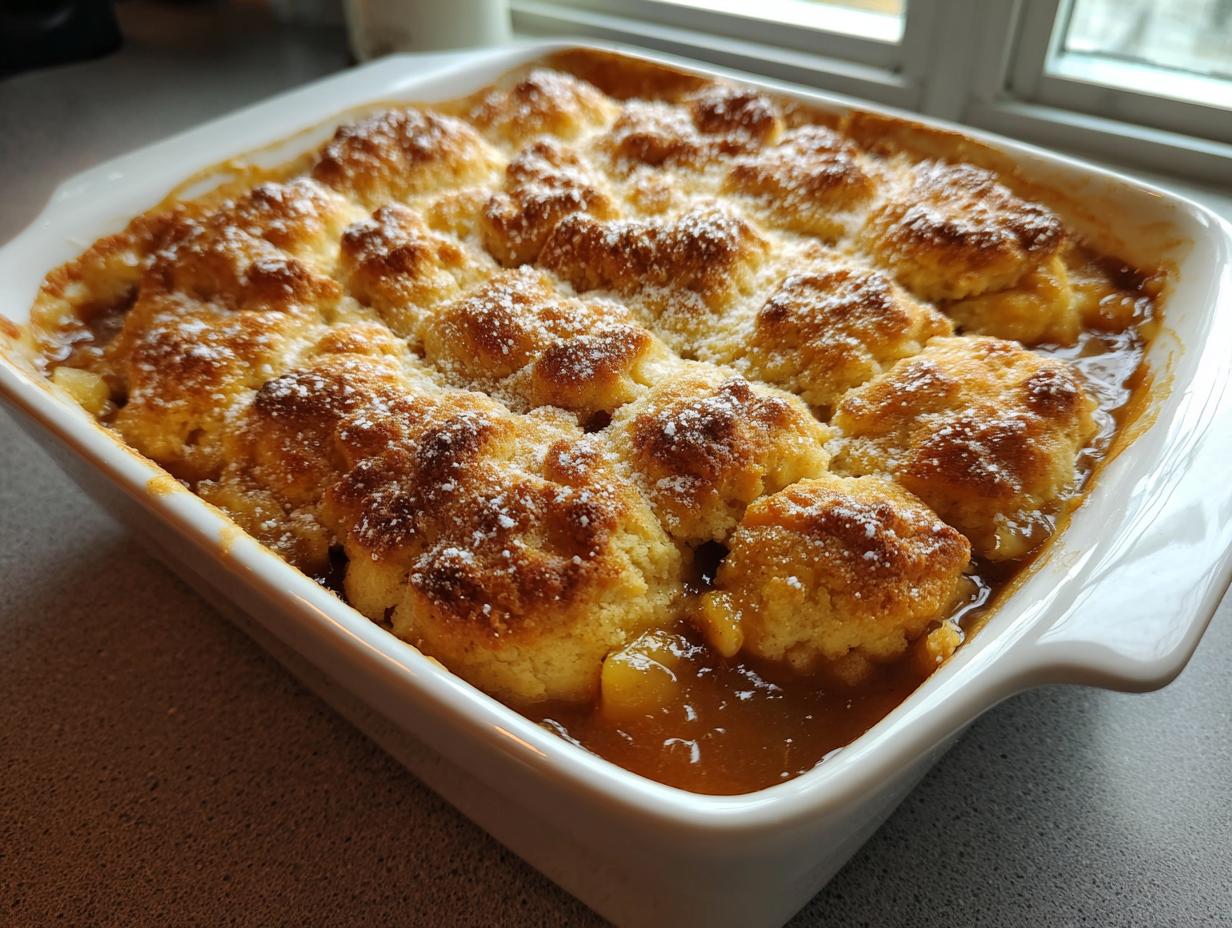
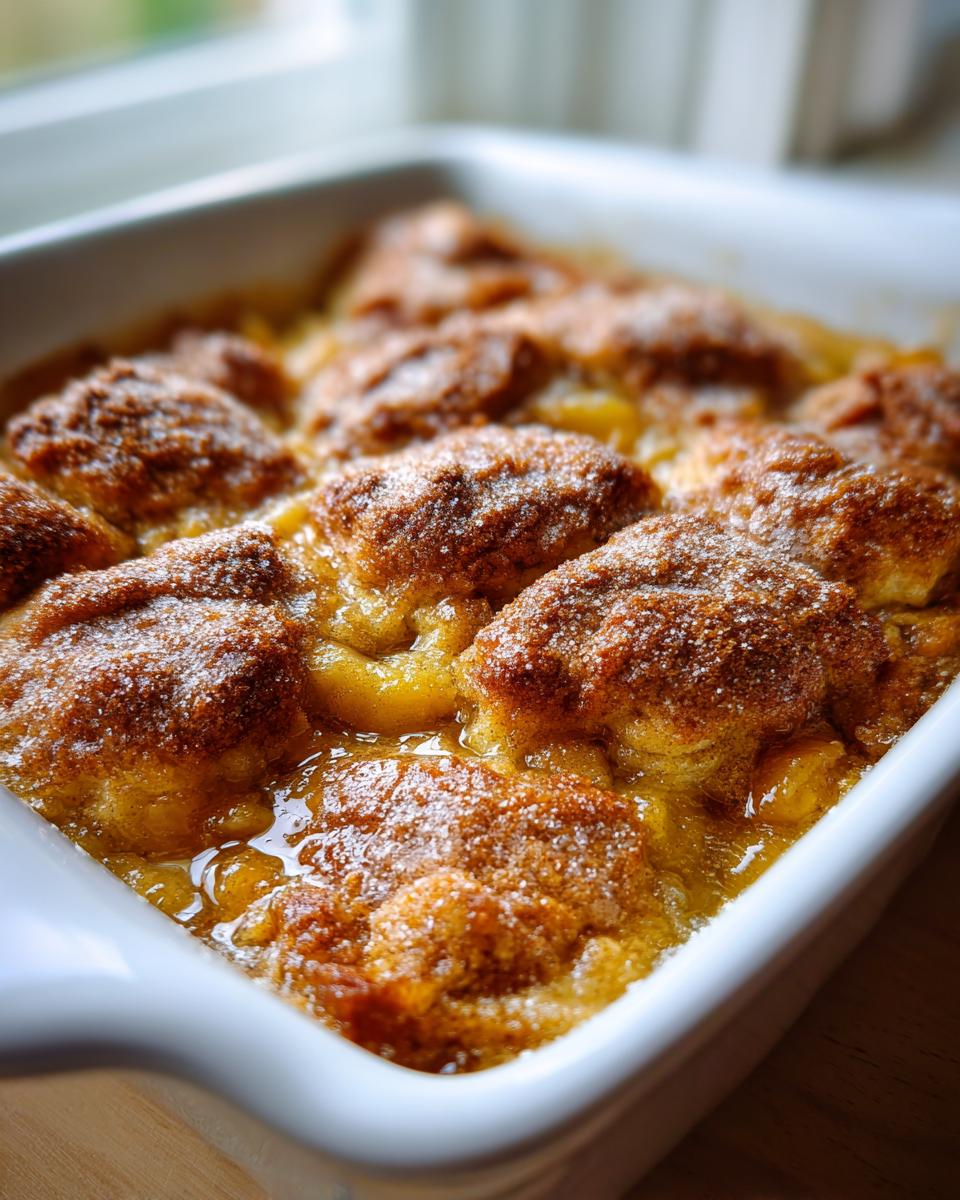
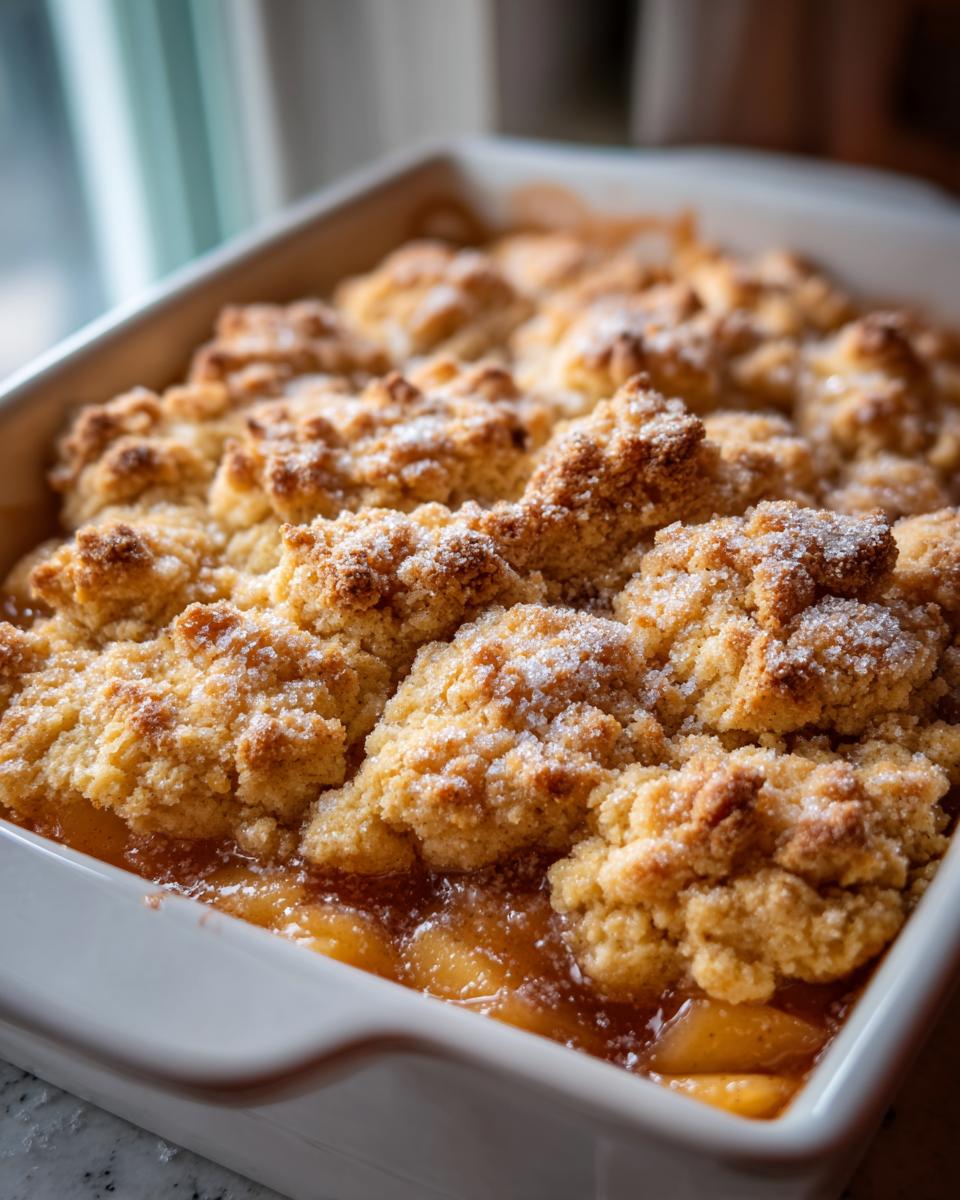
This is the moment we’ve been waiting for! Once you’ve sprinkled that coarse sugar over your biscuits, slide the dish into that preheated 375°F oven. You are looking for about 40 to 45 minutes of baking time. Don’t just watch the clock, though! You need to see those visual cues: the biscuit topping should be beautifully golden brown all over, and most importantly, the apple filling underneath better be bubbling up like a happy little volcano.
When you see those bubbly edges, it means the apples are perfectly tender when you stab them with a fork. Once it comes out, though, you have to show restraint! It’s mandatory that you let your homemade apple cobbler rest on a wire rack for at least 15 minutes. Seriously, don’t skip this! That time allows the juices to settle down and thicken up just right, so when you dish it out, it’s gooey, not soupy. That rest is key!
Serving Suggestions for This Warm Apple Dessert
There is simply no way to enjoy this warm apple dessert without the proper fanfare. And when I say fanfare, I mean vanilla ice cream. Seriously, if you make this entire perfect, Old Fashioned Apple Cobbler and don’t serve it warm with a big scoop of ice cream melting down the sides, you’ve only done half the job!
The contrast between the hot, spiced apples and the cold, creamy vanilla is just divine. It’s the ultimate pairing for any dessert to serve with ice cream, whether you’re having a big holiday meal or just making a Tuesday feel special. Once the cobbler has rested for those 15 minutes, get those bowls ready!
If you want to get fancy, a small drizzle of caramel sauce works wonders, tying in perfectly with the brown sugar depths. You can also find a truly simple cinnamon sugar cream cheese glaze that sometimes works if you’re feeling extra indulgent, but honestly, ice cream is the main co-star here.
Tips for the Best Apple Cobbler Recipe Success
We’ve got the recipe down, but sometimes the oven has other ideas, right? I’ve learned a few tricks over the years—especially making sure that topping browns just right and the bottom doesn’t get soggy—that help guarantee success every time you attempt this apple cobbler recipe.
First, if you worry about a soggy bottom (we all do!), try mixing that 1/4 cup of butter for the filling into the apples a little more thoroughly before you dot it. The goal is even distribution so the fat helps prevent the bottom layer of apples from steaming themselves into mush. Also, if you’re not getting great color after 35 minutes, I find carefully brushing the biscuit tops with a little extra melted butter helps achieve that beautiful golden look quickly. You can check out how some folks handle topping variations over at Salted Side for comparison.
Remember that chilling the butter for the topping is non-negotiable for that tender biscuit. Don’t fret if you don’t have time for everything else; just make sure that butter stays cold! If you want to experiment with apple desserts without the biscuit hassle, I made an amazing snickerdoodle dump cake that is ridiculously easy, too!
Storage and Reheating This Simple Fall Dessert
This simple fall dessert rarely lasts long enough to need storing, but when it does, we need to treat that glorious biscuit topping right. If you have any leftovers, cover the dish loosely with foil or transfer the pieces to an airtight container. You can generally leave it on the counter overnight, but after that, pop it into the fridge for up to three days.
When you are ready for an encore serving—which should be soon!—don’t go reaching straight for the microwave. Microwaving can really steam that biscuit and make it chewy. Instead, reheat individual portions in a toaster oven or a regular oven set to about 325°F for about 8 to 10 minutes. This quick blast of dry heat brings back some of that beautiful golden texture we worked so hard to achieve!
Frequently Asked Questions About This Apple Cobbler Recipe
I know you might have a few lingering questions before you dive into mixing up this incredible dessert. It’s always good to check, especially when you’re trying a new take on a classic! We want to make sure this turns out to be the most satisfying One Hour Apple Dessert you’ve ever made.
Can I make this apple cobbler recipe ahead of time?
You absolutely can assemble the entire thing—apples at the bottom, biscuits dropped on top—and cover it tightly. Store it in the fridge for up to 24 hours. Just remember you’ll need to add about 10 to 15 minutes onto that total bake time since the batter and apples will be totally cold when they hit the hot oven.
What is the best apple to use for a Cinnamon Apple Recipe?
For the best texture, I always lean on Granny Smith apples because they are firm and tart, which cuts through the sugar beautifully. If you want a bit more complex flavor, try a 50/50 mix! Combining Granny Smith with something sweeter, like Honeycrisp or Fuji, gives you that perfect balance while still holding their shape nicely.
How can I get a crispier Buttery Cobbler Topping?
If your sweet tooth leans toward a little more crunch on top, I have a simple trick. Before you sprinkle that coarse sugar on, take about two tablespoons of melted butter and lightly brush it right over the tops of those biscuit dough mounds. Pop it into the oven, and that extra fat will help it brown up beautifully and get a lovely crisp edge!
If you enjoyed this, you might love making my Cranberry Orange Punch to serve alongside it! Also, for completeness, when people ask about the difference between this and a crisp—remember, a crisp has oats, and this apple cobbler recipe has a soft, buttery biscuit top. That’s the real distinction!
Estimated Nutritional Data for This Apple Cobbler Recipe
Now, listen, I’m a cook, not a nutritionist, so take this section with a grain of salt! These numbers are just my best guess based on the ingredients in this recipe, using standard measurements for 6 generous servings. Since we’re using a full stick of butter for that rich flavor, it definitely ticks the boxes for a satisfying treat. This is pure, old-fashioned, delicious indulgence, not diet food!
For one serving of this Ultra Buttery Apple Cobbler, you’re looking at roughly 410 calories, about 21 grams of fat, and around 55 grams of carbohydrates. It does offer about 5 grams of protein, which is nice! Feel free to check out my easy pumpkin bars recipe if you’re looking for another delicious fall bake to compare.
PrintUltra Buttery Apple Cobbler with Soft Biscuit Topping

Make this easy homemade apple cobbler featuring tender, cinnamon-spiced apples covered with a rich, buttery biscuit topping. It is a comforting dessert perfect for serving warm with ice cream.
- Prep Time: 20 min
- Cook Time: 45 min
- Total Time: 65 min
- Yield: 6 servings 1x
- Category: Dessert
- Method: Baking
- Cuisine: American
- Diet: Vegetarian
Ingredients
- 6 large Granny Smith apples, peeled, cored, and sliced
- 1/2 cup granulated sugar
- 1/4 cup packed light brown sugar
- 1 tablespoon all-purpose flour
- 1 teaspoon ground cinnamon
- 1/4 teaspoon ground nutmeg
- 1 tablespoon lemon juice
- 1/4 cup (4 tablespoons) unsalted butter, cut into small pieces (for the filling)
- 1 1/2 cups all-purpose flour (for the topping)
- 2 tablespoons granulated sugar (for the topping)
- 1 teaspoon baking powder
- 1/2 teaspoon salt
- 1/2 cup (1 stick) cold unsalted butter, cut into small cubes (for the topping)
- 1/2 cup buttermilk
- 1 tablespoon coarse sugar (for sprinkling)
Instructions
- Preheat your oven to 375°F (190°C). Lightly grease an 8×8 inch baking dish.
- In a large bowl, combine the sliced apples, granulated sugar, brown sugar, 1 tablespoon flour, cinnamon, nutmeg, and lemon juice. Toss gently until the apples are evenly coated.
- Pour the apple mixture into the prepared baking dish. Dot the top of the apples evenly with the 1/4 cup of small butter pieces.
- Prepare the topping: In a separate medium bowl, whisk together the 1 1/2 cups flour, 2 tablespoons sugar, baking powder, and salt.
- Cut in the cold cubed butter using a pastry blender or your fingers until the mixture resembles coarse crumbs with some pea-sized pieces of butter remaining.
- Pour in the buttermilk and stir just until the dough comes together. Do not overmix.
- Drop spoonfuls of the biscuit dough evenly over the apple filling, leaving small gaps between the mounds. The topping will expand as it bakes.
- Sprinkle the coarse sugar over the biscuit topping.
- Bake for 40 to 45 minutes, or until the topping is golden brown and the apple filling is bubbly and tender when pierced with a fork.
- Let the cobbler cool on a wire rack for at least 15 minutes before serving warm.
Notes
- For the best texture, use cold butter for the biscuit topping.
- Serve this warm apple dessert with a scoop of vanilla ice cream for the ultimate comfort treat.
- If you prefer a slightly tangier filling, substitute one of the Granny Smith apples with a Honeycrisp apple.
Nutrition
- Serving Size: 1 serving
- Calories: 410
- Sugar: 35g
- Sodium: 280mg
- Fat: 21g
- Saturated Fat: 13g
- Unsaturated Fat: 8g
- Trans Fat: 0.5g
- Carbohydrates: 55g
- Fiber: 3g
- Protein: 5g
- Cholesterol: 55mg