

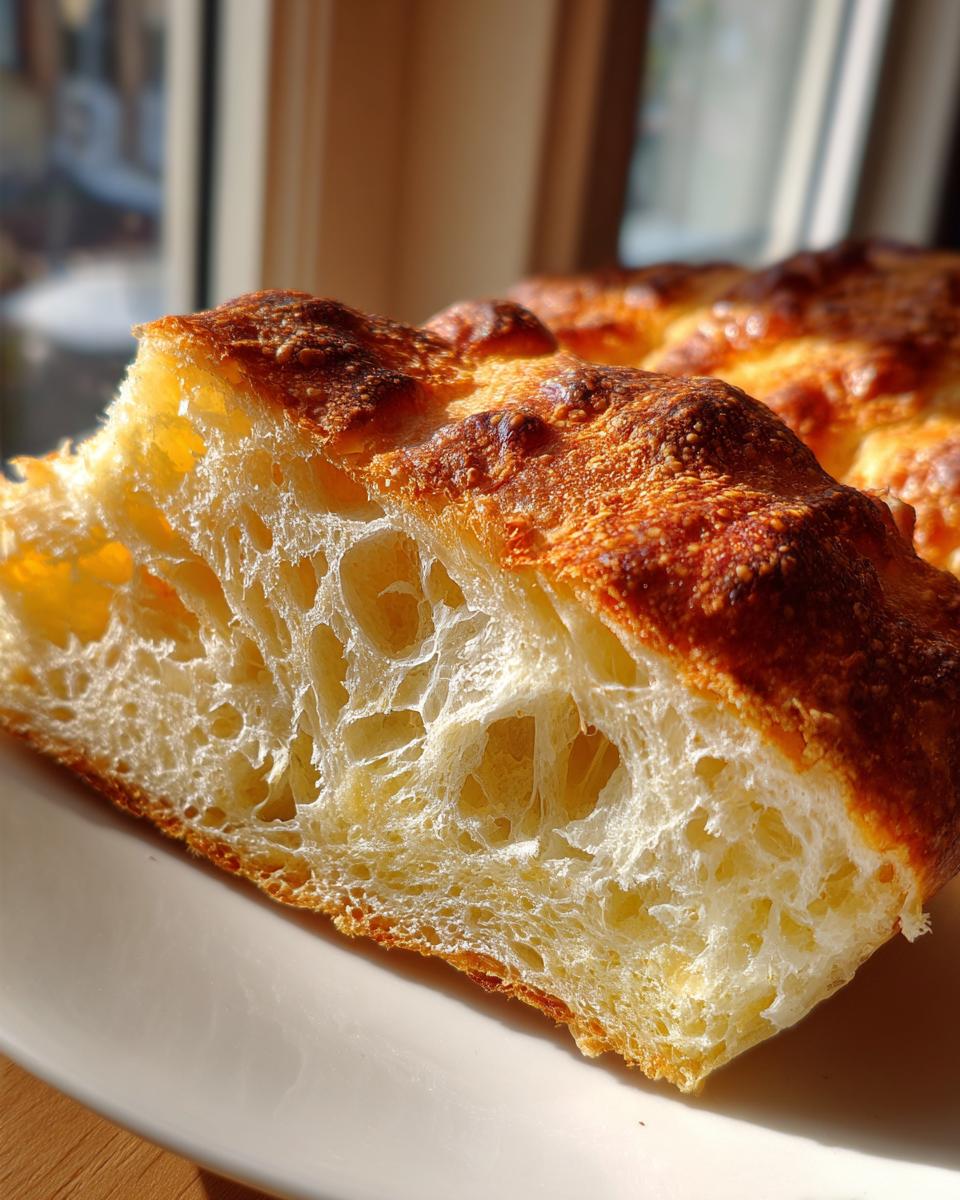
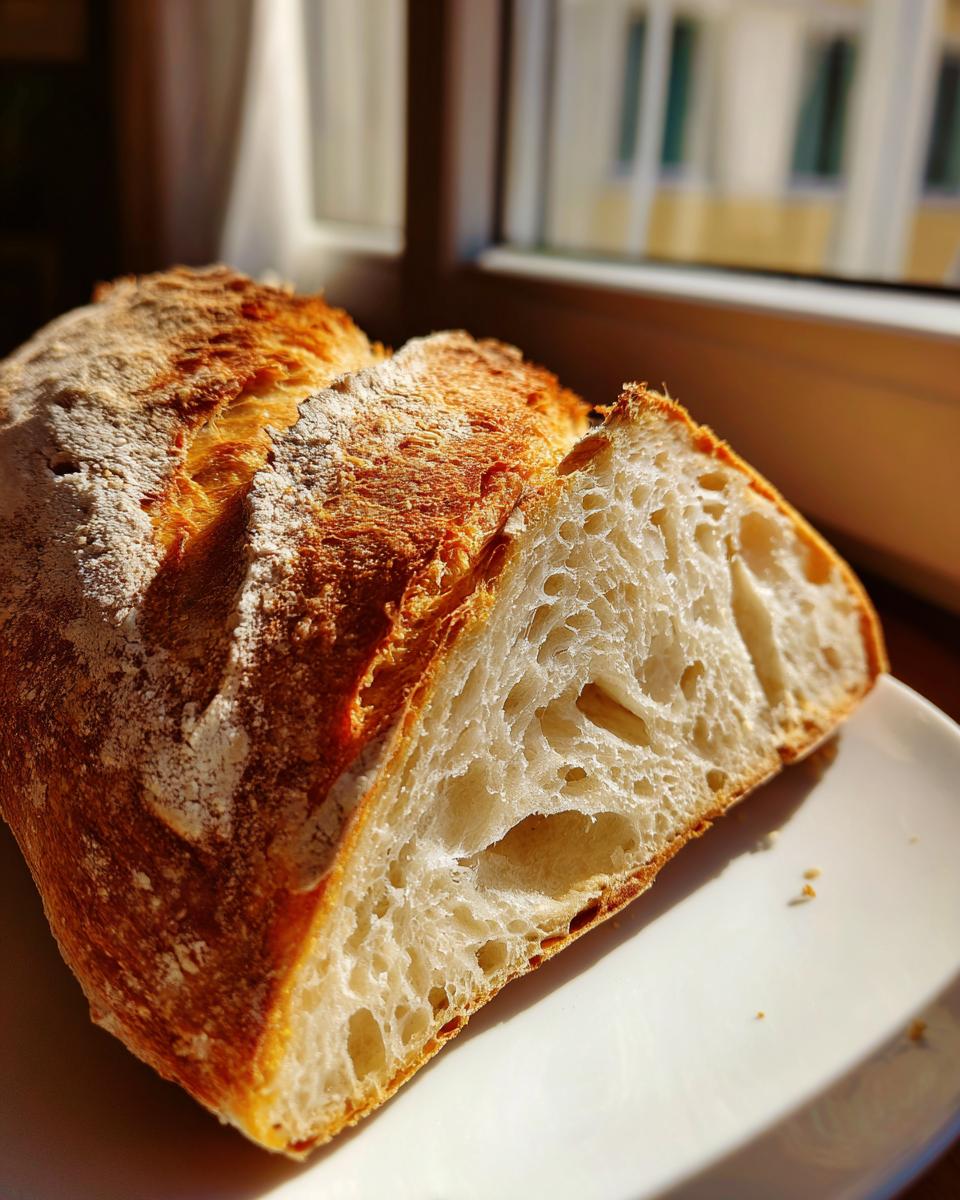
Oh, that smell! There is seriously nothing better than walking into your kitchen and being hit with the amazing aroma of fresh-baked bread, right? If you’re like me, you dream of that perfect loaf: hard, crackly, golden crust on the outside, but totally soft and chewy once you tear into the center. Well, stop dreaming! I’m sharing my absolute favorite, super simple recipe for **Italian bread**. This is pure **bakery-style bread at home**, and trust me, it delivers every single time.
I’m Michael Carter, and while I spent years behind a computer screen, these recipes are born from my busy home kitchen. I developed this foolproof method because I wanted incredible flavor without spending all day waiting around. If my busy schedule can handle this, yours definitely can too! This recipe is designed to prove you don’t need fancy equipment—just a passion for good food—to achieve that perfect, rustic loaf. You can learn more about my journey in the kitchen over at our story page.
- Why This Easy Crusty Italian Bread Recipe Works for Beginners
- Gathering Ingredients for Your Soft and Chewy Italian Loaf
- Step-by-Step Instructions for Perfect Italian Bread
- Tips for Success with Your Homemade Italian Bread
- What to Serve with Italian Bread
- Storing Your Warm Italian Loaf for Later
- Frequently Asked Questions About This Italian Bread
- Nutritional Snapshot of This Homemade Bread
- Share Your Aromatic Fresh Baked Bread Experience
Why This Easy Crusty Italian Bread Recipe Works for Beginners
I know what you’re thinking: bread baking is hard, right? Absolutely not! This **Crusty Italian Bread Recipe** breaks down all the scary parts. Mike—that’s me—tests every single recipe multiple times to make sure it works perfectly for the real home cook. You’re going to nail that perfect loaf on your first try, I promise.
Here is why this recipe is so approachable:
- It requires very little fussing once the dough is mixed.
- The total rising time is manageable for a busy night.
- The results look incredibly professional.
Achieving Bakery Style Bread at Home
The secret to that amazing, crispy exterior you get at a real bakery is steam! In the instructions below, we use a simple trick involving a hot water pan in the oven. This immediate blast of moisture keeps the outside of the dough supple long enough to expand fully before the crust sets rock-hard. That’s how we get such great **Bakery Style Bread at Home**.
Simple Bread Ingredients You Already Have
We aren’t calling for fancy specialty flours or starters here. We stand by our philosophy of using **Simple Bread Ingredients**. Honestly, you only need four things plus some olive oil, water, and yeast. If you have flour, salt, sugar, and yeast in your pantry, you are halfway there to baking this delicious **Soft and Chewy Italian Loaf** right now!
Gathering Ingredients for Your Soft and Chewy Italian Loaf
Baking this **Soft and Chewy Italian Loaf** is really only difficult if you use weird ingredients. Seriously, skip the specialty store trips! My goal here is absolute simplicity, just like we talk about when creating weeknight meals. Gather these few pantry staples—you probably have them right now—and we can get the dough going in under 15 minutes. It feels so satisfying to build something amazing from so little!
Ingredient List for the Italian Bread
Make sure you have your measuring cups ready! I find that using a kitchen scale is best for flour, but if you’re sticking to cups, make sure you scoop lightly. For the water, you absolutely must hit that sweet spot for the yeast activation.
- 3 1/2 cups all-purpose flour
- 1 1/2 teaspoons salt
- 1 teaspoon granulated sugar
- 2 1/4 teaspoons active dry yeast (that’s one full packet!)
- 1 1/4 cups warm water (aim for between 105–115°F – test it with your finger; it should feel nicely warm, not hot)
- 1 tablespoon olive oil (just for greasing the bowl, keeping things smooth!)
Step-by-Step Instructions for Perfect Italian Bread
Okay, time to get our hands dirty! This process is really satisfying once you get into a rhythm. Baking doesn’t have to be stressful; it’s just following a sequence of simple actions. We’re going to make sure this dough has the right structure so we get that amazing, chewy interior later. If you’re looking for more simple cooking guidelines, check out some of my ideas for quick weeknight dinners while the dough is rising!
Mixing and Kneading the Italian Bread Dough
First things first, grab your biggest bowl and whisk together the flour, salt, and sugar. In a small, separate cup, mix your yeast into the warm water; let it get foamy for about five minutes. When you see those bubbles, you know your yeast is awake and ready to work its magic! Pour that bubbly water into your dry stuff. Stir it up with a wooden spoon until it looks shaggy—no need for perfection yet. Now, turn that shaggy mess out onto your counter and knead it hard for about five to seven minutes. That kneading develops the gluten, and gluten is what gives you that satisfying chew in the final, beautiful loaf.

First Rise and Shaping the Rustic Italian Loaf
Once kneading is done, we let it rest! Lightly oil a large clean bowl—that olive oil we listed works perfectly—and drop your smooth dough ball in, turning it once so it gets a little coating. Cover it up tightly and stick it somewhere warm. It needs to relax and grow for a good hour up to an hour and a half, or until it has doubled in size. When it’s nice and puffy, gently punch the air out. Now, shape it into a longer, rustic loaf shape right on your parchment-lined sheet. Cover it loosely again; this second rise only needs about 30 to 45 minutes until it looks nicely puffy.
Second Rise and Creating the Crispy Crust Bread Tutorial
This is where we turn good bread into great bread! While the dough finishes rising, preheat your oven to 400°F (200°C). Super important: place a shallow pan or cast-iron skillet on the bottom rack while it preheats. Just before the loaf goes in, brush the top with a little plain water—it helps the crust start setting just right. Score the top with a sharp knife if you want those classic bakery slits. Slide the loaf in gently, and *very quickly* pour about half a cup of hot water into that hot pan on the bottom rack. Close the door fast! Bake it for 25 to 30 minutes. You’re done when the crust is deep golden brown and an instant-read thermometer hits 200°F in the center. Cool it on a rack completely before you slice it open—patience pays off!

Tips for Success with Your Homemade Italian Bread
I’ve baked this loaf dozens of times, and trust me, those little tweaks can turn a good bread into the stuff of dreams. Since our primary goal here is that signature bakery crunch, we have to pay close attention to moisture—both in the dough and in the oven! These simple tips from the recipe notes are things I never skip when I want the absolute best texture for my **Crusty Italian Bread Recipe**. If you want the full, deep dive on crust perfection, I found some great pro tips over at this resource.
Boosting the Crunch on Your Crusty Italian Bread Recipe
Remember that water pan we used in the oven? That’s critical for the initial crust set, but if you want that extra-loud CRACK when you slice it, you need to make the steam last longer. For my crispiest loaves, I grab a standard spray bottle filled with water and quickly spritz the oven walls twice—fast—during the first ten minutes of baking. Be quick, though; you don’t want much heat escaping! That extra burst of humidity prevents the surface of the bread from drying out too fast, allowing it to expand fully before it hardens. That’s the secret sauce for an amazing golden, crunchy crust!
Making Smaller Batches of Italian Bread for Dipping
Sometimes you don’t need one giant, meal-stopping loaf; you just need little pieces of bread perfect for dipping into soup or olive oil. If you decide to skip the big loaf and make smaller rolls or mini-loaves instead, you need to adjust your baking time. Smaller pieces cook much faster! If you divide the dough evenly for rolls, start checking them around 18 to 20 minutes. Always use the color and internal temperature (looking for that 200°F) as your main guide, not just the clock, because smaller shapes burn quicker. They are absolutely fantastic for when you’re serving hearty homemade soup!
What to Serve with Italian Bread
Now that you have this beautiful, piping hot, **Aromatic Fresh Baked Bread**, the real question is: what are you going to dunk it into first? Honestly, this loaf elevates any simple meal. It’s one of the most versatile things you can bake, making it perfect for everything from a quick snack to a fancy dinner side. When people ask me **What to Serve with Italian Bread**, my first thought is always dipping!
If you’re having pasta night, forget the store-bought stuff; you need something sturdy enough to soak up every last drop of that delicious sauce. This crusty loaf is built for that job. It’s wonderful alongside a heavy meat sauce or even a lighter garlic and oil pasta. I often serve it alongside my simple Bruschetta Chicken because the bread makes the perfect base to soak up the tomato topping.
But it’s not just for Italian mains! If you bake a loaf like this, you need to use it for dipping. It’s spectacular with just olive oil and balsamic vinegar, maybe tossed with some dried oregano and cracked black pepper. It’s also the perfect accompaniment for practically any soup or stew. Trust me, tearing off a chunk of this soft interior and using it to scoop up a bowl of creamy potato leek soup is pure comfort. Don’t forget to butter it generously while it’s still warm—that crispy exterior melts the butter just right!
Storing Your Warm Italian Loaf for Later
That glorious aroma fades quickly if you don’t store this beauty correctly! For the best results, you need to let the **Warm Italian Loaf** cool completely on the wire rack first. If you wrap it while it’s warm, the condensation ruins that beautiful crispy crust we worked so hard for. Once cool, wrap the entire loaf snugly in aluminum foil. This keeps the inside nice and soft.
If you want that crunch back the next day, don’t use the microwave! Just unwrap the piece you want, sprinkle it lightly with water, and pop it back into a 350°F oven for about 5 to 8 minutes. It comes out tasting nearly fresh-baked again!
Frequently Asked Questions About This Italian Bread
I figured you might have a few lingering questions about getting this dough right, especially if this is your first time baking bread! Don’t sweat it; that’s why I developed this recipe in my own kitchen until it was foolproof. If you’re looking for more foundational baking guidance, check out my guide on making other easy homemade bread too!
Can I make this a No Knead Italian Bread recipe?
Short answer? Not really, if you want this exact texture. True no-knead recipes rely on incredibly long, slow rises to develop the gluten structure. Since this recipe is designed to be a relatively **Quick Italian Bread**, we need that 5 to 7 minutes of active kneading—that’s how we build the strength for that wonderful, **chewy** interior without waiting 24 hours!
How long does this Quick Italian Bread take from start to finish?
I know we call it quick, but remember, bread needs time to be happy! From start to finish, including both rises, you’re looking at about 2 hours and 15 minutes total time—that’s 15 minutes of hands-on prep time, 30 minutes actual baking time, and the rest is hands-off rising magic. It’s all about being efficient with your time!
My Italian Bread didn’t get a golden brown Italian loaf crust. What went wrong?
That’s almost always down to the steam! If your crust didn’t brown up perfectly, it likely means you didn’t get enough moisture in the oven during those first ten minutes. The steam keeps the surface soft so the dough expands fully before hardening into that beautiful **golden brown Italian loaf** crust. Make sure that shallow pan is piping hot when you pour the water in!
Nutritional Snapshot of This Homemade Bread
Alright, let’s talk fuel! While we bake this bread for the cozy smells and the amazing taste, it’s good to know what we’re putting into our bodies. Remember, since this is made in my home kitchen using simple pantry items, these numbers are fantastic, but they are still just estimates based on the ingredients listed in the recipe above.
Everything here is calculated based on one slice of the finished loaf. You and I both know it’s hard to stop at just one slice of that **Warm Italian Loaf**, but we have to start somewhere!
- Serving Size: 1 slice
- Calories: 150
- Sugar: 0.5g
- Sodium: 250mg
- Fat: 1g
- Saturated Fat: 0.2g
- Unsaturated Fat: 0.8g
- Trans Fat: 0g
- Carbohydrates: 31g
- Fiber: 1.5g
- Protein: 5g
- Cholesterol: 0mg
See? Bread made with simple ingredients is rarely full of junk. It’s mostly complex carbs and a nice boost of vegetarian protein. It proves that eating food made with love and basic ingredients counts as a win in my book!
Share Your Aromatic Fresh Baked Bread Experience
Now seriously, I want to hear all about it once you pull this **crusty Italian bread** out of your oven! Did you get that perfect crackle on the crust? Did your kitchen smell amazing while it was baking? Home baking is all about sharing that joy, and I really want to know how your loaves turned out.
Please leave a rating below—one to five stars—so other busy cooks know what to expect. And if you have a quick story about how you served it—maybe you used it for the best sandwiches ever, or you mastered the dipping technique—drop a comment!
I always encourage you to share pictures of your creations with me on social media! Seeing your **golden brown Italian loaf** makes my day and helps build our little Symphony family right here. If you have any follow-up questions that this post didn’t cover, feel free to reach out directly on the contact page anytime. Happy baking!
PrintEasy Crusty Italian Bread Recipe (Bakery Style)
Bake bakery-quality Italian bread at home with this simple recipe. You get a golden, crunchy crust and a soft, chewy interior using basic ingredients.
- Prep Time: 15 min
- Cook Time: 30 min
- Total Time: 2 hours 15 min
- Yield: 1 loaf 1x
- Category: Baking
- Method: Baking
- Cuisine: Italian
- Diet: Vegetarian
Ingredients
- 3 1/2 cups all-purpose flour
- 1 1/2 teaspoons salt
- 1 teaspoon granulated sugar
- 2 1/4 teaspoons active dry yeast (1 packet)
- 1 1/4 cups warm water (about 105-115°F)
- 1 tablespoon olive oil (for the bowl)
Instructions
- In a large bowl, whisk together the flour, salt, and sugar.
- In a separate small bowl, dissolve the yeast in the warm water. Let it sit for 5 minutes until foamy.
- Pour the yeast mixture into the dry ingredients. Mix with a wooden spoon until a shaggy dough forms.
- Turn the dough out onto a lightly floured surface. Knead for 5 to 7 minutes until the dough is smooth and elastic.
- Lightly oil a large bowl. Place the dough in the bowl and turn it over to coat. Cover the bowl with plastic wrap or a clean towel.
- Let the dough rise in a warm place for 1 to 1.5 hours, or until doubled in size.
- Gently punch down the dough. Shape it into a long loaf.
- Place the loaf on a baking sheet lined with parchment paper or in a prepared loaf pan. Cover loosely and let it rise again for 30 to 45 minutes, or until puffy.
- Preheat your oven to 400°F (200°C). Place a shallow pan on the bottom rack to create steam.
- Before baking, lightly brush the top of the loaf with water. Score the top with a sharp knife if desired.
- Place the loaf in the oven. Pour about 1/2 cup of hot water into the shallow pan on the bottom rack to create steam, then quickly close the oven door.
- Bake for 25 to 30 minutes, or until the crust is deep golden brown and the internal temperature reaches 200°F.
- Remove the bread from the oven and cool completely on a wire rack before slicing.
Notes
- For an extra crispy crust, spray the oven walls with water a few times during the first 10 minutes of baking.
- This bread is excellent served warm with butter or used for dipping in olive oil and herbs.
- You can use this dough to make smaller rolls instead of one large loaf.
Nutrition
- Serving Size: 1 slice
- Calories: 150
- Sugar: 0.5
- Sodium: 250
- Fat: 1
- Saturated Fat: 0.2
- Unsaturated Fat: 0.8
- Trans Fat: 0
- Carbohydrates: 31
- Fiber: 1.5
- Protein: 5
- Cholesterol: 0