
Do you ever get that intense craving for a classic chocolate eclair—that perfectly smooth filling, the rich chocolate, that crisp little pastry shell—but the thought of actually making choux pastry sends you straight to the couch? Trust me, I get it. That’s where my No-Bake Chocolate Eclair Cake swoops in to save the day! It delivers that familiar, dreamy flavor without ever needing the oven. This recipe perfectly captures the heart of Delish Symphony: taking something everyone loves and making it simple and accessible, just like Michael Carter believes. We focus on efficiency and flavor harmony, which means you get a huge, impressive dessert using pantry staples, ready for your next busy evening or big gathering. You can learn more about the philosophy behind these quick and easy dishes over on our About Us page.
- Why This No-Bake Chocolate Eclair Cake is a Crowd Favorite Dessert
- Gathering the Ingredients for Your Eclair Cake
- Step-by-Step Instructions for the Eclair Cake
- Tips for Success When Making Your Eclair Cake
- Ingredient Notes and Substitutions for This Easy Cream Dessert
- Serving Suggestions for Your No Oven Dessert
- Storage and Reheating Instructions for the Eclair Cake
- Frequently Asked Questions About the Eclair Cake
- Share Your Experience with This Simple Sweet Treat
Why This No-Bake Chocolate Eclair Cake is a Crowd Favorite Dessert
Honestly, this is the first dessert I reach for when company shows up unexpectedly. It looks fancy because it’s layered and topped with that glossy chocolate, but it’s secretly one of the easiest things you’ll ever put together. It’s what I call a true crowd favorite dessert because everyone loves that nostalgic taste!
- It’s a genuine no bake dessert—which means zero heat near my kitchen, especially in the summer.
- It utilizes shelf-stable ingredients, saving me a frantic mid-week grocery run.
- It tastes unbelievably close to the real thing, just softer and creamier!
I’ve taken this to so many potlucks using my tried-and-true methods, and it never fails. If you are looking for amazing, tested recipes like this one, you can browse through my whole collection of other delicious dessert recipes to find your next go-to.
Quick Dessert Recipe Assembly Time
Seriously, you only need about 15 minutes to assemble the whole thing! I mean, that’s faster than most microwave meals, and this is way more satisfying. It flies together so quickly; you just alternate layers of cream and graham crackers. It’s the perfect quick dessert recipe when you’re staring down a deadline or hosting last minute.
Achieving the Classic Eclair Flavor in Your Eclair Cake
The pastry shell is the hardest part of a real eclair, right? Well, we skip that entirely! The magic here is in the layers. The instant vanilla pudding mixed with whipped topping perfectly mimics that rich custard center. When that softens against the graham crackers—oh my gosh—it nails that classic eclair flavor. Then, the sweet chocolate on top seals the deal. It’s comfort food perfection!
Gathering the Ingredients for Your Eclair Cake
Okay, before we start layering this showstopper of an eclair cake, we need to make sure the troops are assembled! Since this is a no-bake recipe, pantry staples are your best friends here. The key is organization—we’re making two separate creamy fillings, so keep those bowls ready. Trust me, having everything measured out makes that 15-minute assembly time totally achievable.
Components for the Creamy Vanilla Pudding Recipe Layer
For the base layer that gives us that classic custard vibe, you’ll need one 3.4-ounce package of instant vanilla pudding mix. We mix that with 2 cups of cold milk until it gets nice and thick—that’s the secret to a good vanilla pudding recipe that holds its shape! Once it thickens up, we gently fold in one whole 8-ounce container of thawed whipped topping. Don’t stir too hard here; we want to keep all that air in!
Ingredients for the Chocolate Pudding Cake Layer
Next up is our luscious chocolate second layer. This part is just as easy but uses different components so we get that dual flavor! Grab another container—a full 8-ounce one—of thawed whipped topping. For the chocolate pudding cake element, you need one 5.1-ounce package of instant chocolate pudding mix combined with 2 cups of fresh, cold milk. Whisk that until it sets, and then fold in that extra container of whipped topping gently.
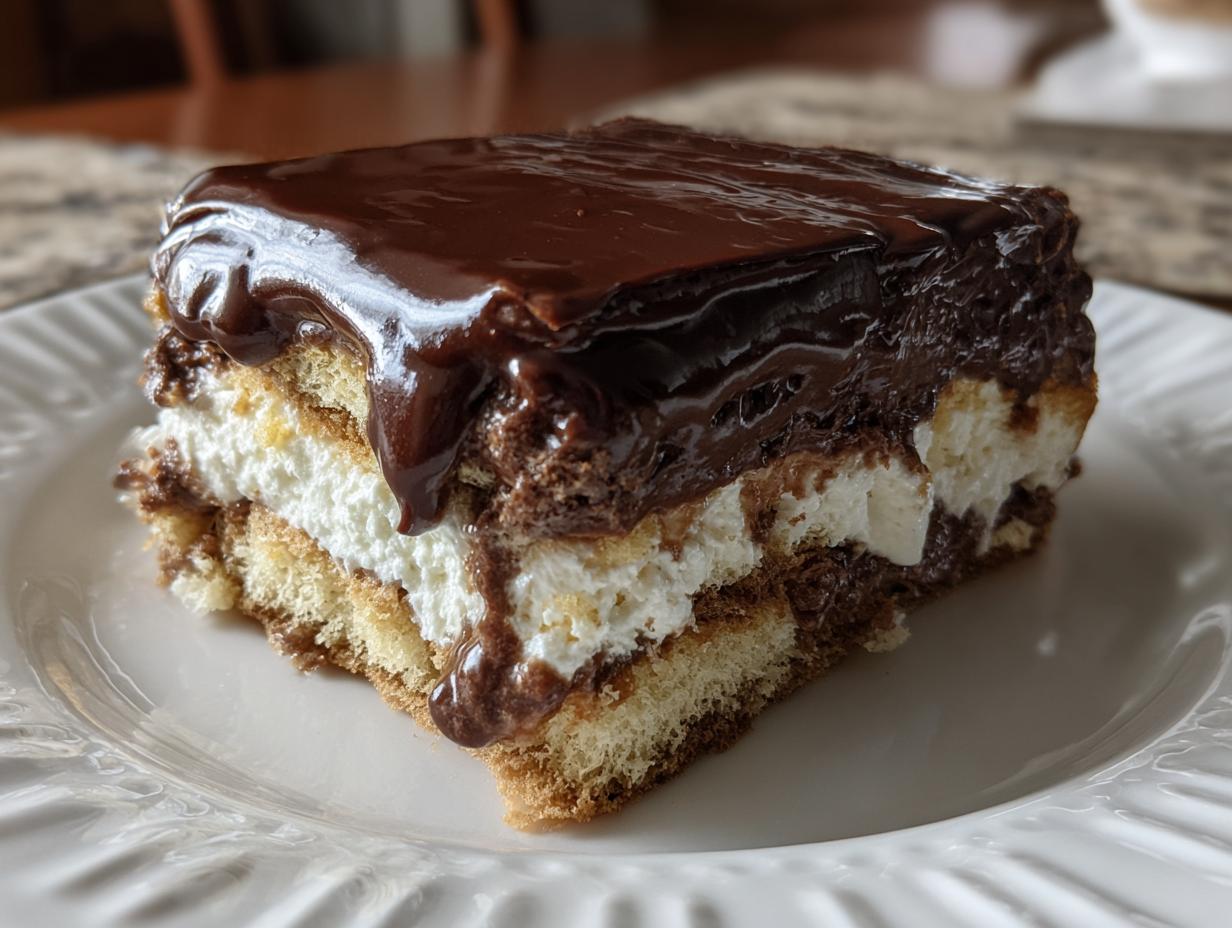
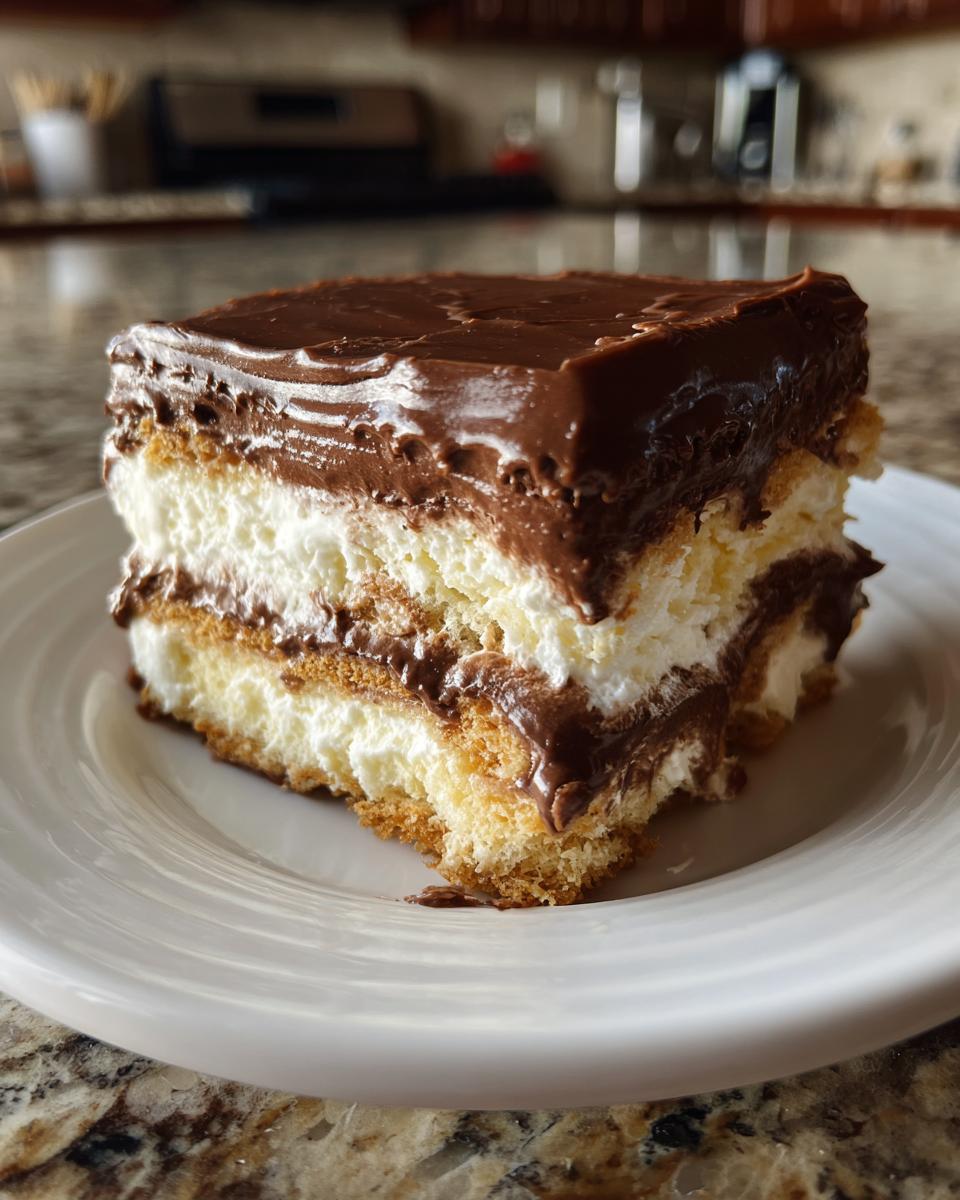
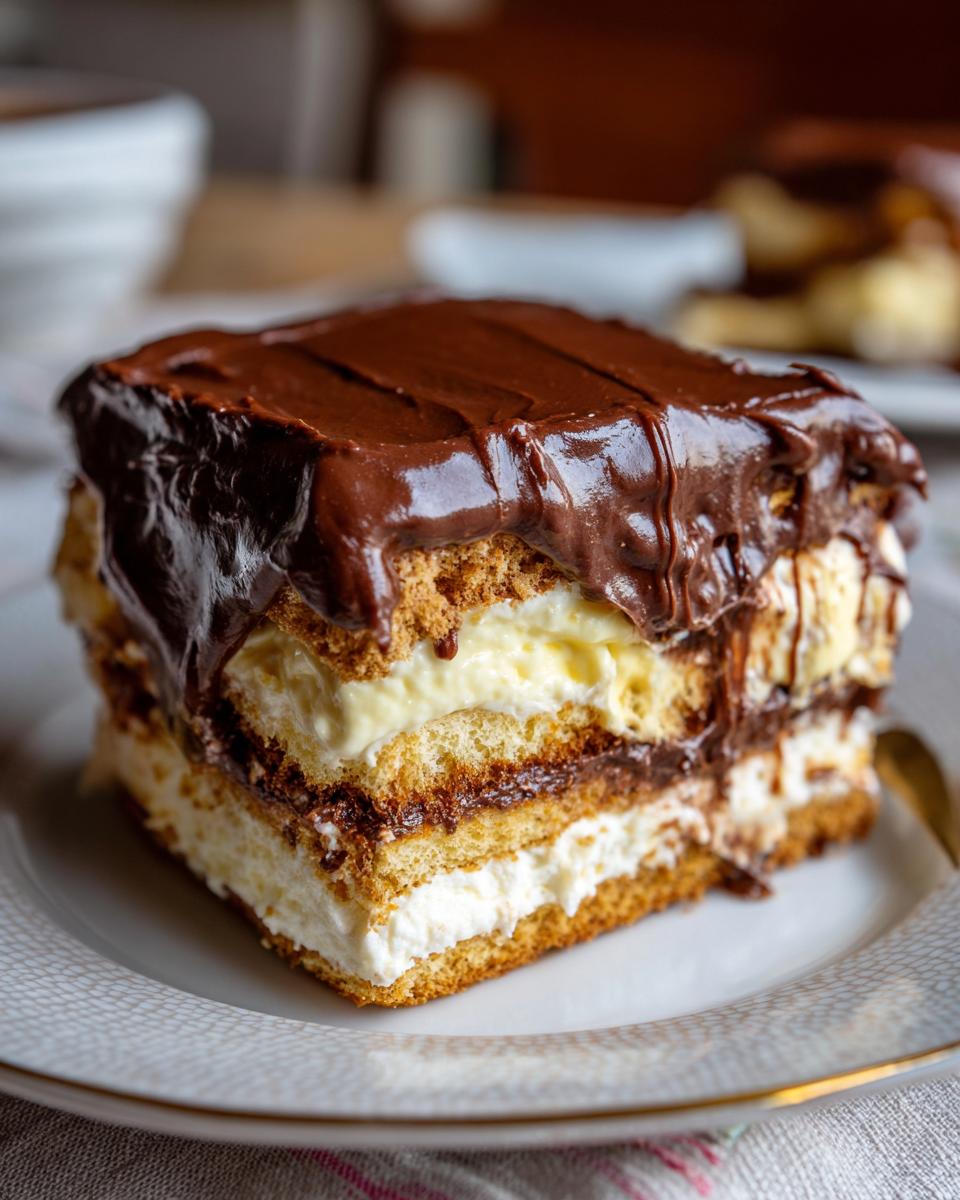
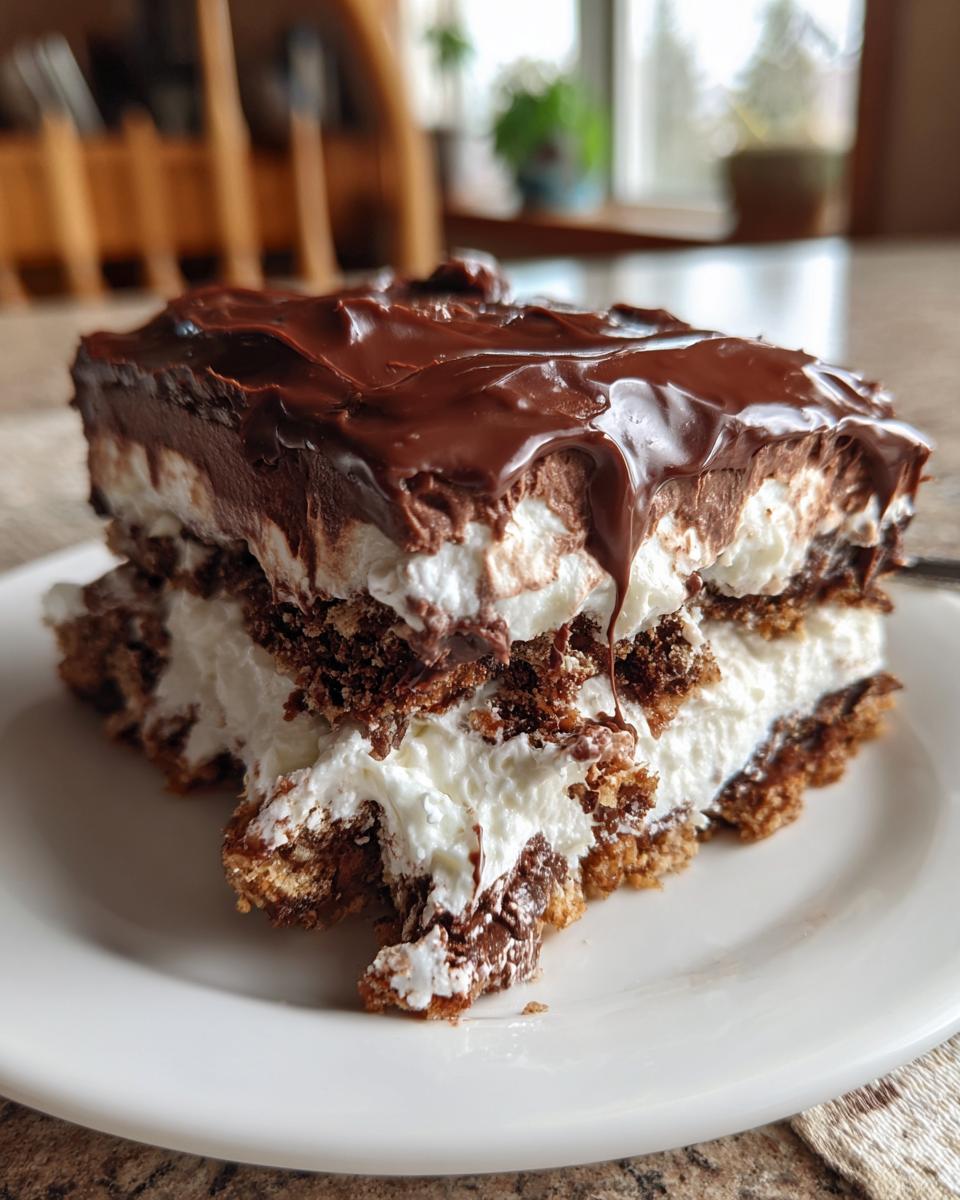
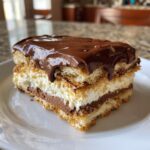
Graham Cracker Structure and Chocolate Ganache Topping
The structure relies on simple graham crackers—you’ll need about 30 full sheets from a standard 11-ounce box. They are what softens into that cake-like texture! Finally, we top the whole glorious thing with one 12-ounce jar of store-bought chocolate frosting. If you want something richer, you can warm that frosting up slightly, turning it more into a thin ganache for pouring, but the jarred stuff works perfectly for this graham cracker dessert!

Step-by-Step Instructions for the Eclair Cake
Alright, let’s get this beautiful, no-fuss dessert assembled! This is where the magic happens, but remember, we treat those whipped toppings gently. You don’t want to deflate all that lovely air we just introduced. This process is really quick, probably taking just about 15 minutes, which is why this recipe is one of my favorites for a make ahead dessert when company is coming. Efficiency meets flavor, just how we like it around here!
Creating the First Creamy Layered Dessert Base
First things first, grab that bowl with your vanilla pudding and milk mixture. You’ve whisked it until it’s thick—great job! Now take one of those containers of thawed whipped topping. Here’s my little secret for the best texture: take a rubber spatula and gently—and I mean gently—fold it in. Don’t beat it like you’re mixing cake batter! We are incorporating air, not whipping more air in. Once it’s mostly combined, spread exactly half of this vanilla cream across the bottom of your 9×13 dish. Make sure it’s an even layer; this sets the stage for everything else!
Layering the Graham Crackers and Chocolate Pudding Cake
Now for the structure! Lay down a complete layer of graham crackers right over that vanilla cream. Don’t worry if the dish isn’t perfectly covered; just snap a few pieces here and there to fill the gaps. Next, move over to your chocolate cream mixture—remember, you just folded in the second container of whipped topping. Spread half of this chocolate cream right over those crackers. Then, you’ll repeat the cracker layer, followed by the remainder of the chocolate cream mix.
Finishing the Eclair Cake Assembly and Chilling
We’re almost there! Place your third layer of graham crackers on top of that last chocolate layer. Then, spread the remaining vanilla mix over those crackers, followed by the final layer of crackers. Finally, smooth out that whole jar of store-bought chocolate frosting right across the top. This is the part that really seals in the moisture and creates that signature look. Now, listen closely: cover it tight with plastic wrap and stick it in the fridge for a minimum of six hours, but honestly, if you can wait overnight, do it! That long chill time is what turns those crackers into tender, cake-like layers—it’s the whole point of an icebox cake style dessert like this one. You won’t regret the patience!
Tips for Success When Making Your Eclair Cake
I want you to have the absolute best final product when you pull this out of the fridge! This isn’t one of those desserts you can rush through; the chilling time is mandatory if you want that perfect texture. People always ask me if they can slice it after just three hours, and look, you *can*, but it’s going to be sloppy. We are transforming graham crackers here; that takes time!
The Importance of Overnight Chilling for the Eclair Cake
For this eclair cake to truly live up to its name, it needs that long soak. The moisture from the pudding and whipped topping has to slowly seep into every nook and cranny of those graham crackers. If you chill it overnight—that’s minimum eight hours, ideally—the crackers disappear entirely. What you’re left with is tender, cake-like layers that slice beautifully. Don’t skip this step; it’s non-negotiable for the right texture!
Techniques for Spreading the Frosting
The final layer—that glossy chocolate topping—can sometimes be stubborn if it comes straight out of the fridge and has been sitting there for hours. If you find your frosting is too stiff to spread without tearing up the top layer, try this! Take a small spoonful of the frosting out onto a separate little plate and microwave it for about 10 to 15 seconds. It doesn’t need to be runny, just slightly softened. This makes it glide over the top layer like silk, giving you that smooth, professional look without messing up the cream underneath.
Ingredient Notes and Substitutions for This Easy Cream Dessert
I know sometimes you get into a recipe and realize you’re missing that one specific instant pudding mix. Don’t panic! This easy cream dessert is super flexible because it relies on rich dairy carriers anyway. If you’re out of the instant pudding mix, you absolutely can use pre-made, ready-to-eat vanilla or chocolate pudding cups/tubs instead. Just skip the milk measurement for that portion. You’ll need about 5.1 or 5.4 ounces of the ready-made pudding to equal one box of instant mix plus the milk.
The trick is needing that thickness, so if you use pre-made pudding, you must still fold it into the thawed whipped topping by itself. If you use the instant mix, just remember those two cups of cold milk are crucial for making sure the pudding gels up properly. You can see a guide on a fantastic version of this dessert over at Chloe’s Kitchen, where she runs through her no-bake chocolate eclair cake recipe too, just to give you another set of eyes on the process!
Serving Suggestions for Your No Oven Dessert
Since this eclair cake is already so rich and creamy—it’s basically dairy heaven on a graham cracker layer—we don’t need a ton of fuss when serving it. It’s perfect as is for almost any setting! For summer potlucks, it stands up wonderfully on its own; it’s a heavy hitter among all the lighter fruit salads. If you’re serving it after a big meal, a simple accompaniment is key. Maybe just some fresh raspberries or strawberries scattered around the serving platter? That small bit of tart fruit cuts through the richness beautifully! This is truly the easiest no oven dessert you can bring to a party, and it always disappears first. If you’re looking for more easy ideas perfect for dessert for holidays that don’t require oven space, I have a whole list ready for you!
Storage and Reheating Instructions for the Eclair Cake
Because the eclair cake is purely a chilled item—there’s zero baking involved—storage is super important to keep those layers perfect. You absolutely must keep this refrigerated from the moment that frosting goes on until you slice into it. If you leave it out on the counter for too long, that whipped topping is going to start weeping, and nobody wants a watery cake!
Once you’ve let it chill for the mandatory 6 to 8 hours (or overnight, which is better!), cover the entire dish tightly. I mean tight! Use plastic wrap, making sure it doesn’t touch the frosting too much, though a slight resting impression is unavoidable. A layer of aluminum foil pressed lightly over the top of the plastic wrap helps create an extra good seal.
In the fridge, this keeps beautifully for three, maybe four days tops. I’ve found that Day 2 is the absolute pinnacle of texture—that’s when the graham crackers are fully softened into that melt-in-your-mouth layer. By Day 4, things can start to get a little too soft, especially if you live in a humid climate.
As for reheating? Nope! This is a strictly cold dessert. If you try to warm this up, you’ll just end up with sweet, soupy milk, pudding, and melted cream! Just slice it directly from the cold environment of your refrigerator. It’s designed to be an easy grab-and-go option, which is why it’s such a winner for leftovers.
Frequently Asked Questions About the Eclair Cake
I always get a ton of questions about this recipe because people can’t believe how easy it is! It gets high scores for being a fantastic make ahead dessert, but folks always wonder about those textures since there’s no baking involved. Let’s tackle the most common things I hear about making this creamy layered dessert.
Can I substitute the whipped topping in this eclair cake?
Yes, you definitely can switch things up, but you have to respect the structure! The whipped topping (like Cool Whip) is super important because it keeps the pudding light and airy, making it the perfect whipped topping dessert base. If you want to use real heavy cream that you whip yourself, go for it! Make sure you whip it to stiff peaks first, though. If you skip the whipped topping entirely, your pudding layers will collapse into a dense layer of pudding, and that’s not nearly as dreamy!
How long does this make ahead dessert last in the fridge?
This is such a great benefit of the eclair cake! Because it needs that long chill time to soften the graham crackers, it actually tastes better on Day 2. I feel like it’s at its absolute prime between 12 and 24 hours after assembly. You can safely keep this make ahead dessert covered tightly in the fridge for about 3 to 4 days. Just remember, the longer it sits, the softer those cracker layers get. Seriously, the texture is divine on Day 2, but it’s still perfectly good on Day 4!
If you want more ideas for meals you can prep ahead of time so you can chill out later, check out my tips for easy weeknight dinner recipes!
Share Your Experience with This Simple Sweet Treat
Now that you know all the secrets to assembling this perfect, no-fuss eclair cake, I truly hope you give it a try! It’s designed for busy people who still deserve a fantastic, decadent dessert without turning on the oven. Knowing that this recipe—which serves 12, by the way—can save someone stress on a busy holiday or potluck night is exactly why I love sharing these kitchen harmonies.
I’m dying to hear how it turns out for you! Did the graham crackers soften perfectly? Did your family notice how much it tastes like the real thing? Drop a comment down below, rate this simple sweet treat out of five stars, and let me know what gatherings you served it at. If you make it, tag me on social media so I can see your amazing results! We build this community together, one delicious, practical dish at a time.
If you’re looking for other super easy recipes, check out my collection of simple snack recipes that also cut down on cooking time!
PrintNo-Bake Chocolate Eclair Cake
Assemble this easy, creamy dessert using graham crackers, vanilla pudding, and chocolate frosting. It requires no oven time and tastes like classic eclairs.
- Prep Time: 20 min
- Cook Time: 0 min
- Total Time: 6 hr 20 min
- Yield: 12 servings 1x
- Category: Dessert
- Method: No Bake
- Cuisine: American
- Diet: Vegetarian
Ingredients
- 1 (3.4 ounce) package instant vanilla pudding mix
- 2 cups cold milk
- 1 (8 ounce) container frozen whipped topping, thawed
- 1 (14 ounce) can sweetened condensed milk
- 1 (5.1 ounce) package instant chocolate pudding mix
- 2 cups cold milk (for chocolate layer)
- 1 (8 ounce) container frozen whipped topping, thawed (for chocolate layer)
- 1 (12 ounce) package chocolate frosting
- 1 (11 ounce) box graham crackers (about 30 full sheets)
Instructions
- Prepare the vanilla cream layer: In a medium bowl, whisk together the instant vanilla pudding mix and 2 cups of cold milk until thickened, about 2 minutes. Gently fold in one container of thawed whipped topping.
- Spread half of the vanilla cream mixture evenly over the bottom of a 9×13 inch baking dish.
- Arrange a single layer of graham crackers over the vanilla cream. Break crackers as needed to cover the surface.
- Prepare the chocolate layer: In a separate large bowl, whisk together the instant chocolate pudding mix and 2 cups of cold milk until thickened. Gently fold in the second container of thawed whipped topping.
- Spread half of the chocolate cream mixture over the graham cracker layer.
- Place a second layer of graham crackers over the chocolate cream.
- Spread the remaining vanilla cream mixture over the second graham cracker layer.
- Place a third layer of graham crackers over the vanilla cream.
- Spread the remaining chocolate cream mixture over the third graham cracker layer.
- Top the entire cake with a final layer of graham crackers.
- Spread the chocolate frosting evenly over the top graham cracker layer.
- Cover the dish tightly with plastic wrap and refrigerate for at least 6 hours, or preferably overnight, to allow the graham crackers to soften.
- Slice and serve cold.
Notes
- For the best cake-like texture, chill the dessert for a minimum of 8 hours.
- You can use pre-made vanilla or chocolate pudding if you prefer not to use the instant mix.
- If you want a richer chocolate top, warm the frosting slightly before spreading it on.
Nutrition
- Serving Size: 1 slice
- Calories: 380
- Sugar: 45
- Sodium: 350
- Fat: 18
- Saturated Fat: 10
- Unsaturated Fat: 8
- Trans Fat: 0.5
- Carbohydrates: 52
- Fiber: 1
- Protein: 5
- Cholesterol: 25