
The annual holiday feast can feel like a big production, right? The pressure to get that centerpiece just right—golden, glistening, and absolutely bursting with flavor—can make anyone sweat palms before the oven is even on. Well, take a deep breath. I’m Mike Carter, and trust me, I’ve spent countless hours in my own kitchen trying to perfect the roast. I’ve figured out the simple harmony needed to ensure your **turkey** comes out unbelievably moist with that perfectly achieved, crispy skin.
This Juicy Herb Butter Roasted Whole Turkey recipe is my go-to solution for creating that show-stopping holiday moment without the drama. We skip the complicated techniques and focus on layering beautiful, accessible flavors. If you follow my lead on the herb butter application, you won’t have to worry about dry meat ever again. If you want to learn more about how we approach cooking here at Delish Symphony, check out our page on Our Story. Ready to compose your masterpiece?
- Why This Juicy Herb Butter Roasted Whole Turkey Recipe Works (Expert Tips)
- Gathering Ingredients for Your Holiday Turkey Centerpiece
- Step-by-Step: How to Roast the Perfect Turkey
- Tips for Success with Your Herb Butter Turkey
- Variations: Glazed Turkey Breast and Other Thanksgiving Turkey Ideas
- Serving Suggestions for Your Roasted Turkey
- Storage and Reheating Instructions for Leftover Turkey
- Frequently Asked Questions About Cooking Turkey
- Nutritional Estimate for Roasted Turkey
- Share Your Holiday Turkey Success
Why This Juicy Herb Butter Roasted Whole Turkey Recipe Works (Expert Tips)
The difference between a good holiday roast and *the* holiday roast comes down to a couple of practical techniques. We’re not doing anything crazy here, but we are paying attention to the details that trap moisture and crisp up the skin. These **juicy turkey techniques** are non-negotiable if you want that perfect centerpiece without the stress!
It’s all about surface moisture management and flavor infusion. If you haven’t tried patting your bird down like you’re drying a child after a bath, you are missing out on incredible texture. For more smart ways to make dinner easier during the busy week, check out my take on weeknight dinner recipes.
The Secret to Crispy Skin Turkey Preparation
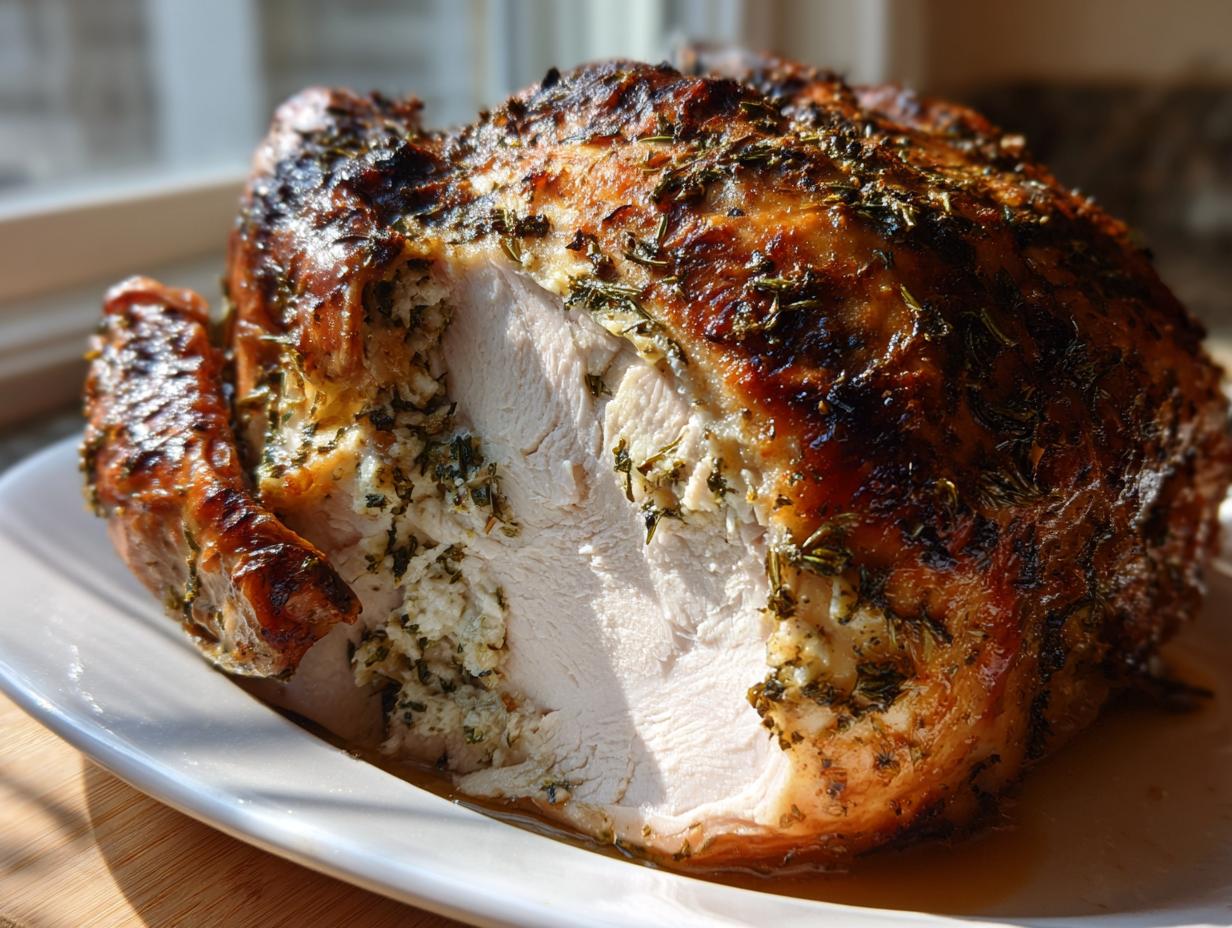
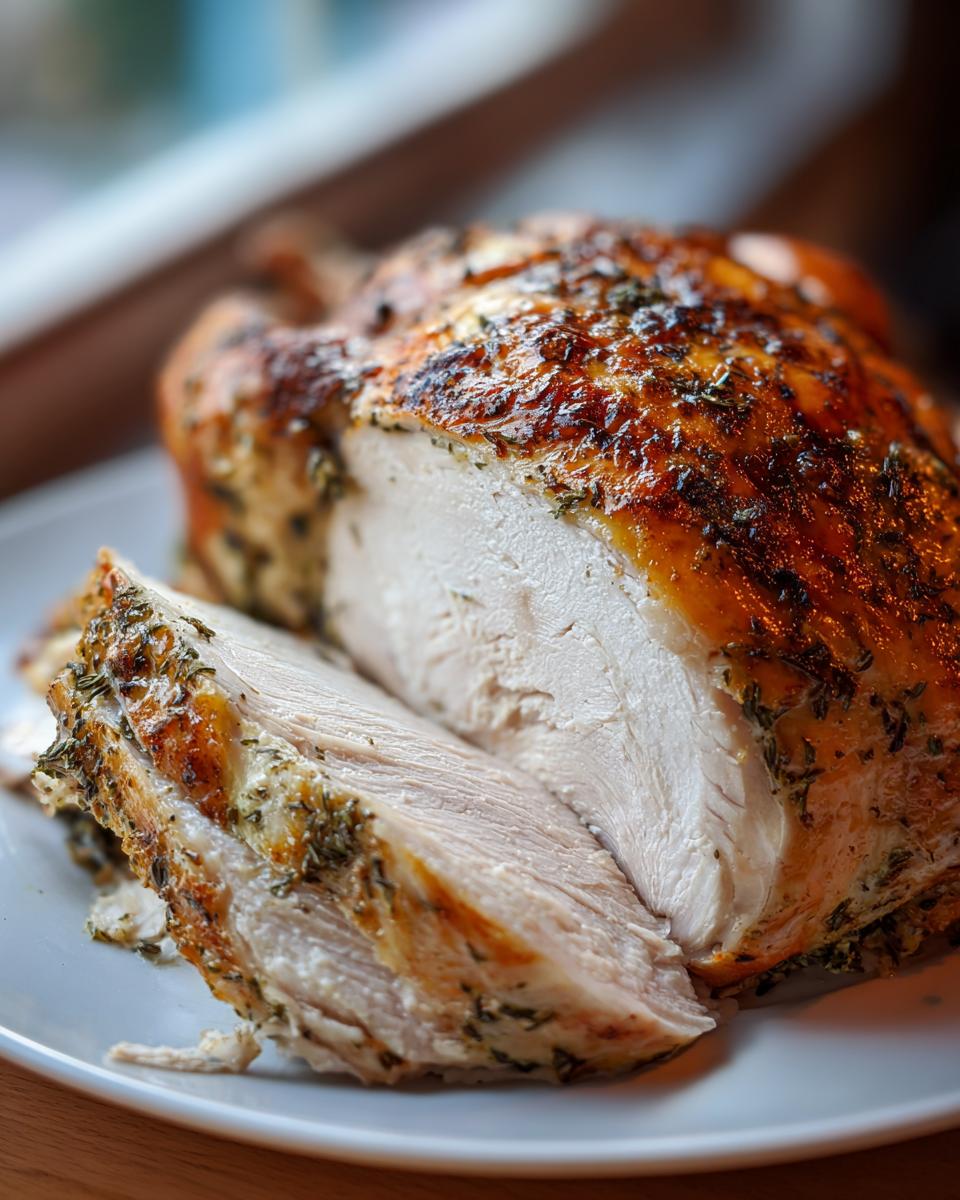
First thing’s first: You need your **turkey** completely thawed—no shortcuts there! Once it’s ready, grab a huge stack of paper towels. You need to pat EVERYTHING dry. I mean every inch of the skin until you feel like you’re polishing it. Why? Because moisture equals steam, and steam equals soggy skin. We want golden, crisp results here, not rubbery disappointment. A dry surface is the foundation for a **crispy skin turkey**.
Building Flavor Under the Skin: Herb Butter Turkey
This is where the magic ingredient comes in: the compound butter. Sure, you can brush the outside layer, but that only seasons the very surface. For a truly flavorful **herb butter turkey**, you need to gently separate the skin from the breast meat with your fingers—be gentle so you don’t tear it! Then, you rub that glorious butter mixture (packed with sage, rosemary, and thyme) directly onto the meat. This bastes the meat from the inside out as it cooks. If you want to read about other holiday approaches, this great guide on juicy turkey tips always has good pointers!
Gathering Ingredients for Your Holiday Turkey Centerpiece
Okay, now that we know *how* we’re building flavor, let’s make sure you have everything ready to go. I always lay out my ingredients before I start prepping the bird. It saves frantic searching later when everything needs to move fast! We’re keeping this simple by sticking to high-impact flavors. Remember, a great **turkey** doesn’t need fifty different things in the spice cabinet.
If you’re looking for some breakfast ideas to have ready the night before so you can focus on the roast, take a peek at my easy breakfast recipes!
Herb Butter Components for the Turkey
This is the core of our flavoring system, so pay attention to the details here. Fresh herbs make an enormous difference; dried herbs just don’t create that beautiful aroma when they melt into the warm butter.
- 1 cup unsalted butter, softened (make sure it’s actually soft, not oily!)
- 4 cloves garlic, minced
- 2 tablespoons fresh rosemary, chopped
- 1 tablespoon fresh thyme leaves
- 1 tablespoon fresh sage, chopped
- 1 tablespoon kosher salt
- 1 teaspoon black pepper
Aromatics and Liquid for Roasting the Turkey
These elements aren’t meant to be eaten directly, but they hang out inside and underneath the bird to create a moist, aromatic environment. They steam the bird slightly while the butter crisps the skin. Don’t chop these too fine!
- 1 large onion, quartered
- 2 carrots, roughly chopped
- 2 celery stalks, roughly chopped
- 1 cup chicken or turkey broth
Step-by-Step: How to Roast the Perfect Turkey
This is it—the moment we bring all those preparation tricks together into our **Whole Roasted Turkey Recipe**! Trust me, once you see this bird come out golden brown, you’ll wonder why you ever stressed about cooking a large **turkey** before. The key here is efficiency; be methodical, and you’ll nail the timing.
It might look like a lot of steps, but each one is crucial for ensuring your centerpiece is a winner. If you follow these steps closely, you’ll have achieved maximum flavor and moisture enhancement. For more techniques that simplify busy cooking days, feel free to browse my collection of weeknight dinner recipes.
Preparing the Turkey and Herb Butter Application
Step one is getting that bird ready. Take it out, pull out the neck and giblets from the cavity—you won’t want those in the roast. Then, use those paper towels to pat the skin bone-dry. Seriously, dry it until it squeaks! While you do this, make sure your herb butter is perfectly softened. Gently shimmy your fingers between the skin and the breast meat to create pockets, and rub half that amazing butter mix right onto the muscle. Then, spread the rest all over the outside skin. That’s how you guarantee a flavorful **turkey** from the inside out.
Roasting Times and Temperature for a Moist Turkey Cooking Tips
Next, stuff the cavity with those aromatic veggies—the onion, carrots, and celery. Don’t pack it tight, though; we need airflow! Get your oven preheated to 325 degrees Fahrenheit. Place the bird on the rack and pour that cup of broth into the bottom of the pan. Now, we roast! Plan for about 3 to 3.5 hours, but remember this golden rule: you’re looking for that meat thermometer in the thigh to hit 165 degrees Fahrenheit. Baste every 45 minutes with the pan drippings. If the skin starts looking too dark too early, just loosely tent a piece of foil over the top. We are aiming for perfection here!
The Essential Resting Period for Your Turkey
This is arguably the most important step for **moist turkey cooking tips**, so don’t cheat it! When your **turkey** hits 165°F, pull it out immediately. Cover it loosely with foil—don’t wrap it tight, or you’ll steam that beautiful crispy skin you worked so hard for—and let it sit for a minimum of 30 minutes. I usually push for 40 minutes if I can. This rest allows all those juices, which were bubbling frantically, to redistribute back into the meat instead of pouring out onto your cutting board. That resting time is the non-negotiable secret for juicy meat!

Tips for Success with Your Herb Butter Turkey
I know that once the bird is out of the oven, you’ll want to carve it right away, but hang tight! My Grandma always said patience in the last ten minutes of cooking is what separates the stressed cooks from the celebration hosts. Since this specific recipe is designed to be the **best roast turkey** you’ve ever made, here are a few final nuggets of wisdom taken right from our notes section to help you secure that top-tier result.
The goal here is ultimate flavor and texture harmony in your **turkey**. These little tweaks are what push this from a standard roast to a culinary centerpiece.
If you end up with beautiful pan drippings after the turkey has rested—and trust me, you will—don’t let them go to waste! A quick, easy gravy made right in that pan is the perfect accompaniment. For a fantastic dipping sauce that complements rich turkey meat, you might love my recipe for garlic aioli, though gravy reigns supreme for the holiday bird.
Achieving Ultimate Crispy Skin Overnight
This is my favorite trick, and it’s brilliant if you have the space in your fridge. After you complete Step 3—rubbing that glorious herb butter all over your **turkey**—don’t put it in the oven yet! Instead, place the prepared bird (uncovered) right into the refrigerator overnight, or at least for several hours. Leaving the skin exposed to the cold, dry air helps draw out any remaining surface moisture. When it finally goes into the hot oven the next day, that already dry skin has absolutely no chance but to turn golden and shatteringly crisp. It’s a game-changer for that **crispy skin turkey** finish!
Using Flavorful Pan Drippings
When you remove that beautifully roasted bird to rest, don’t clean that roasting pan yet! Those liquids sitting underneath are concentrated flavor bombs. We tossed carrots and onions in there for aromatic steam, and they mixed with turkey juices and melted herb butter. This is the perfect base for your gravy. Just pour off most of the fat, scrape up those brown bits (that’s called fond, by the way!), and you’ve got the foundation for the richest gravy you can imagine to pour over your wonderful slices of **turkey**.
A Note on Finishing Touches and Glazing
While this recipe focuses on the pure herb butter flavor for maximum juiciness, sometimes you want that holiday shine. If you decide during dinner prep that you want a sweeter finish, this is the time to introduce a glaze. If you apply a sweet glaze too early, the sugar will burn off before the turkey is done cooking. Keep that glaze on hand and just brush it on evenly during the last 30 minutes of roasting time. It gives you that beautiful, sticky, **cranberry glazed turkey** look without compromising the fantastic base flavor we built earlier!
Variations: Glazed Turkey Breast and Other Thanksgiving Turkey Ideas
Now, I know this Herb Butter **Turkey** is my favorite way to go, especially when I want that beautifully intense savory flavor, but I completely understand wanting to mix things up if you’ve made this recipe a few times! We all love a little variety on the holiday table, right? It keeps things fresh, even when we rely on classic techniques.
Don’t feel chained to the original plan! We can easily pivot this recipe to cater to different tastes or different sizes of gatherings. Some of the searches I see focus heavily on **Thanksgiving turkey ideas** that offer a little more sweetness or perhaps a smaller bird size.
Adding a Sweet and Tangy Glaze
If you’re dreaming of that gorgeous, shiny, mahogany finish, introducing a glaze near the end of the bake is the answer. Remember what I said about timing? Applying any sugary glaze too soon means it cooks down, caramelizes too much, and might even burn before your **turkey** reaches that perfect 165°F.
The trick here is waiting until the final 30 minutes. At that point, the meat is essentially done, and the skin is nicely browned. Brush on your glaze evenly—maybe something citrusy and tart to cut through the richness of the herb butter we already applied. This is where a fantastic cranberry orange glaze starts to shine! It sets up beautifully in that last half hour, giving you that stunning, sticky exterior without drying out the meat we worked so hard to keep moist.

Adapting This Technique for Turkey Breast
What if you’re feeding a smaller crowd this year and don’t need a massive whole bird? Great news! This exact herb butter concept works wonderfully for a larger **turkey breast** roast. The cooking time will obviously be much shorter—measurements are key here—but the principle remains the same: pat dry, herb butter under and over.
When cooking just the breast, you have even more flexibility because the surface area is smaller, meaning the skin crisps up faster. You can use this method for just the breast or even smaller individual pieces!
Beyond the Roast: Thinking About Other Turkey Meals
While this recipe is focused on that stunning holiday centerpiece, I know many of you are always searching for easy ways to use up leftovers or cook simpler meals during the week. If you used ground meat instead of a whole bird, those recipes are fantastic for busy nights! We do have some great ideas for quick meals that utilize ground **turkey**, but for today, let’s focus on making *this* roast absolutely unforgettable.
If you want something completely different to serve alongside your main event, perhaps you’d like a festive, non-alcoholic pairing? My recipe for cranberry orange punch is a perfect, bright companion to a rich roast!
Serving Suggestions for Your Roasted Turkey
You’ve successfully navigated the roasting process, and now you have this incredible, moist centerpiece ready to grace your table. But what’s a masterpiece roast without the perfect supporting cast? When you have a rich, savory bird seasoned with herbs and garlic, you want sides that can stand up to that flavor without fighting it. We’re looking for balance here—something creamy, something bright, and something delicious to soak up those precious pan drippings!
For me, the harmony of the plate is just as important as the harmony in the pan. A perfect roast demands perfect partners, and I’ve got a couple of favorites that always make the absolute cut at our family table. If you need a side that is pure comfort and pairs perfectly with savory meat juices, you absolutely must try my recipe for garlic parmesan mashed potatoes.
Creamy Counterpoints
When you cut into that juicy meat, you need something soft and luxurious on the plate to catch all those flavorful juices. Forget dry stuffing sitting sadly on the side; we need something that actively embraces the moisture!
- Mashed Potatoes: Nothing beats creamy, decadent mashed potatoes. The garlic and parmesan in my recipe, which I mentioned above, give them just enough savory punch to complement the poultry without overwhelming it.
- Creamy Casseroles: Think creamy green bean casseroles or rich sweet potato gratins. Texture contrast is essential, and the softness of these sides makes the crispy skin on your roast even more satisfying.
Bright, Acidic Cleansers
Rich food needs a sharp counterpoint to keep your palate refreshed between bites. If everything is heavy, the meal becomes tiring quickly. We need some vibrancy!
- Cranberry Sauce: This is traditional for a reason! Whether you make a homemade version with orange zest or use a jarred one, that sweet tartness cuts right through the richness of the meat beautifully.
- Sautéed Greens with Lemon: A quick sauté of Brussels sprouts or kale finished with a generous squeeze of fresh lemon juice provides necessary acidity and color to keep the plate looking lively.
The Stuffing Conversation
We have to address stuffing, of course. If you choose to roast the aromatics inside the bird (like we did in the main recipe), that cavity filling isn’t technically safe or delicious stuffing. It’s just aromatics being overworked while the bird roasts! So, my recommendation is always to bake your stuffing separately.
Baking it in a separate casserole dish lets you control its richness and moisture level independently. You can load it up with sausage, apples, or extra herbs, and it comes out perfectly crisp on top while staying fluffy underneath.
Storage and Reheating Instructions for Leftover Turkey
Well, congratulations! If you followed along, you’ve got a mountain of delicious leftovers. That juicy **turkey** meat is fantastic the next day, but the absolute worst thing you can do is dry it out during reheating. We poured so much effort into keeping it moist on cooking day, we certainly don’t want to ruin it in the microwave, right?
My goal is to make sure your leftovers taste almost as good as the main event. This means respecting the meat and using just a little bit of moisture while handling it. For totally different leftovers that store well—like breakfast food—you should check out my homemade granola recipe!
Safe Storage Practices for Roasted Turkey
Food safety is part of that trust, so we have to cover this first. You need to get that cooked meat cooled down and refrigerated quickly. Don’t leave that magnificent bird sitting out at room temperature for more than two hours—that’s the danger zone, and nobody wants that interrupting the holiday vibe!
- Shred or Slice: Try to remove the breast meat from the bone within a day or two. Cutting it into smaller, manageable portions helps it cool faster and makes reheating much more even than trying to heat a huge slab.
- Airtight Containers: Store the meat in shallow, airtight containers. If you can’t get it into the fridge quickly, spreading it out on a baking sheet to cool slightly before boxing it up is a good intermediate step.
How to Reheat Slices Without Drying Them Out
This is the secret sauce for leftover **turkey**! We’re going back to the broth we used for roasting. We need liquid to bring the heat back gently.
- Low and Slow: Never blast leftover slices on high power. If using the oven, wrap the slices tightly in foil first.
- Add Protective Moisture: Add about a tablespoon of broth (or even just water mixed with a pinch of salt) to the bottom of the foil packet or right into your microwave-safe container before covering it. This creates a tiny steam bath for the meat.
- Gentle Heat: Reheat just until warmed through. For oven reheating, keep the temperature low, around 300°F, until the slices are warm, probably about 15-20 minutes depending on the quantity. For the microwave, use 50% power in short 30-second intervals.
Making Gravy from Leftover Drippings
If you followed my advice earlier, you should have some leftover gravy ready to go! Gravy is your best friend for leftovers. If you do need to make a new batch from the frozen drippings you saved, just reheat the drippings gently, whisk in some flour or cornstarch slurry, and thin it out with a little extra broth or even water. A fresh, hot gravy poured over warm, moist slices of **turkey** is unbeatable!
Frequently Asked Questions About Cooking Turkey
If you’re standing in the kitchen wondering about a few last-minute details before you commit to putting that big bird in the oven, I totally get it. Cooking a huge **turkey** can sometimes bring up more questions than answers! We addressed flavor infusion with our herb butter, but let’s cover a few other common queries I hear all the time from folks nervous about their holiday centerpiece. For more recipe inspiration, especially for using up those leftovers later, take a peek at my easy lasagna recipe!
Should I brine my turkey before roasting?
That is a fantastic question! Brining works, no doubt, but it adds a whole extra day of planning, fridge space, and cleanup. For this specific **turkey** recipe, I actually recommend skipping the brine. Why? Because our herb butter technique delivers so much intense flavor directly under the skin and into the meat that you don’t need the saltwater bath. The butter acts as a barrier, essentially tenderizing and sealing in moisture as it melts. If you are dedicated to the brine, that’s fine, but for sheer flavor harmony without the hassle, stick to the butter method!
How do I calculate the cooking time for a larger turkey?
People always ask me for an exact time, but I have to stress this: time is just a suggestion, and temperature is the law! You must use a reliable meat thermometer. That said, for a general guideline when roasting unstuffed at 325°F, you can budget about 13 minutes per pound. So, a 15-pound **turkey** might take around three hours and ten minutes. But again, double-check that thigh temperature. The instant it hits 165°F, pull it out. That’s the only real way to guarantee a safe and perfectly cooked bird.
Can I skip basting for this turkey recipe?
This is a fun one! In traditional recipes where the skin is just rubbed with oil or seasoning, basting every 45 minutes helps keep the exterior from drying out while adding a little moisture and color. However, because we are using that massive amount of softened herb butter *under* the skin, most of the meat stays protected and moist throughout the cook. So, can you skip it? Technically, yes, if you’re busy. But, I still recommend basting once or twice mid-cook just to spoon some of those pan drippings over the top skin layer. It helps achieve that beautiful, rich, deep golden color. You can read all about what makes the ‘best’ bird over at The Kitchn.

Nutritional Estimate for Roasted Turkey
Now, I want to be upfront: because this recipe is for a massive, holiday-sized bird, the nutritionals are based on a standard serving size, which is about 6 ounces of cooked meat. My goal here at Delish Symphony is always flavor harmony first, but I know folks like knowing what they are digging into! These aren’t lab-tested figures, of course—they are educated estimates based on the ingredients we used, especially factoring in the butter and the lean nature of the meat itself. Think of this as a general guide for planning your big meal.
We’re looking at a really solid protein centerpiece here. If you’re cutting back on rich sides, this herb butter **turkey** can fit beautifully into most diets, even if it uses a generous amount of fat for flavor infusion. You can balance out the richness easily!
If you want something sweet to balance out this savory feast that doesn’t add too much guilt, you should definitely check out my recipe for easy moist banana bread for next morning’s breakfast!
| Serving Size | 6 oz cooked meat |
| Calories | 350 |
| Fat | 18g |
| Saturated Fat | 7g |
| Protein | 45g |
| Carbohydrates | 1g |
| Sodium | 450mg |
As you can see, the majority of the calories come from that essential, mouth-coating fat we used to keep the meat juicy and the skin crisp. But look at that protein count! That’s why this **turkey** remains the king of the holiday table!
Share Your Holiday Turkey Success
And there you have it—the blueprint for a stunning, flavorful, and unbelievably moist **turkey** centerpiece! I truly hope this recipe brings a little more harmony and a lot less stress to your holiday table this year. Now that I’ve shared my secrets for infusing that herb butter and managing the heat, I really, really want to hear how it went for you!
Cooking is a conversation, and I love hearing about the small adjustments you make in your own kitchen. Did the skin get extra glassy? Did your family fight over the crispy bits? Don’t just leave me hanging! Your feedback helps me make sure every recipe here is absolutely foolproof for the next person who tries it.
Rate This Juicy Roasted Turkey Recipe
If this **Whole Roasted Turkey Recipe** delivered on its promise and you ended up with juicy meat and perfect skin, please take a moment to leave a star rating right below this section. Seriously, those five stars help other cooks find this guide when they’re searching for the best way to roast their bird. A high rating tells others that this method is reliable for creating a memorable holiday dish.
Tell Me About Your Experience in the Comments
We have a lovely community here, and the comments section is where the real magic happens. Did the 30-minute rest really make a difference for you? Do you have a secret wine you like to pour over the top while basting? Share your triumphs! And hey, if you ran into a snag or something wasn’t quite right, drop a comment there too. I read every single one, and I’m always happy to jump in and troubleshoot any issues you might have had with your **turkey**.
Show Us Your Holiday Centerpiece
While I can’t see your amazing plate right now, I’d absolutely love to see the finished work! If you snapped a photo of that golden-brown, glistening bird ready for carving, please consider sharing it. Tag us on social media so I can see your success! You can find the official channels listed on my contact page. Seeing your beautiful holiday tables makes all the recipe testing and writing worthwhile. Thank you for letting this recipe be a part of your symphony!
PrintJuicy Herb Butter Roasted Whole Turkey

Follow this simple method to create a perfectly moist and flavorful whole roasted turkey with crispy, golden skin, ideal for your holiday centerpiece.
- Prep Time: 30 min
- Cook Time: 3 hr 30 min
- Total Time: 4 hr 0 min
- Yield: 10 servings 1x
- Category: Holiday Main Dish
- Method: Roasting
- Cuisine: American
- Diet: Low Fat
Ingredients
- 1 whole turkey (12–14 lbs), thawed
- 1 cup unsalted butter, softened
- 4 cloves garlic, minced
- 2 tablespoons fresh rosemary, chopped
- 1 tablespoon fresh thyme leaves
- 1 tablespoon fresh sage, chopped
- 1 tablespoon kosher salt
- 1 teaspoon black pepper
- 1 large onion, quartered
- 2 carrots, roughly chopped
- 2 celery stalks, roughly chopped
- 1 cup chicken or turkey broth
Instructions
- Remove the turkey from its packaging. Remove the neck and giblets from the body cavity. Pat the entire turkey skin dry using paper towels. This step helps achieve crispy skin.
- In a small bowl, combine the softened butter, minced garlic, rosemary, thyme, sage, kosher salt, and black pepper. Mix until you have an even herb butter.
- Gently loosen the skin over the turkey breast and thighs using your fingers. Rub about half of the herb butter mixture directly onto the meat under the skin. Rub the remaining herb butter all over the outside of the turkey skin.
- Place the quartered onion, carrots, and celery inside the turkey cavity. Tie the legs together with kitchen twine if desired.
- Preheat your oven to 325 degrees Fahrenheit. Place the turkey on a roasting rack set inside a roasting pan. Pour the chicken broth into the bottom of the roasting pan.
- Roast the turkey for approximately 3 to 3.5 hours, or until a meat thermometer inserted into the thickest part of the thigh registers 165 degrees Fahrenheit. Baste the turkey with pan drippings every 45 minutes.
- If the skin begins to brown too quickly, loosely tent the turkey with aluminum foil.
- Once cooked, remove the turkey from the oven. Tent it loosely with foil and let it rest for at least 30 minutes before carving. This resting period is key for a juicy turkey.
Notes
- For extra crispy skin, you can place the turkey in the refrigerator uncovered overnight after applying the herb butter.
- If you prefer a glazed turkey finish, brush the turkey with a cranberry glaze during the last 30 minutes of cooking.
- Use the pan drippings to make a simple gravy to serve alongside the moist turkey meat.
Nutrition
- Serving Size: 6 oz cooked meat
- Calories: 350
- Sugar: 1
- Sodium: 450
- Fat: 18
- Saturated Fat: 7
- Unsaturated Fat: 11
- Trans Fat: 0
- Carbohydrates: 1
- Fiber: 0
- Protein: 45
- Cholesterol: 150