

There’s a certain kind of magic that happens when two incredible flavors get together, right? It’s like finding the perfect chord in music—it just *sings*. For me, as a home cook, that harmony is always peanut butter and chocolate. But why make things complicated when we can simplify the joy? That’s exactly what we’re doing today. Forget turning on the oven; this **buckeye graham crackers** recipe is my go-to shortcut for pure decadence. We’re taking the creamy, salty goodness of classic Buckeye candy and building it right onto a sweet, crunchy graham cracker base. It’s ridiculously easy, which means you get maximum flavor payoff for minimal effort. If you’re looking for a dessert that truly harmonizes ease and pure taste, you’ve found it here. Check out my collection of delicious dessert recipes later for more simple sweets!
- Why You Will Love This Buckeye Graham Cracker Recipe
- Gathering Ingredients for Your Buckeye Graham Crackers
- Step-by-Step Instructions for No Bake Peanut Butter Chocolate Graham Crackers
- Expert Tips for Perfect Buckeye Graham Squares
- Storage and Make-Ahead for Your Buckeye Graham Crackers
- Serving Suggestions for these Crunchy Chocolate Peanut Butter Bars
- Frequently Asked Questions About Buckeye Graham Cracker Recipe
- Estimated Nutritional Snapshot for Buckeye Graham Crackers
- Share Your Homemade Graham Cracker Peanut Butter Bars
Why You Will Love This Buckeye Graham Cracker Recipe
When I’m looking for something that hits all the right notes without needing a full afternoon, this recipe always comes through. It’s honest food that tastes like a treat without any fuss. You really can’t go wrong relying on this one for a quick fix or a big crowd.
- It’s genuinely no-bake! Absolutely zero oven time required, which makes it perfect for summer or when the kitchen is already too hot from dinner. This is one of my favorite Simple No Oven Desserts solutions.
- The texture is just divine—you get that creamy, rich peanut butter center sandwiched between two layers of satisfyingly crisp graham cracker crunch.
- Prep time is lightning fast. Seriously, you mix the filling and layer everything in about 20 minutes tops before it heads into the fridge.
- These handle travel like champs—they stay solid when chilled, making them incredible for potlucks or taking to a friend’s house.
- It captures that iconic, nostalgic flavor profile of classic Buckeye candy, but in bar form! Everyone knows and loves peanut butter and chocolate together.
- They are incredibly sliceable. You can cut them small for big parties or leave them chunkier for serious snacking.
Gathering Ingredients for Your Buckeye Graham Crackers
When you’re making something this simple, you might think the ingredients don’t matter much, but trust me, they do! For these **Graham Cracker Peanut Butter Bars** to sing their best song, we need good quality basics. Think about the peanut butter—we want that smooth texture so it spreads without tearing up our delicate graham cracker layers later. If the ingredients aren’t quite right, the whole harmony falls apart!
Because we aren’t baking, every component stands out clearly. Making sure your butter is properly softened, for example, is crucial for getting that dreamy, creamy filling that mimics the best **Buckeye Graham Cracker Recipe**.
Peanut Butter Filling Components
This is the heart of the treat and needs to come together perfectly smooth. Make sure your butter is soft—leave it out an hour or two before you start mixing!
- 2 cups of powdered sugar. Sift it if you have time, because nobody likes little lumps of sugar in their smooth filling!
- 1 full cup of creamy peanut butter. Please stick to creamy for this texture; crunchy throws off the balance we’re aiming for.
- 1/2 cup of unsalted butter. But remember, it needs to be softened to room temperature, not melted!
- 1 teaspoon of pure vanilla extract. Don’t skip this; it really wakes up the peanut flavor.
- A small pinch—just 1/4 teaspoon—of salt to cut through the sweetness.
Chocolate Coating and Base
This section handles the structure and the glorious chocolate finish. For this layered bar style of **Buckeye Graham Cracker Recipe**, we absolutely need the whole sheets, not the crumbs!
- One full package (about 14.4 ounces) of graham crackers. You need whole sheets to build those beautiful layers in the pan.
- 12 ounces of semi-sweet chocolate chips. I lean towards semi-sweet because the filling is so rich, but milk chocolate works if you’ve got a major sweet tooth.
- 2 tablespoons of shortening or coconut oil. This is non-negotiable for the dipping! It keeps the melted chocolate nice and fluid, so you avoid that chalky, thick coating.
Step-by-Step Instructions for No Bake Peanut Butter Chocolate Graham Crackers
Okay, now that we have all our components ready, we get to the fun part: assembly! Remember, we are building flavor harmony here—the creamy layers need to support the crunchy crackers perfectly. We need structure before we get to the chocolate waterfall! Don’t rush the chilling steps; that’s where the magic sets, making these **Chocolate Dipped Graham Cracker Treats** hold their shape.
Creating the Creamy Peanut Butter Layer
This is where your mixer earns its keep. You need this filling to be unbelievably smooth so you don’t end up fighting lumps when you try to spread it over the crackers. In your medium bowl, combine all your filling stuff: the powdered sugar, peanut butter, softened butter, vanilla, and salt. Start slow, seriously, or you’ll have a sugar cloud dusting your entire kitchen!
Once it’s combined a bit, turn the speed up and mix it until it’s truly creamy and light. You might need to stop once or twice to scrape down the sides with a spatula. We want absolutely no graininess here. Once it looks like the best peanut butter frosting you’ve ever seen—that’s when you know we are ready for the next layer.
Layering and Chilling the Graham Cracker Base
Grab your 8×8 inch pan. Line it completely with parchment paper, making sure you leave a good overhang on two opposite sides. That overhang is your handle later, so don’t skimp on it! After lining, arrange a single, snug layer of whole graham crackers across the bottom. You might have to snap a few pieces to make them fit tightly edge-to-edge. Think of it like tiling—no big gaps allowed for the filling!
Now, take half of that gorgeous peanut butter filling and gently spread it evenly over that first cracker layer. Go slow; you don’t want to slide the crackers around! Once that’s covered, place your second layer of whole graham crackers right on top. Spread the remaining filling evenly over this second layer.
Cover the whole pan—plastic wrap works great—and pop it into the refrigerator. We need this to firm up so we can cut it without everything squishing. Thirty minutes is the minimum, but if your kitchen is warm, give it 45 minutes. You’ll know it’s ready when the filling feels firm to the touch.
Melting Chocolate and Finishing the Buckeye Graham Crackers
While that’s chilling firming up, let’s handle the chocolate. In a microwave-safe bowl, mix the chocolate chips with the shortening or coconut oil. The shortening is our secret weapon here; it helps the chocolate stay smooth and shiny, giving you that perfect shell coating like the best Chocolate Dipped Graham Cracker Treats! Microwave it in short, 30-second bursts, stirring really well between each one. Stop when it’s *almost* melted, then just stir it until the residual heat melts the last little bits. This prevents scorching!
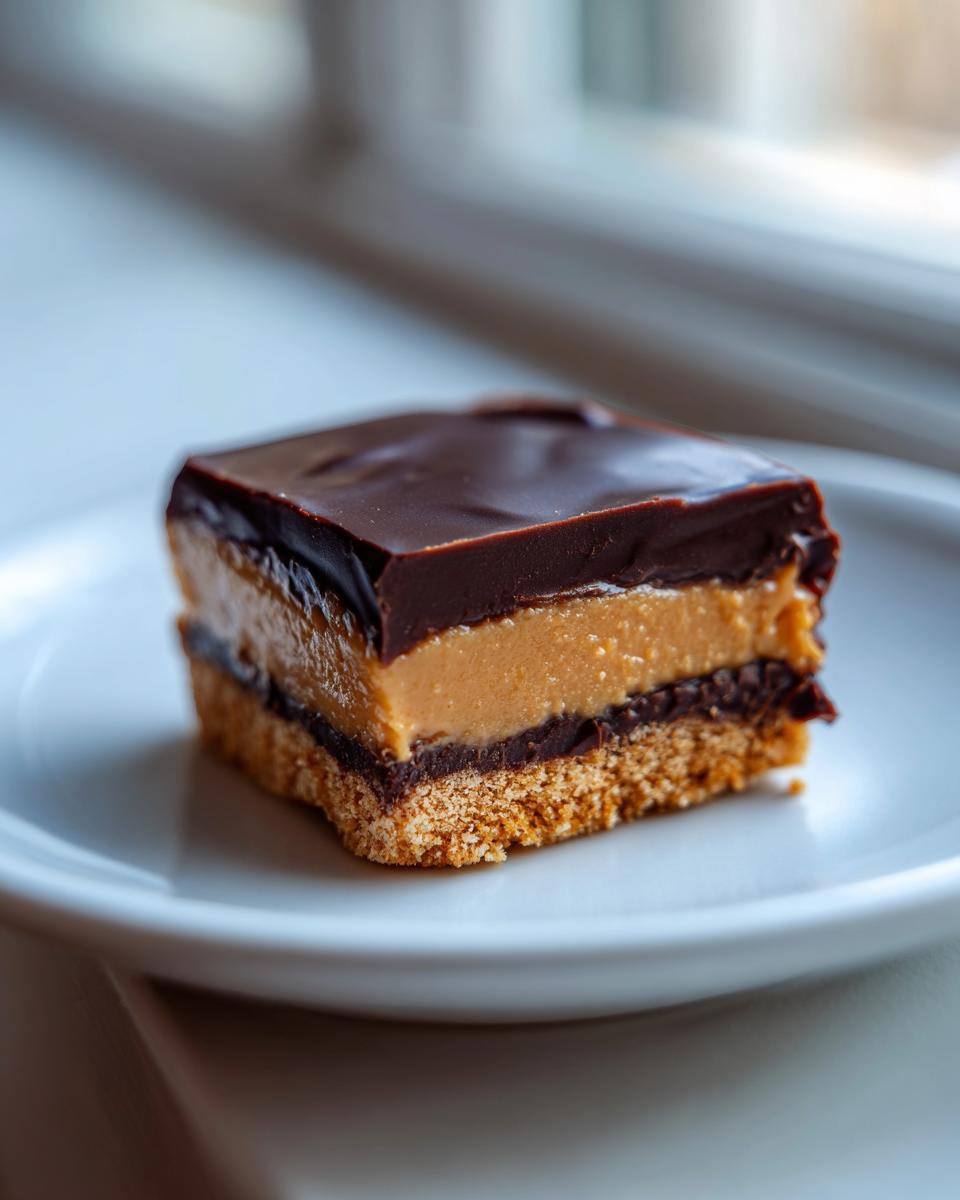
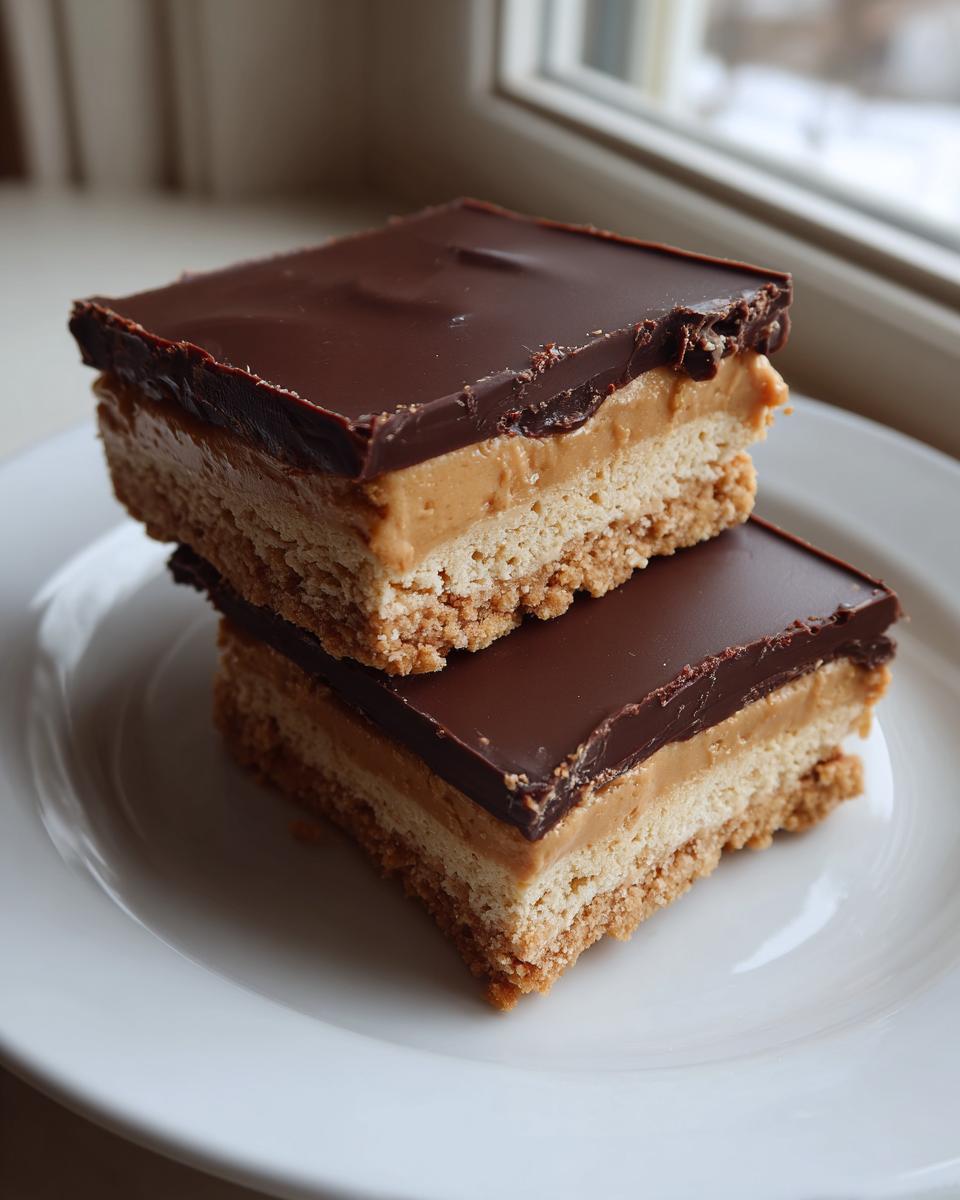
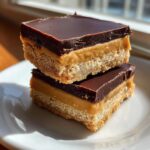
Once the filling is firm, use that parchment overhang to lift the whole slab out onto a cutting board. Cut it into 16 uniform squares. Now for the iconic finish: dip the bottom or the top of each individual square into the melted chocolate. The key to that classic look is to leave a small ring of the peanut butter filling showing—just like a traditional buckeye! Place these finished **buckeye graham crackers** back onto a clean, parchment-lined tray. Another quick 15 to 20 minutes in the fridge, and those chocolate tops will set hard. You did it!
Expert Tips for Perfect Buckeye Graham Squares
Look, the basic recipe gets you 90% of the way there, but if you want these bars to taste like they came from a professional bakery—even though they’re no-bake—you need to know a few small chef tricks. I’ve spent years tinkering in my kitchen to get that perfect bite, so I’m happy to share what I’ve learned to make this the Best No Bake Buckeye Recipe you’ve ever tried. It’s all about control, especially over temperature and texture. Knowing the foundations of why a recipe works is key, and if you’re curious about how I test everything here, you can always check out my About Page to see how I approach flavor harmony!
Ingredient Adjustments for Texture
The biggest change you can make here is the peanut butter you choose. The recipe calls for creamy, and for good structural reason! Conventional peanut butters, like Jif or Skippy, are formulated to stay smooth even when cold, which is exactly what we need for these **Peanut Butter Chocolate Graham Squares**. They spread beautifully and yield that familiar, dense filling.
Now, if you reach for natural peanut butter—the kind where the oil separates—you are going to run into trouble. Natural PB is way looser, and even with all that powdered sugar, the filling may stay far too soft to hold up to the graham crackers when you try to stack or cut it. If that’s all you have, you might need to add an extra quarter cup of powdered sugar, or maybe even a tablespoon of melted butter, just to help it firm up during that first chill. Taste it first, though; you don’t want it too sweet!
Achieving a Clean Chocolate Dip
Dip time is where things can go sideways fast! If your chocolate seizes up or looks dull, it ruins the whole aesthetic we’re going for with these **buckeye graham crackers**. Remember that shortening or coconut oil we added to the chips? That’s essential. It lowers the viscosity, meaning it stays liquid enough to coat thinly and evenly.
After you melt it, let the chocolate cool down just slightly—maybe five minutes off the counter—before dipping. If it’s too hot, it will immediately melt the peanut butter layer underneath, and you’ll end up with a gooey mess instead of a clean square. When you dip, use a quick, decisive motion. If you need that classic ‘Buckeye’ look where you leave a circle of filling showing, use a toothpick stuck into the bottom of the square. Dip the rest into the chocolate, gently set it on the parchment paper, and then quickly pull the toothpick out. It leaves a tiny, perfect hole, just like the candies!
Storage and Make-Ahead for Your Buckeye Graham Crackers
One of the best things about these **No Bake Peanut Butter Chocolate Graham Crackers** is how well they play ahead! Since they rely on chilling to firm up rather than baking at high heat, they are fantastic for making days before you need them. Honestly, I think they taste even better the next day once the peanut butter filling has had a solid chance to really meld with those crunchy crackers.
When you’re prepping for a big holiday or a church potluck—you know, those events where you need **Potluck Friendly Peanut Butter Sweets** ready to go—make a batch and keep them tucked away. You don’t have to worry about them going stale quickly, which is a huge relief!
For short-term storage, just place them in a good, airtight container. Make sure you put a layer of parchment paper between the layers of **Graham Cracker Peanut Butter Bars** so they don’t stick together, especially if the chocolate coating is still feeling a little soft. Keep that container right in the refrigerator, and they should stay absolutely perfect for up to a week. That chilling solidifies the chocolate a bit, which is nice.
Now, if we’re talking long-term or you need to get them out of your fridge space, freezing these is incredibly simple! They freeze like a dream. Just arrange them snugly in a freezer-safe container, again with parchment paper separating them so they don’t fuse into one giant chocolate block. They hold up beautifully in the freezer for up to three months, according to the notes I took.
When you want to serve them after freezing, just pull the container out of the freezer and let them thaw slowly in the refrigerator overnight, or for a couple of hours on the counter if you’re in a rush. They come out tasting almost as fresh as the day you made them. It’s that foolproof structure that makes this recipe such a winner!
Serving Suggestions for these Crunchy Chocolate Peanut Butter Bars
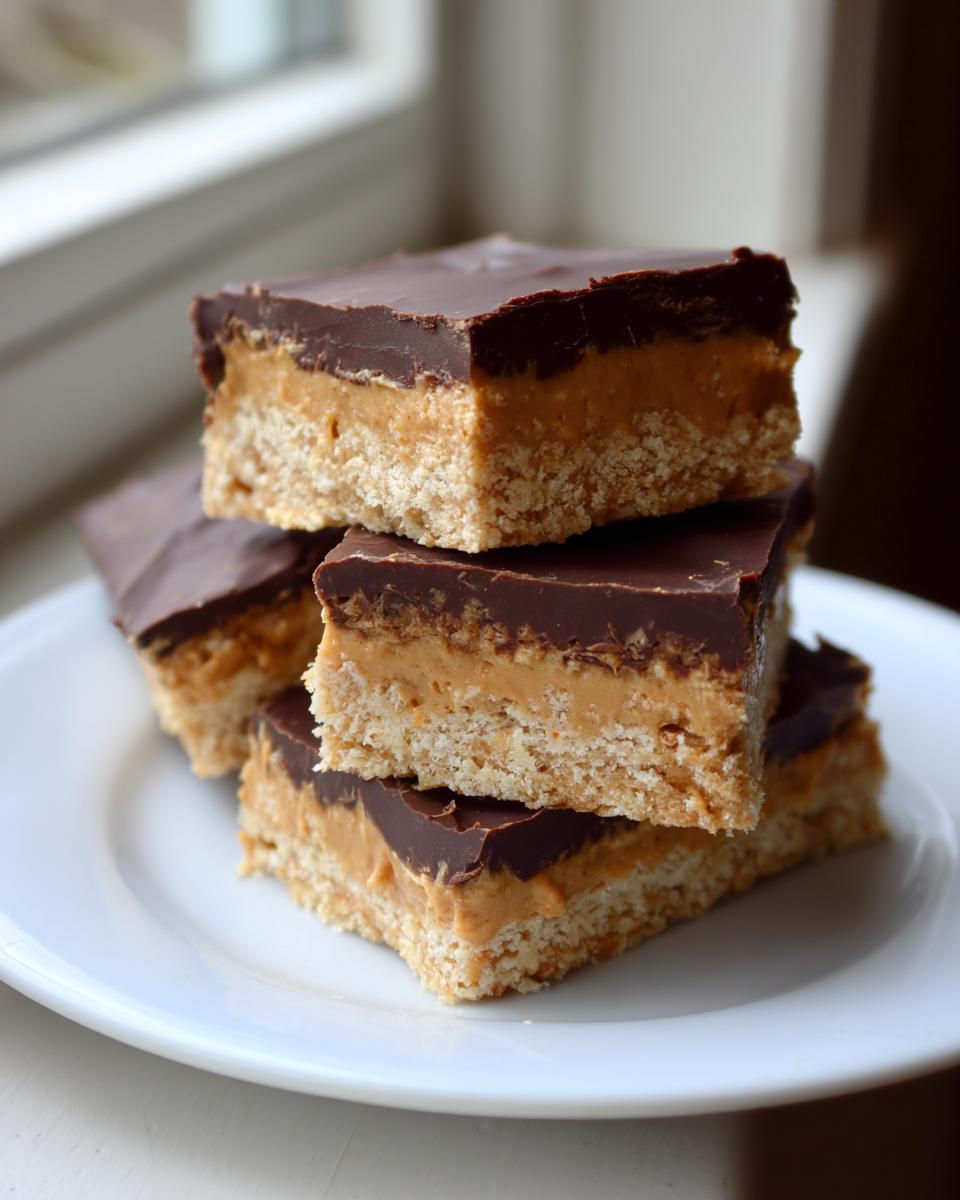
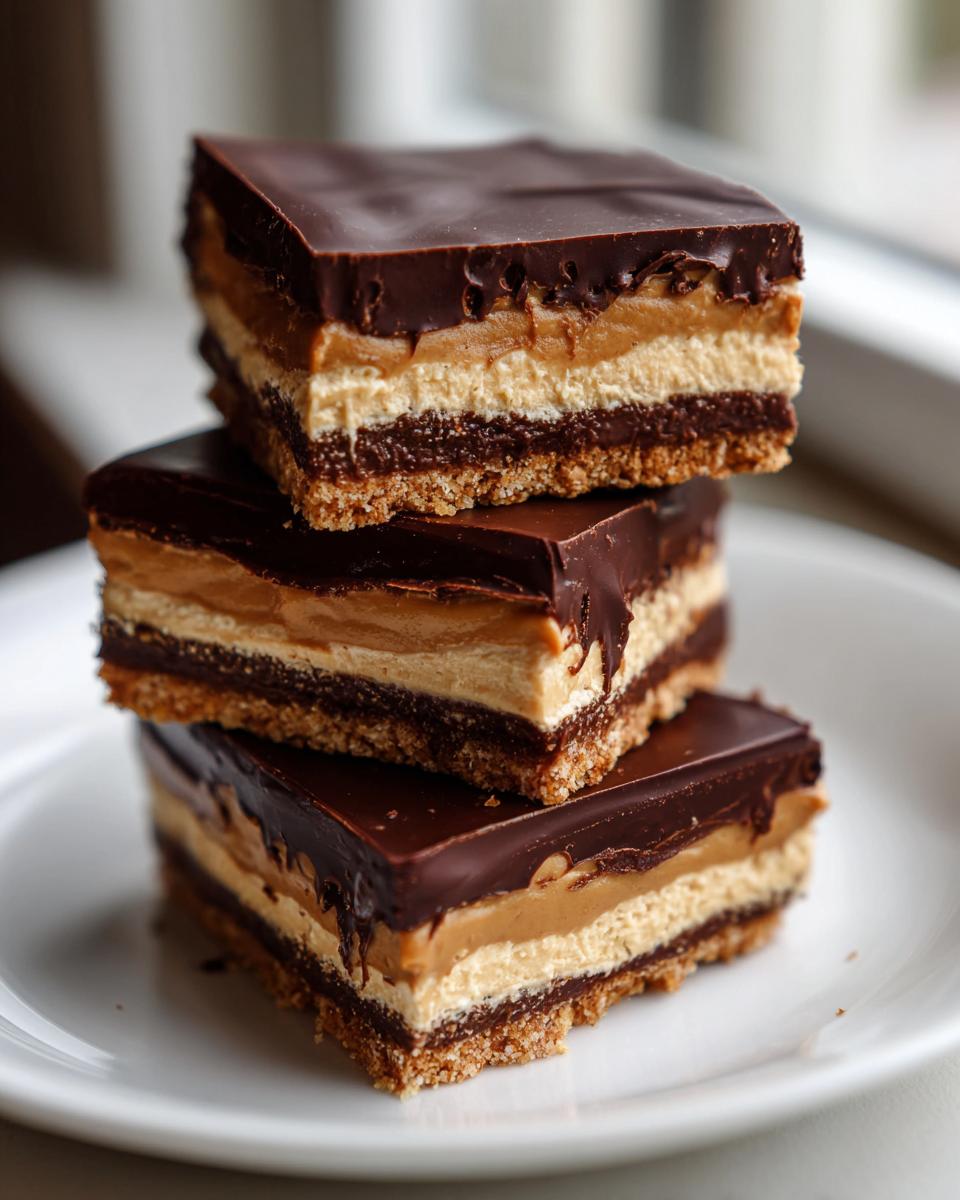
Part of the joy of making treats like these **Crunchy Chocolate Peanut Butter Bars** is seeing where you can use them! Because they are so stable and easy to make in big batches, they are perfect for just about any social gathering you can imagine. They sit beautifully on a platter and look way fancier than the five minutes of effort they actually require.
If you’re putting together a dessert tray for a party—especially around the holidays—these are an absolute must. They look fantastic nestled right alongside frosted cookies or fudge. They provide that much-needed textural contrast. You get soft cookies, dense fudge, and then BAM! You hit one of these **buckeye graham crackers** that gives you that amazing peanut butter smoothness followed by that sharp, snappy chocolate crunch.
For holidays, I toss a few extra chopped peanuts right onto the chocolate while it’s still wet, just for some extra texture and crunch. They fit right in on any holiday cookie recipe platter.
Here are a few ways I love to serve them up:
- The Cookie Exchange Hero: Since they are technically a bar but dipped like a candy, they always stand out among traditional cookies at swaps.
- Movie Night Upgrade: Serve them slightly chilled next to a bowl of fresh fruit like strawberries or raspberries. The tart fruit cuts through the richness of the peanut butter and chocolate perfectly.
- Game Day Snack: They pair wonderfully with salty snacks if you’re serving up a spread for watching football. That balance between sweet and salty is unbeatable!
- As an Edible Gift: Wrap them individually in small cellophane bags and tie them with a festive ribbon. They travel so well, and everyone loves getting homemade goodies that don’t require a million ingredients!
Frequently Asked Questions About Buckeye Graham Cracker Recipe
I know whenever I look up a new recipe, my head starts buzzing with a million little “what if” questions. Is this going to work if I switch this one ingredient? How much time do I really need to wait? I’ve collected the ones I get asked the most now that these incredible **buckeye graham crackers** are circulating around my friends!
Can I make these Peanut Butter Chocolate Graham Squares with crunchy peanut butter?
That’s a great question about texture! Since this recipe is all about that super smooth, creamy filling—just like the classic candy we’re trying to emulate—I strongly recommend sticking with creamy peanut butter. When you use crunchy, the pieces of peanut can sometimes make the filling uneven, which makes it harder to spread thinly over the graham crackers without tearing them.
If you absolutely must use crunchy, be prepared for a slightly more texturized bite. You might even need to add an extra tablespoon or two of powdered sugar to thicken it up slightly, because crunchy peanut butter tends to be a little runnier than the smooth stuff. It won’t be bad, but it won’t have that signature melt-in-your-mouth consistency of the classic **Easy Buckeye Dessert** filling.
What is the secret to making these No Bake Peanut Butter Candy Inspired treats set properly?
The secret isn’t really a sneaky ingredient; it’s all about patience! Since we aren’t baking anything, the structure of these bars depends entirely on chilling. You have two really crucial chilling steps, so don’t try to hurry them along!
First, after you’ve layered the peanut butter filling and the top graham cracker layer, you need that minimum 30-minute chill. This allows the peanut butter and softened butter mixture to harden *just enough* so that when you try to cut the slab, it doesn’t squish out the sides like toothpaste. Second, and just as vital, is the chill *after* you dip them in chocolate. The chocolate needs time to set hard on the outside so you can handle them without leaving fingerprints all over the beautiful finish. If you only chill for 5 minutes after dipping, the chocolate will still be soft and messy when you try to move them!
Can I skip the shortening or coconut oil in the chocolate topping?
Honestly, I wouldn’t recommend it if you want that glossy, smooth finish. The shortening (or coconut oil, which I prefer for a neutral flavor) is our insurance policy against dull, matte, or crumbly chocolate. It’s often called a ‘temper’ aid, even though we aren’t technically tempering the chocolate here.
Without that extra fat, the melted chocolate cools too quickly when it hits the cool peanut butter layer. This causes it to seize up and look dull, or sometimes even causes the chocolate to stick to your fingers when you pick it up later. The tiny bit of fat keeps the melted chocolate flowing easily so you can get a thin, even coat on your **Chocolate Dipped Graham Cracker Treats**. It’s worth keeping on hand!
How thick should my graham cracker and peanut butter layers be?
We want balance! Since we are using whole graham cracker sheets, try to make your layers even. The goal is two layers of crackers sandwiching two layers of filling. If you notice your peanut butter filling is looking dramatically thicker than one cracker sheet, you might be using too much filling in one spread. The recipe is designed so that half the filling goes over the first cracker layer, and the second half goes over the second cracker layer—keeping those layers proportional is key to a good slice!
Estimated Nutritional Snapshot for Buckeye Graham Crackers
You know, when I’m putting together a recipe like this, I always try to calculate what we’re looking at nutritionally. Since these are so addictive—I mean, who can stop at just one of these perfect **buckeye graham crackers**?—it’s good to have a general ballpark idea of what you’re diving into. I always stress that this is a treat, a flavorful indulgence, not something you eat every day. Think of this as a guideline after you’ve polished off a piece!
These estimates are based on serving the whole pan cut into 16 squares, using standard ingredients like semi-sweet chips. Because we aren’t baking, ingredient quality (especially the type of peanut butter) can shift these numbers a tiny bit, but this gives you a reliable baseline for these wonderful **no bake peanut butter chocolate graham crackers**.
- Serving Size: 1 square
- Calories: Approximately 280 calories per piece. That sounds right for a rich chocolate and peanut butter treat!
- Total Fat: Around 17g. Remember, a good chunk of that is the creamy fat from the peanut butter doing its job to keep the filling smooth.
- Saturated Fat: About 6g. We keep things reasonable here, but chocolate and peanut butter add up naturally.
- Carbohydrates: Roughly 30g. This covers the sugar from the powdered sugar and the carbs from the graham crackers.
- Sugar: This clocks in around 25g. That’s where all the deliciousness comes from, naturally!
- Protein: About 5g, thanks to all that peanut power we packed into the center.
- Cholesterol: Around 15mg.
I always show you the numbers because transparency is part of harmony in the kitchen. We celebrate the joy of the treat, but we stay grounded in knowing what’s in it. These are indulgent, yes, but that quick prep time makes them worth it for any special occasion!
Share Your Homemade Graham Cracker Peanut Butter Bars
And there you have it—the easiest way to combine classic comfort flavors into one perfect, no-bake square!
I truly hope you take the time to make these **buckeye graham crackers**. Watching that creamy filling set up and getting that clean snap when you bite into that chocolate shell? That’s pure culinary harmony right there. This recipe is proof that sometimes the simplest combinations—peanut butter, chocolate, and a great crunch—are the ones that stick with you the longest.
When you try this recipe out in your own kitchen, I genuinely want to hear about it! Did you go for the traditional dipped look, or did you drizzle the chocolate across the top? Did you let them chill overnight, or did you sneak one while they were still a tiny bit soft?
Please, come back here and leave a star rating for the recipe right below this post. And if you have a few extra seconds, drop a comment! Telling me how these **Graham Cracker Peanut Butter Bars** played out for your family really helps me keep developing recipes that fit your busy lives. My goal with Delish Symphony is to make cooking enjoyable and accessible for everyone, so your feedback is essential to keeping that rhythm going strong.
If you snapped a photo of your finished bars—maybe looking perfect on a holiday platter or piled high for a party—I’d absolutely love to see them! You can always reach out through my contact page to share updates or ask any lingering kitchen questions. Happy baking (or, well, *not* baking)!
PrintNo Bake Buckeye Graham Cracker Squares
You can create these easy no bake Buckeye Graham Crackers that layer creamy peanut butter filling between crunchy graham crackers, topped with rich chocolate. This simple dessert delivers classic peanut butter chocolate flavor without using your oven.
- Prep Time: 20 min
- Cook Time: 5 min
- Total Time: 25 min
- Yield: 16 servings 1x
- Category: Dessert
- Method: No Bake
- Cuisine: American
- Diet: Vegetarian
Ingredients
- 2 cups powdered sugar
- 1 cup creamy peanut butter
- 1/2 cup (1 stick) unsalted butter, softened
- 1 teaspoon vanilla extract
- 1/4 teaspoon salt
- 1 package (14.4 ounces) graham crackers, whole sheets
- 12 ounces semi-sweet chocolate chips
- 2 tablespoons shortening or coconut oil
Instructions
- Prepare the peanut butter filling: In a medium bowl, combine the powdered sugar, peanut butter, softened butter, vanilla extract, and salt. Mix with a hand mixer or stand mixer until the mixture is smooth and creamy.
- Prepare the graham crackers: Line an 8×8 inch baking pan with parchment paper, leaving an overhang for easy removal later. Arrange a single layer of whole graham crackers on the bottom of the pan. You may need to break some to fit snugly.
- Spread the filling: Evenly spread half of the peanut butter mixture over the layer of graham crackers.
- Add the second layer: Place another layer of whole graham crackers on top of the peanut butter filling.
- Top with remaining filling: Spread the remaining peanut butter mixture over the second layer of graham crackers.
- Chill: Cover the pan and place it in the refrigerator for at least 30 minutes to allow the filling to firm up.
- Cut the squares: Once firm, use the parchment paper overhang to lift the slab out of the pan. Cut the slab into squares or rectangles, about 16 to 20 pieces, depending on your desired size.
- Melt the chocolate: In a microwave-safe bowl, combine the chocolate chips and shortening (or coconut oil). Microwave in 30-second intervals, stirring well after each interval, until the chocolate is completely smooth.
- Dip the treats: Dip the bottom or top of each peanut butter graham cracker square into the melted chocolate, leaving a small portion of the peanut butter layer exposed, similar to a traditional buckeye candy. Alternatively, you can drizzle the chocolate over the top.
- Set the chocolate: Place the dipped squares back onto a parchment-lined baking sheet. Refrigerate for another 15 to 20 minutes, or until the chocolate coating is fully set.
- Serve or store: Serve immediately or store in an airtight container in the refrigerator.
Notes
- For a cleaner dip, use a toothpick to gently guide the chocolate around the edges of the peanut butter layer.
- You can substitute milk chocolate or dark chocolate for the semi-sweet chips based on your preference.
- These treats freeze well. Place them in a freezer-safe container with parchment paper between layers for up to three months.
Nutrition
- Serving Size: 1 square
- Calories: 280
- Sugar: 25
- Sodium: 150
- Fat: 17
- Saturated Fat: 6
- Unsaturated Fat: 11
- Trans Fat: 0
- Carbohydrates: 30
- Fiber: 1
- Protein: 5
- Cholesterol: 15