
Remember those incredible, slightly messy desserts from your childhood parties? The ones that made you feel like a kid again just looking at them? Well, I dug deep into my archive of simple, crowd-pleasing recipes to bring you the official, foolproof version of that classic: the best dirt cake you will ever make. Since leaving my tech job to focus on what really matters—great food made easy—I’ve specialized in taking those nostalgic flavors and making them utterly foolproof. This no-bake Oreo Dirt Cake recipe relies on simple layering and pantry staples, proving that you don’t need an oven to create magic. You can read more about my practical approach to cooking over on the About Page.
- Why This Easy Dirt Cake Dessert is a Family Favorite
- Essential Ingredients for Perfect Oreo Dirt Cake Recipe
- Step-by-Step Instructions for No Bake Dirt Cake Assembly
- Tips for Making the Best Dirt Cake Recipe
- Serving Suggestions for Your Chocolate Dirt Pudding
- Storage and Make Ahead Tips for Dirt Cake
- Frequently Asked Questions About This Dirt Cake
- Nutritional Estimates for This Creamy Dirt Cake Filling
- Share Your Experience Making This Dirt Cake
Why This Easy Dirt Cake Dessert is a Family Favorite
Honestly, this is the recipe I turn to when I need to impress a huge group without spending all day in the kitchen. It checks every single box for a successful gathering treat. It’s fast, it’s chocolatey heaven, and everyone, no matter their age, always asks for seconds!

- It’s the ultimate Potluck Desserts No Bake champion—just throw it together and chill!
- You genuinely only spend about 20 minutes actively working on it. That’s amazing for a dessert this rich.
- It uses ingredients you probably have right now, meaning zero fancy grocery trips. Check out more of my fantastic dessert flavor ideas here.
Quick Assembly for the Best Dirt Cake
Forget the oven, friends! The best part about this No Bake Dirt Cake is that you don’t need to heat up the house. Seriously, you can have this layered and ready for the fridge in under twenty minutes flat. That quick assembly time is why I use it for last-minute get-togethers all the time.
Ultra Creamy Dirt Cake Filling
If you hate dry desserts, this is for you. We aren’t just using pudding here; we are folding in that fluffy whipped topping right into the chocolate base. That’s how you get that signature Ultra Creamy Dirt Cake Filling that makes every bite feel totally decadent. It melts in your mouth before you even hit the cookie crunch!
Essential Ingredients for Perfect Oreo Dirt Cake Recipe
When making this iconic Oreo Dirt Cake Recipe, the ingredients list is short, which is why quality matters! Since there’s no baking involved, every component has to pull its weight in texture and flavor. I’m not messing around with ingredients here; this needs that rich, deep chocolate flavor. Make sure you grab the full-fat instant pudding mix—we are going for decadence, not diet food here!
Here is exactly what’s going into the mix for the perfect layered experience:
- One standard package of Oreo cookies (14.3 ounces). Yes, the entire thing—cream filling and all! Don’t separate them; we want all that buttery flavor in our ‘dirt’.
- One package (3.9 ounces) of instant chocolate pudding mix. Make sure it’s instant!
- Three cups of very cold milk. Seriously, use cold milk, or your pudding won’t set up right.
- One container (8 ounces) of frozen whipped topping, and this is crucial: make sure it is fully thawed before you start folding.
- And, for the fun part, grab a bag of gummy worms if you want that classic look!
If you want to see how I handled ingredients in another classic, check out my notes on making easy moist banana bread—it’s all about preparation!
Ingredient Substitutions for Your Dirt Cake
I always preach using what you have efficiently, and this recipe is super flexible if you’re missing one tiny thing. If you’re making this for a big crowd, you can easily scale this up and use a 9×13 pan instead of a trifle dish; just plan on baking it a little longer if you need it to firm up fully, even though it’s technically no-bake assembly.
Also, if you happen to only have vanilla instant pudding on hand, go ahead and use it! It creates a cookies-and-cream flavor profile instead of pure chocolate, and it’s still delicious, though I find the pure chocolate version is better for the true ‘dirt’ aesthetic.
And here’s a little secret I learned: if you swap out about one cup of that cold milk for one cup of cold brewed coffee, the chocolate flavor in the pudding deepens so much! It tastes more complex, trust me on this one.
Step-by-Step Instructions for No Bake Dirt Cake Assembly
Okay, this is where the real fun starts, and believe me, this is a fantastic recipe to get the kids involved with! Since it’s all about layering, they are going to love measuring and sprinkling. It’s like building a delicious, edible tower that you get to eat!
First things first: we need dirt! Grab all your Oreos—yes, the entire package—and toss them into a sturdy, large zip-top bag. Now, you can use a food processor, but honestly, I prefer pounding them out with a rolling pin or even the bottom of a heavy pan. You want that nice mix of fine powder and slightly coarser crumbs. That variation gives you that amazing texture when you take a bite. Once they look perfectly messy, set aside about one cup of those glorious crumbs just for the very top layer later.
Next up is the creamy filling. In a large bowl, whisk the instant chocolate pudding mix really well with the three cups of cold milk. You have to whisk this vigorously for two full minutes, trust me, or it won’t thicken up enough to hold those layers. Once it looks thick, gently fold in about half of your thawed whipped topping. You need to fold carefully so you don’t deflate all the air we just whisked in!
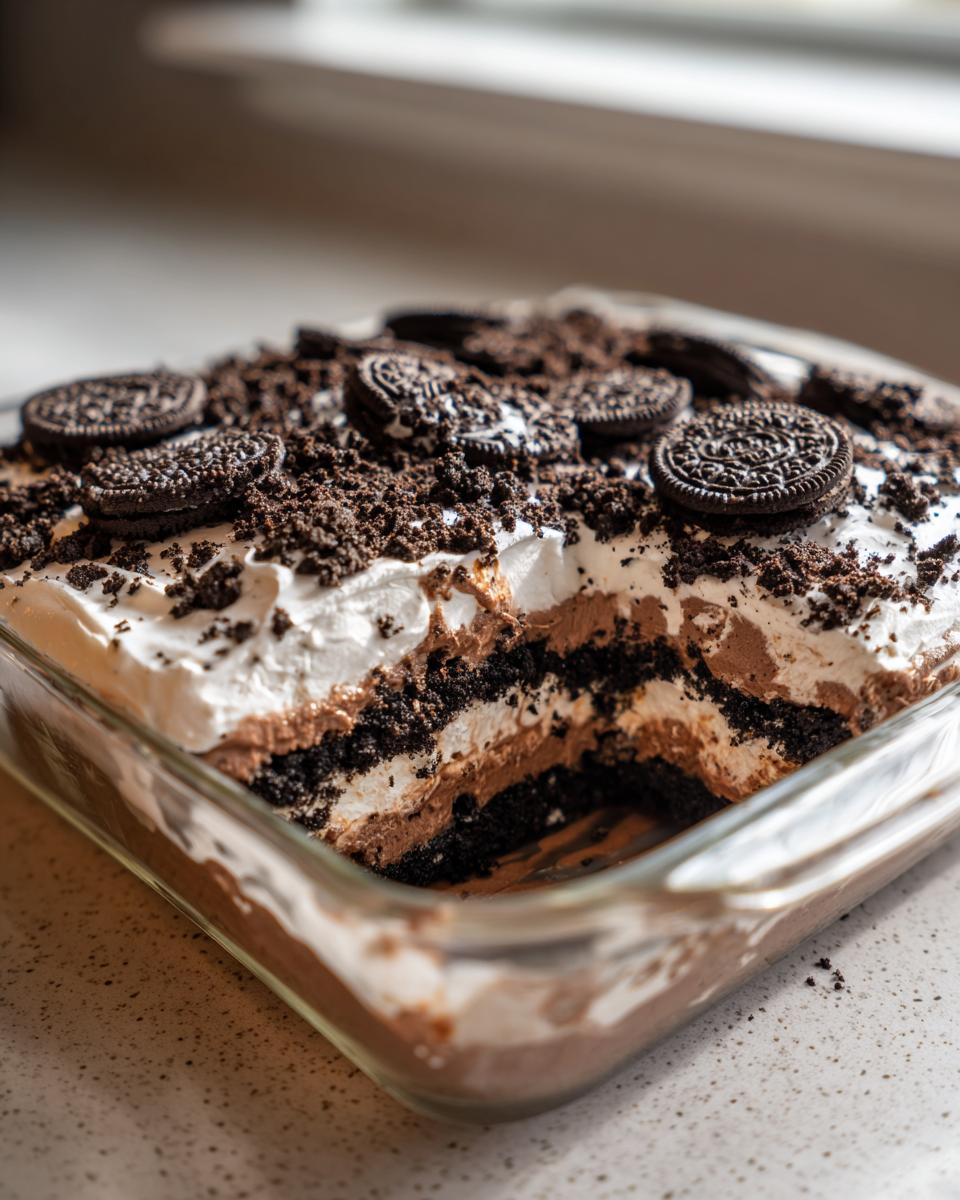
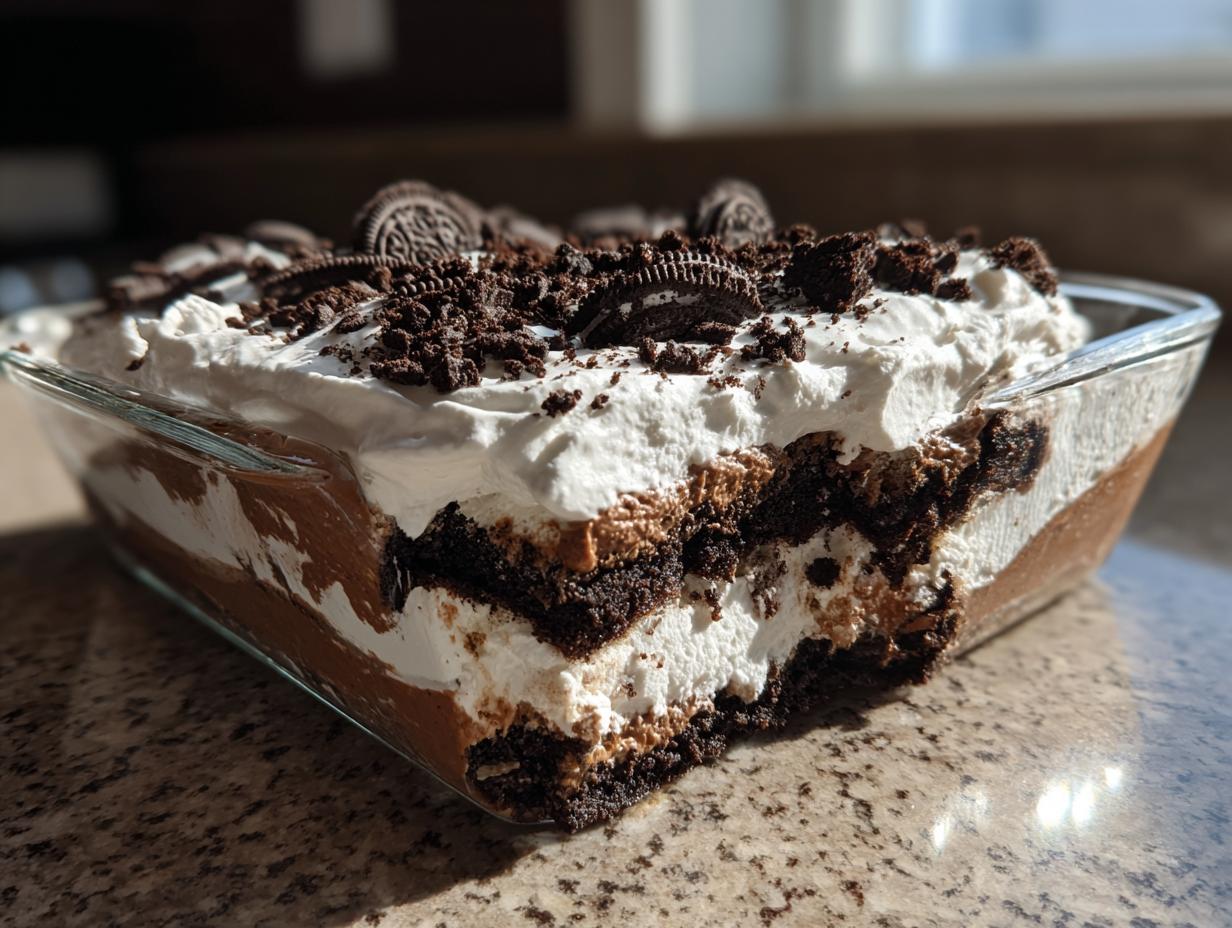
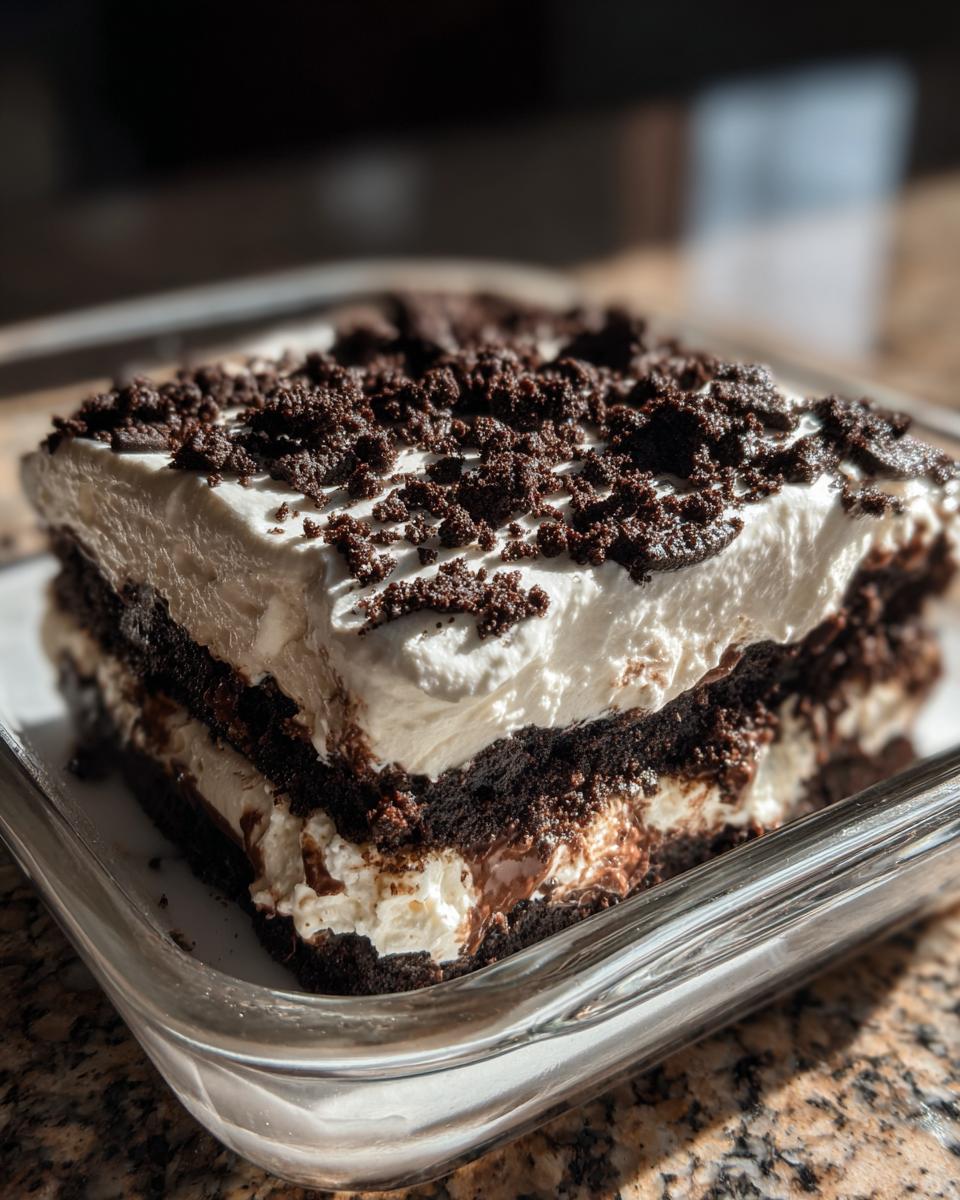
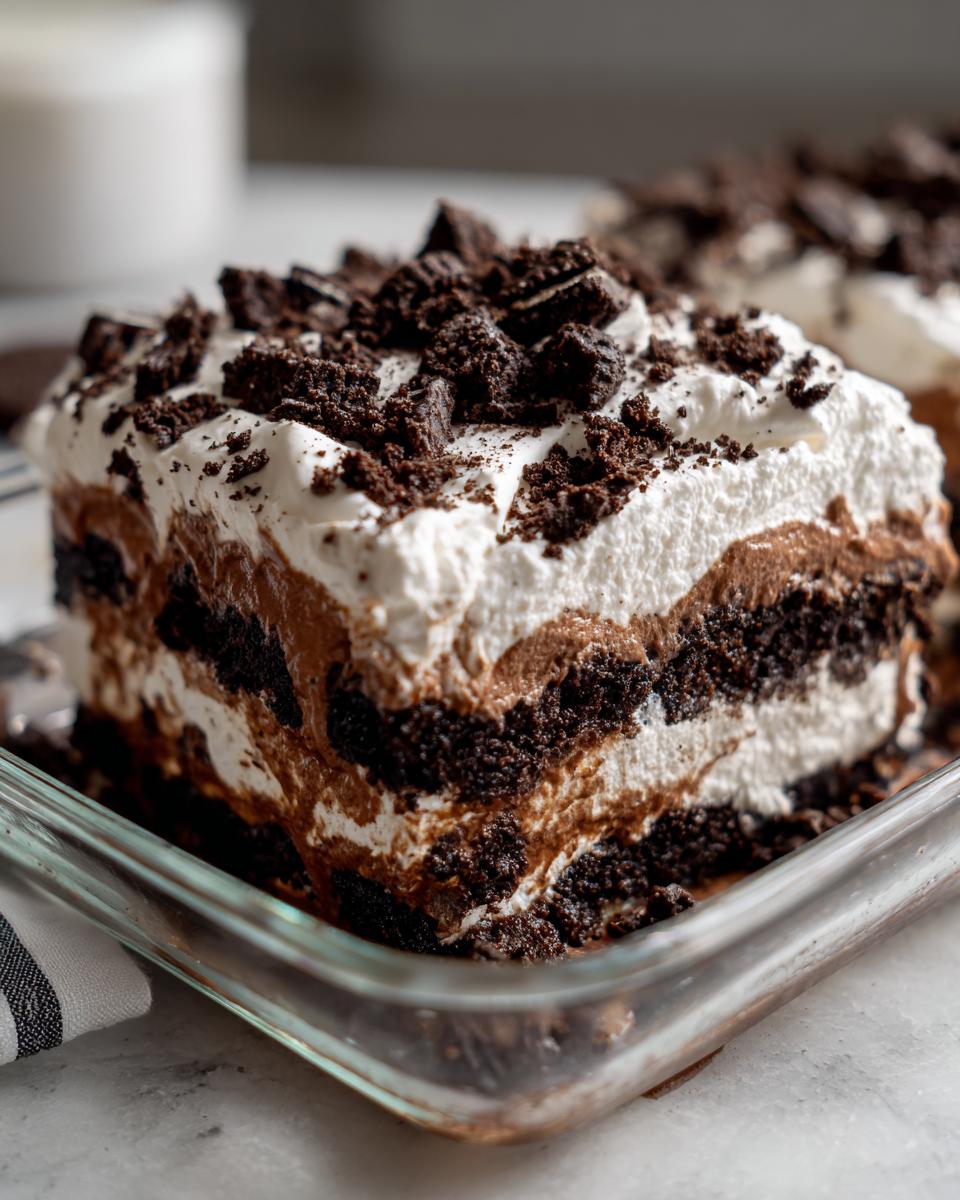
Now we layer! If you’re using a big trifle dish, start with a thick layer of your crushed Oreos—that’s the base dirt layer. Then, spoon down half of your creamy chocolate pudding mixture right over the top. Don’t smash it down; try to keep it fluffy! Repeat that process: another layer of cookie crumbs, followed by the rest of your pudding mixture. Make sure you end with the pudding on top to give your final topping something to stick to.
Finish it off by spreading the rest of that fluffy whipped topping smoothly over the pudding layer. Then, take those reserved crumbs and sprinkle them evenly across the top until it looks completely covered in dirt. If you have gummy worms, push them jauntily into the crumbs now! Ready for the essential final step…
Achieving the Best Texture in Your Layered Oreo Dessert
This is the hardest part, but you’ve got this: patience! You absolutely must chill this Layered Oreo Dessert for at least two hours. This isn’t just to make it cold; chilling is critical because it lets that pudding completely set up and firm itself against those crunchy cookies. If you skip this step, your dessert will be runny pudding soup instead of a firm No Bake Dirt Cake.
The great news is that this is the ultimate Make Ahead Dessert. If anything, it tastes even better the next day! The cookies get just a tiny bit softer from the moisture, but they hold their crunch enough to give you that wonderful texture contrast. I often make this the night before a big event, checking in on it every few hours to make sure the layers are melding perfectly. You can find some other great quick assembly recipes for weeknights when you’re short on time here.
Tips for Making the Best Dirt Cake Recipe
Now that you know the steps, let me share a few tricks I’ve picked up over the years of making this specific Dirt Cake for everything from quick Tuesday night fixes to huge family reunions. Getting that fantastic crunch-to-cream ratio is all about a couple of little execution details.
First, I mentioned this back in the ingredients section, but I have to reiterate: don’t use room temperature milk when setting your pudding! It needs that shock of cold to gel up fast enough to support the layers. My absolute favorite trick for really deepening that chocolate flavor, especially if I’m bringing this to a big gathering, is swapping out one cup of the cold milk for one cup of very cold brewed coffee. Wow! It doesn’t taste like coffee, it just makes the chocolate taste richer. Seriously, try it next time you’re whipping up a batch!
Also, if you’re worried about presentation, go ahead and crush your Oreos last. You want those crumbs crisp when you sprinkle them on top right before chilling. If you crush them too early, they start absorbing ambient moisture and turn dull. For more easy flavor boosters, check out some of my quick ideas for easy breakfast recipes!
Serving Suggestions for Your Chocolate Dirt Pudding
Okay, presentation time! Since this is such a rich, decadent dessert, you don’t need a ton of bells and whistles to make it look spectacular. It’s naturally fun because of the ‘dirt’ look, but presentation makes all the difference when you’re serving friends and family.
For parties, my absolute favorite way to serve this is in individual small clear plastic cups. We call them Dirt Dessert Cups around here! They are instant potluck perfection because everyone gets their own neatly layered portion, and they are so easy for people to grab and mingle with. When you do the individual cups, make sure you push those gummy worms right up against the side of the glass so you can see them wiggling out of the top layer of crumbs!
If you are serving it up big in a trifle dish, try garnishing the top lightly with some fresh piped whipped cream rosettes around the edges before you sprinkle on that final layer of crumbs. It just gives it a slightly more finished look without taking away the fun.
What should you serve alongside something this wonderfully heavy and sweet? Keep the sides light! Since this is pure chocolate indulgence, I always pair it with something tangy or fresh. Sliced kiwis or perhaps some bright, slightly tart strawberries on the side really cut through the richness nicely. If you are looking for lighter fare before dessert, you have to try my super simple guacamole dip—perfect for balancing out the sweetness!
For more ideas on bringing light snacks to the party table, check out my tips for simple snack recipes, or see how I handle a savory classic like homemade guacamole party dip!
Storage and Make Ahead Tips for Dirt Cake
Since this Dirt Cake is a no-cook dessert, storage is super straightforward, which is part of why it shines as a party superstar. Like I mentioned before, this is absolutely a Make Ahead Dessert. In fact, I recommend making it the day before you need it!
When it comes to keeping leftovers fresh, cover your dish tightly with plastic wrap or an airtight lid. You absolutely have to keep this refrigerated because of the milk and the whipped topping in that creamy filling. It does great in the fridge for about three or maybe even four days. Any longer than that, and the cream gets a little too soft, and the bottom cookie layer starts to get too soggy for my liking.
You won’t be reheating this one, obviously, since it’s cold pudding dessert. Just pull it out of the fridge about 15 minutes before you plan to serve it. That little bit of time lets the flavors settle even more and makes the texture just perfect—still cold, but not rock hard from the fridge chill.
If you are planning a big meal and need to get ahead on prep, this is fantastic to make alongside something that needs baking, like my rich, cheesy easy lasagna with ricotta. Get the lasagna ready for the oven, whip up the dirt cake for the fridge, and you feel so much less stressed on party day!
Frequently Asked Questions About This Dirt Cake
I get so many questions whenever I share this recipe—it’s just one of those desserts people love to customize! Here are the most common things folks ask me when they’re planning to whip up their own batch of this decadent treat.
Can I use a different cookie instead of Oreos in this dirt cake?
That’s a great question. While the classic Oreo Dirt Cake Recipe relies on those specific chocolate sandwich cookies to give us that iconic, dark ‘dirt’ look and flavor, you certainly can swap them out if you need to! Any chocolate wafer or chocolate sandwich cookie will work in a pinch. Just be aware that the texture might be slightly different—some other brands have a harder crunch which changes how the cookie layer feels against the Creamy Dirt Cake filling. But yes, flexibility is key in the home kitchen!
What is the best way to make the dirt cake look like actual dirt?
If you are aiming for that authentic, fresh-from-the-garden look, the crushing method is everything! You want a good mix of textures—that fine powder that mixes with the whipped topping, and those slightly coarser bits that give you that satisfying little crunch. Make sure you are generous with the final scattering of those reserved crumbs on top until it’s fully covered. And, of course, you absolutely need those gummy worms poking out! That’s the hallmark of a proper Dirt Cake with Gummy Worms, isn’t it? Make sure you press them in halfway so it looks like they are truly burrowing!
Since this is a simple pudding cake, you can adjust the look however you want for your family gathering. If you happen to need help figuring out timing on other recipes, don’t hesitate to reach out through the Contact Page!
Nutritional Estimates for This Creamy Dirt Cake Filling
Look, I’m not a nutritionist, and I’m certainly not baking this to count macros, but since you asked, I pulled together the standard estimates for a generous serving of this utterly necessary indulgence. Since this is a high-sugar, high-fat dessert—we’re using actual full-fat pudding and whipped topping, remember?—the numbers reflect its truly satisfying nature.
Keep in mind these figures are educated guesses based on the common grocery store brands used in my testing here in the kitchen. If you swap out the milk for coffee, for instance, or use a different brand of crushed cookie, the final breakdown changes a little bit.
- Serving Size: 1 generous serving
- Calories: About 350 (Worth every single one, trust me!)
- Sugar: Roughly 35 grams
- Total Fat: Around 18 grams
- Saturated Fat: About 10 grams
- Total Carbohydrates: Around 45 grams
- Protein: About 4 grams
- Sodium: Near 320 mg
The goal here isn’t calorie counting; it’s enjoying a fantastic, fuss-free Chocolate Dirt Pudding that brings smiles to faces at any party. It’s meant to be a rich treat, not an everyday affair. Enjoy it!
Share Your Experience Making This Dirt Cake
Alright, my friends, now it’s your turn to get into the kitchen and make some sweet memories with this ridiculously easy Dirt Cake! I poured my heart into making this the most straightforward, ultra-creamy recipe possible for you. I truly want to know how it turned out at your next family gathering or party.
When you finish assembling your masterpiece—especially if you added those wiggly gummy worms—please come right back here and leave me a star rating. Tell me what you thought! Did you use it as one of your favorite simple snack recipes for a crowd, or did you just devour it on the couch like I sometimes do?
If you snap a picture of your finished, beautiful, layered creation, please tag me! I absolutely love seeing this dessert pop up in your home kitchens. It makes all the recipe testing worthwhile. If you decided to try out that coffee trick for a richer flavor, let me know how that deep chocolate taste worked out for you!
We take privacy seriously here at Delish Symphony, so remember to review our Privacy Policy before sharing too much personal info, but your recipe feedback is always welcome. If you think this is the Best Dirt Cake Recipe ever, you can also check out the recipe posted by Maria over at her site for a little comparison shopping! Maria’s site link for Oreo Dirt Cake.
PrintEasy No-Bake Oreo Dirt Cake

Make this simple, layered dessert featuring crushed Oreos, creamy chocolate pudding, and whipped topping. It is a quick, no-bake treat perfect for parties or family gatherings.
- Prep Time: 20 min
- Cook Time: 0 min
- Total Time: 2 hours 20 min
- Yield: 10 servings 1x
- Category: Dessert
- Method: No-Bake Assembly
- Cuisine: American
- Diet: Vegetarian
Ingredients
- 1 package (14.3 ounces) Oreo cookies
- 1 package (3.9 ounces) instant chocolate pudding mix
- 3 cups cold milk
- 1 container (8 ounces) frozen whipped topping, thawed
- Optional: Gummy worms for decoration
Instructions
- Place all Oreo cookies into a large zip-top bag. Crush the cookies using a rolling pin until they resemble fine dirt. Set aside about 1 cup of crumbs for the top layer.
- In a large bowl, whisk together the instant chocolate pudding mix and cold milk for two minutes until the mixture thickens.
- Gently fold half of the thawed whipped topping into the thickened chocolate pudding mixture until just combined. This creates the creamy filling.
- In a large trifle dish or individual serving cups, begin layering the ingredients. Start with a layer of crushed Oreos (not the reserved cup).
- Add a layer of the chocolate pudding mixture over the cookie crumbs.
- Repeat the layers: cookies, then pudding mixture, until both are used up, ending with the pudding mixture on top.
- Spread the remaining half of the whipped topping evenly over the top layer of pudding.
- Sprinkle the reserved 1 cup of crushed Oreo crumbs over the whipped topping to create the ‘dirt’ look.
- If using, press gummy worms into the top layer.
- Chill the dirt cake for at least 2 hours before serving to allow it to set.
Notes
- You can make this dessert in a 9×13 inch pan or in clear plastic cups for individual servings.
- For a richer flavor, substitute 1 cup of the milk with 1 cup of cold coffee when making the pudding.
- Prepare this dessert a day ahead; it tastes even better after chilling overnight.
Nutrition
- Serving Size: 1 serving
- Calories: 350
- Sugar: 35
- Sodium: 320
- Fat: 18
- Saturated Fat: 10
- Unsaturated Fat: 8
- Trans Fat: 0
- Carbohydrates: 45
- Fiber: 1
- Protein: 4
- Cholesterol: 30