
Sometimes, the best flavors come when you skip the oven entirely. When I’m looking for a truly satisfying, crowd-pleasing dessert that won’t hog my stove when I’ve got a busy day—or maybe I’m just craving something cool on a humid evening—I turn straight to this No Bake Oreo Pie. Forget fussy, multi-component desserts; this recipe is pure harmony in a pie dish. It’s the ultimate, simple oreo pie, and trust me, the texture is just unbelievably creamy and dreamy. After years spent balancing code architecture and family dinners, I learned that the easiest recipes are often the ones that bring the biggest smiles. If you’re looking for more simple desserts that just sing, check out my collection of delicious dessert recipes. This one is tested, foolproof, and ready for your table tonight.
- Why This No Bake Oreo Pie is Your New Go-To Dessert
- Gathering Ingredients for Your Creamy Oreo Pie
- The Essential Ingredients for This Oreo Pie Recipe
- Step-by-Step Instructions for the Best Oreo Pie Recipe
- Tips for Success Making Your No Bake Oreo Pie
- Serving Suggestions for Your Simple Oreo Dessert
- Storage and Making Ahead Tips for the Oreo Pie
- Frequently Asked Questions About This Oreo Pie
- Estimated Nutritional Data for One Slice of Oreo Pie
Why This No Bake Oreo Pie is Your New Go-To Dessert
When you need flavor without the fuss, this is the recipe you pull out. Seriously, this oreo pie checks every box for what a modern home cook needs. I developed this specifically because sometimes standing over a hot oven for an hour just isn’t in the cards. It’s fast, it’s easy, and it delivers that luxurious, cold dessert experience everyone craves.
- No Oven Required: This recipe stays out of your hot kitchen, making it perfect for summer or busy holiday schedules.
- Super Quick Prep: We get the filling mixed and into the crust in under 25 minutes of active time.
- That Signature Texture: Nobody likes a soupy pie, and this version sets up perfectly every single time.
Effortless Preparation for the Perfect Oreo Pie
If you are hunting for a Simple Oreo Dessert that practically makes itself, you’ve found it. The beauty here is in the simplicity of combining the crust ingredients and then layering the fillings. There’s no baking stress, no worrying about dome tops or sunken centers. You mix, you spread, you chill, and you’re basically done. It’s genius!
Creamy Texture That Wows Every Time
What makes this the Creamy Oreo Pie of your dreams? It’s all about maintaining the airiness we build into the filling. We’re using whipped topping and then folding in freshly whipped heavy cream later, which gives the filling that light, melt-in-your-mouth mousse-like quality that you just can’t beat in a standard pudding pie.
Gathering Ingredients for Your Creamy Oreo Pie
At Delish Symphony, we aim for approachable ingredients, and this pie is proof positive. You likely have most of these items in your cabinet right now! For our ultimate dream version of the oreo pie, we are combining a simple buttery crust with a dual-layered filling utilizing cream cheese, instant pudding, and plenty of that classic whipped topping. We keep the ingredient count tight—around eight key components—to ensure this remains a quick, weeknight-friendly recipe we can all rely on.
You can get a head start on your prep by checking out tips for delicious dessert inspiration over at Home Kitchen Secrets, but stick with me for the exact measurements for this pie!
Ingredient Notes and Substitutions for Your Oreo Pie
Preparation of your simple ingredients is crucial here, especially since this is a no-bake affair. Make sure those 8 ounces of cream cheese are fully softened, otherwise, you’ll get lumps in your filling—and nobody wants that! The Oreos need to be crushed finely; I mean dust fine, so they integrate perfectly into the crust and the filling. If you want to amp up the chocolate flavor in the pudding layer, remember that using cold chocolate milk instead of regular milk makes a fantastic difference, just like I mentioned in the recipe notes.
The Essential Ingredients for This Oreo Pie Recipe
Alright, let’s get down to brass tacks. You need the right components to make this dream come true. Since this version of the oreo pie relies on cold assembly, the quality and preparation of these ingredients are what make the texture sing. I suggest gathering these all before you start mixing—it keeps things smooth, reflecting my philosophy of efficiency in the kitchen. When you shop, remember that accessible ingredients are key to enjoying your meal!
If you want to see other baked treats alongside this no-bake wonder, I always point people toward my delicious dessert recipes. For now, here is exactly what you need to make this show-stopping oreo pie.
- 1 package (14.3 oz) Oreo cookies, finely crushed (that should give you about 3 cups of crumbs)
- 6 tablespoons unsalted butter, melted down until liquid
- 1 package (8 oz) cream cheese, softened beautifully on the counter first
- 1 cup powdered sugar, sifted if you can manage it
- 1 teaspoon vanilla extract
- 1 container (8 oz) frozen whipped topping (like Cool Whip), thawed completely
- 1 package (3.4 oz) instant pudding mix (either chocolate or vanilla works well here!)
- 1 1/2 cups cold milk (remember, chocolate milk makes the filling richer!)
- 1 cup heavy cream, nice and cold for whipping later
- 1/4 cup granulated sugar for that final topping
You can check out a similar short-list recipe idea over at Kathryn’s Kitchen, but these quantities are the ones I’ve tested for the perfect structure in our particular oreo pie.
Step-by-Step Instructions for the Best Oreo Pie Recipe
Now we move into the sweet spot—the actual building process. My goal here is always efficiency and flawless layering, which separates a good oreo pie from a spectacular one. Watch the timing on the chilling steps; they are non-negotiable for that clean slice later on. When following these steps, think about the harmony of textures we’re building. It’s a structured, yet simple process designed to fit perfectly into your busy schedule. If you need quick ideas for other main dishes to serve alongside this dessert, I keep a solid list of weeknight dinner recipes handy!
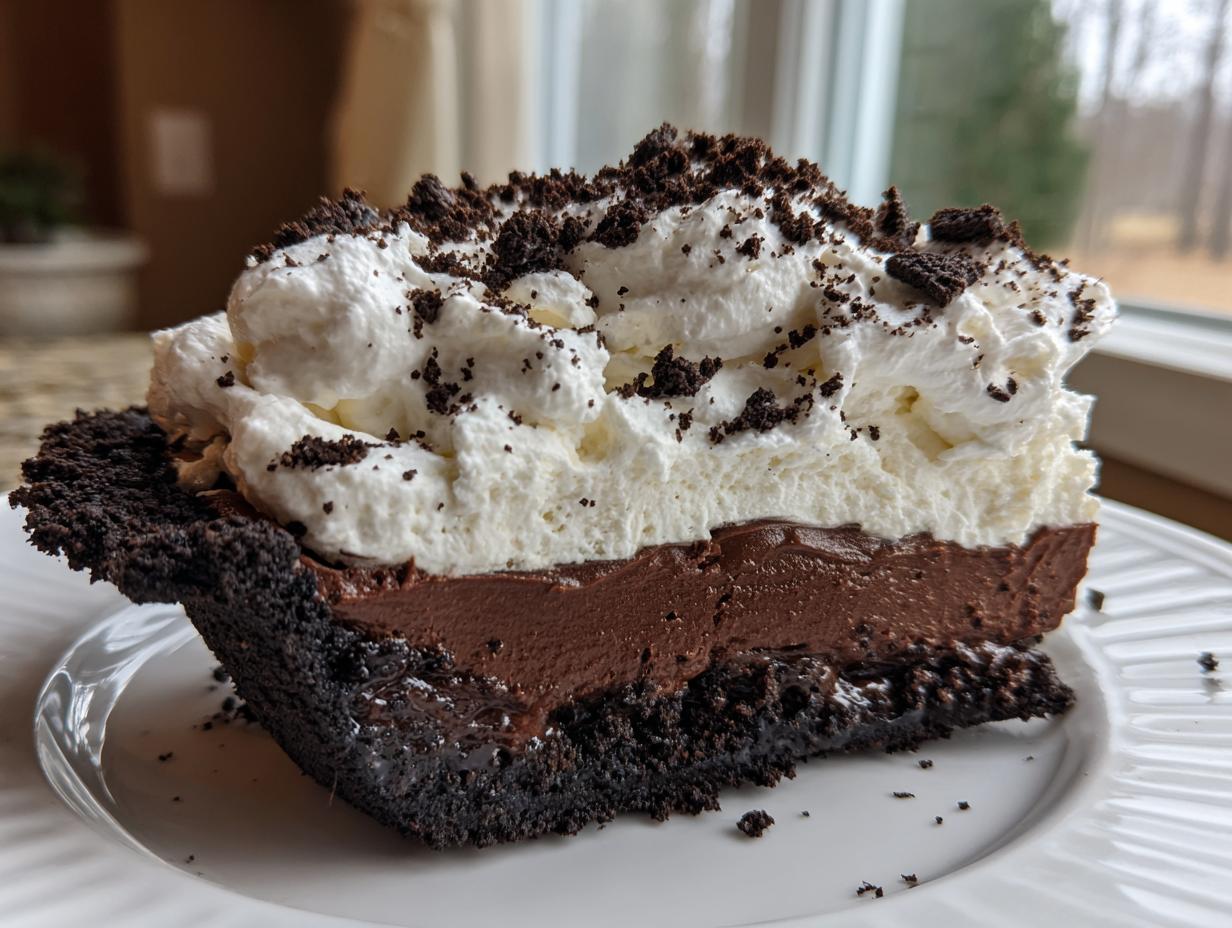
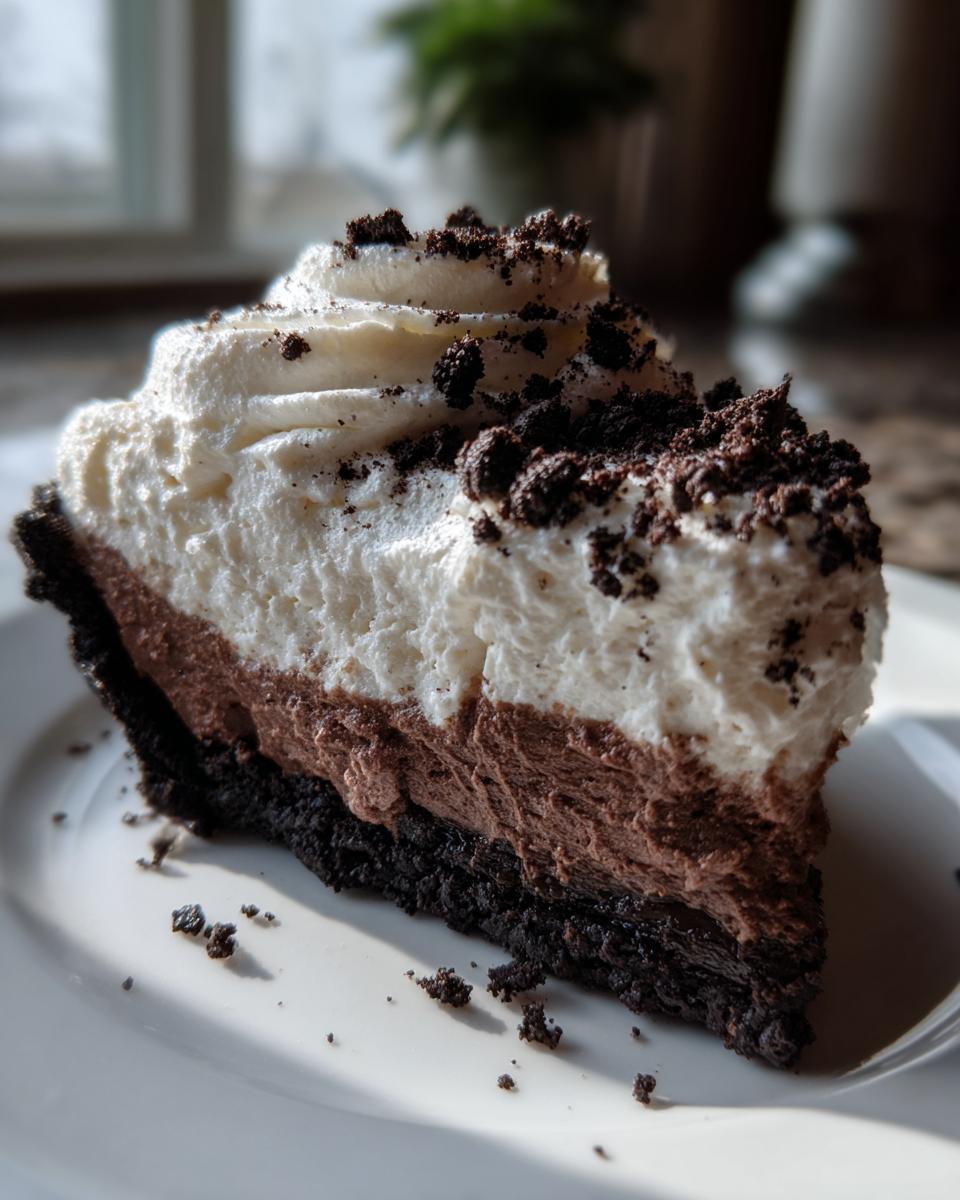
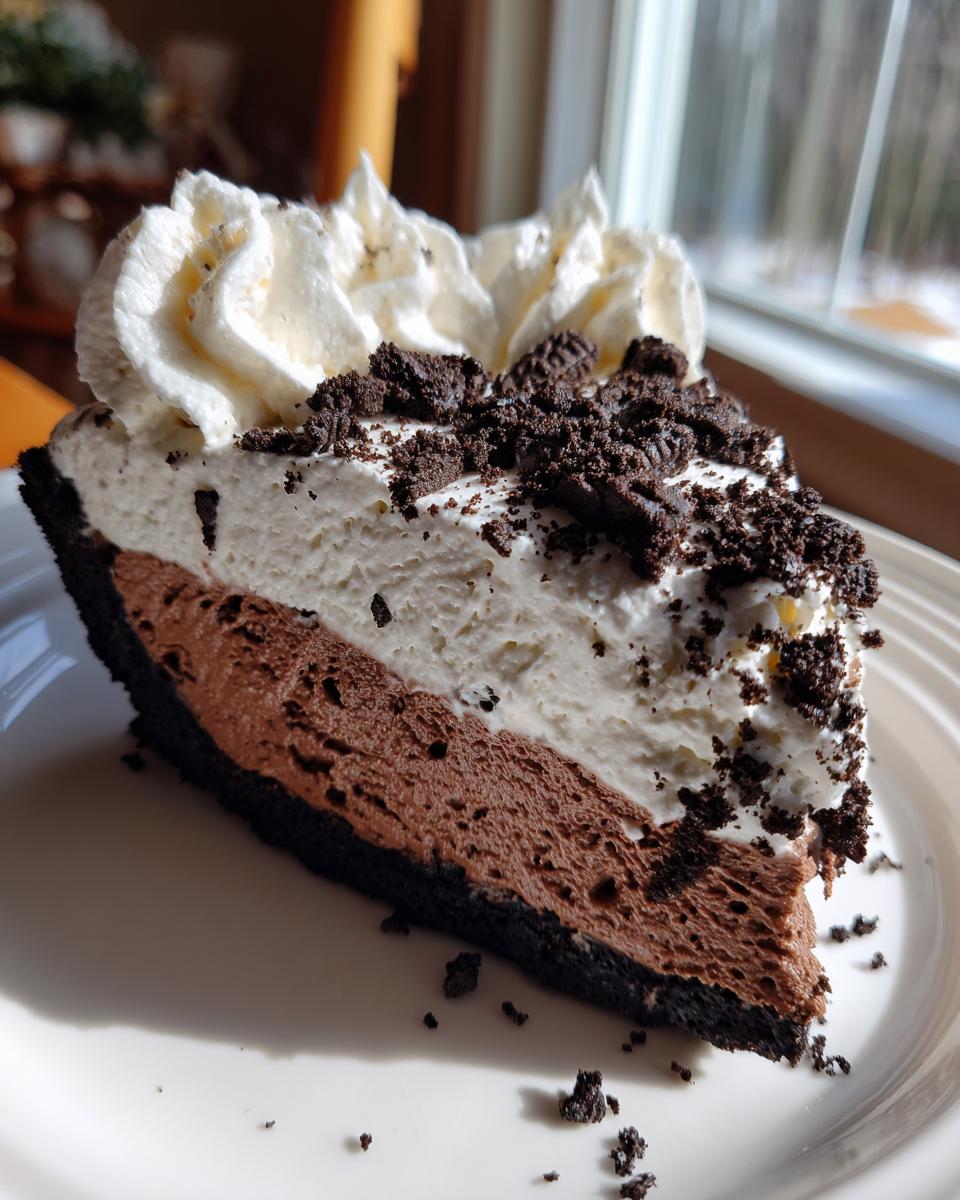
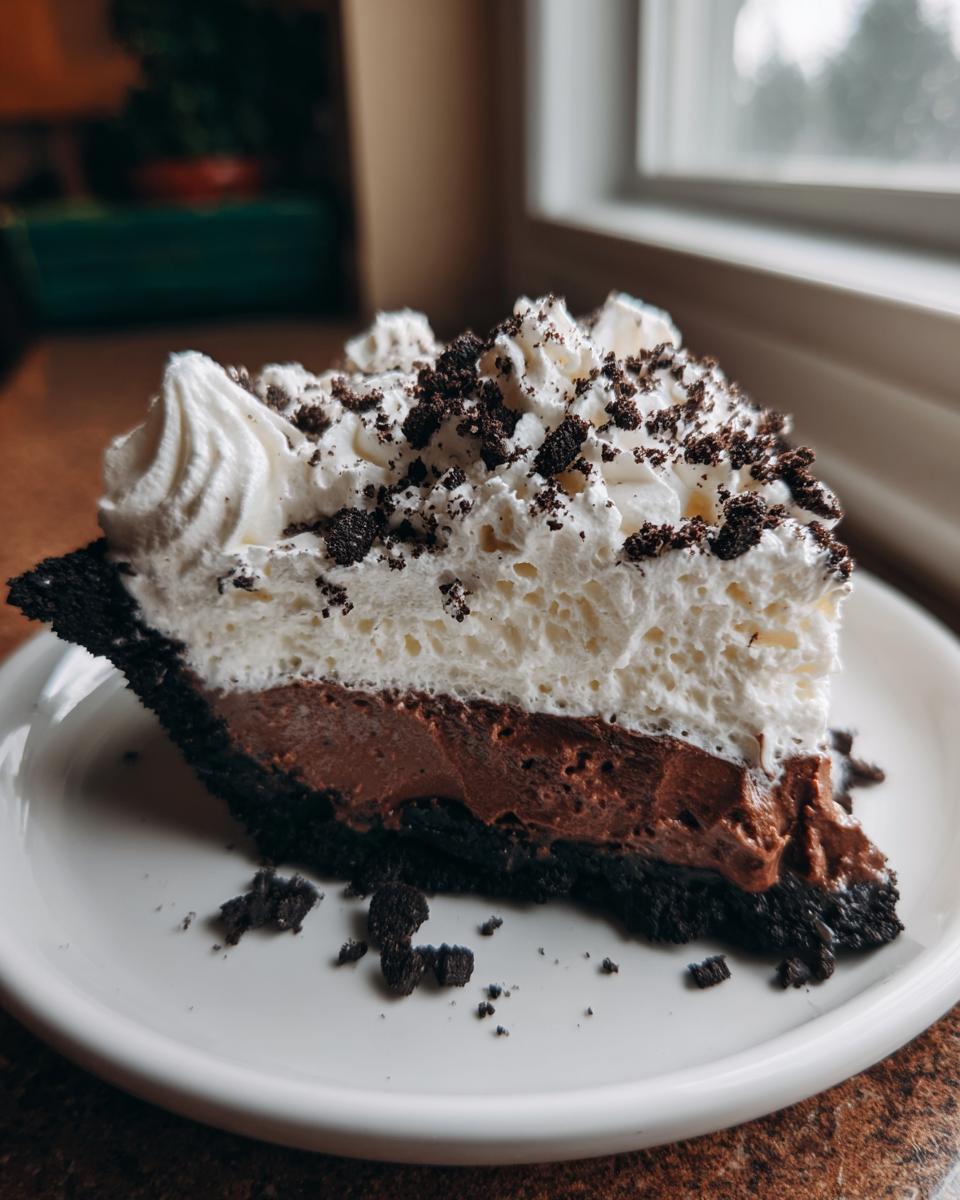
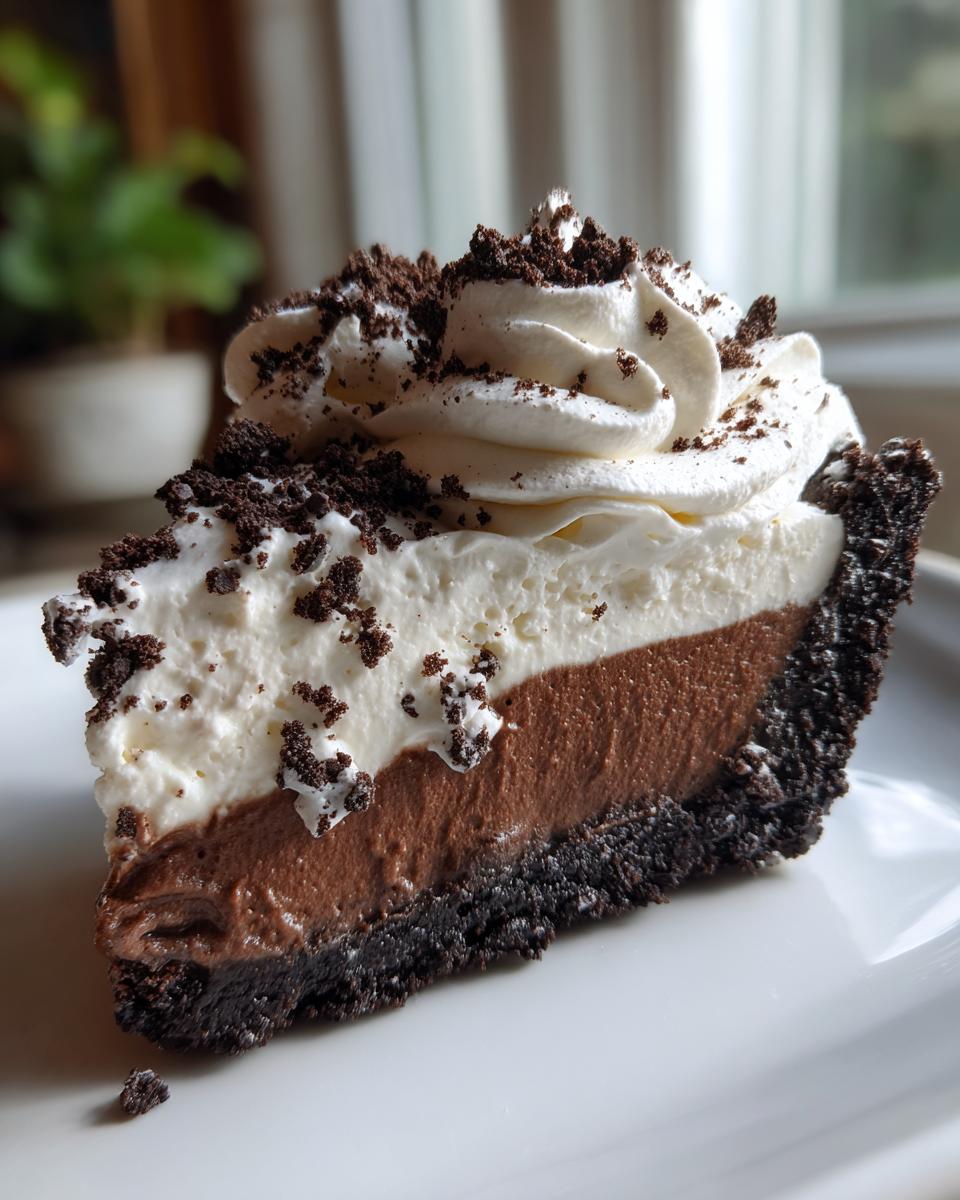
Building the Oreo Cookie Crust Foundation
First up, the crust! Mix those finely crushed Oreos with the melted butter until everything looks like wet sand. Then, use the bottom of a measuring cup to really pack it down firmly into a 9-inch pie plate. Once it’s tight, send that crust into the freezer straight away. We need it very cold while we start on the fillings, so give it at least 15 or 20 minutes in there.
Layering the Cream Cheese and Pudding Filling for Your Oreo Pie
Next, we create those two distinct, creamy layers. Get the cream cheese perfectly smooth before adding the sugar and vanilla. Then, gently fold in *half* of your thawed whipped topping—don’t stir too hard, we want it fluffy! Spread that base layer into the chilled crust. In a separate bowl, quickly whisk your pudding mix with the cold milk until it just starts to thicken, then fold in the *rest* of the whipped topping. Spoon that pudding mixture carefully on top of the cream cheese base. Don’t forget to check out the technique over at The First Year Blog for inspiration on texture!
After that second layer goes on, it’s crucial to cover it loosely and let the whole oreo pie chill in the fridge for a solid four hours. This chilling step sets everything up beautifully so it doesn’t collapse when you slice it.
Tips for Success Making Your No Bake Oreo Pie
Listen, I know the magic word here is “No Bake,” but that doesn’t mean we can skim on technique. If you want your oreo pie to set up like a dream, temperature control is everything. Make sure that cream cheese is actually soft—room temperature soft, not microwaved gooey! If it’s too cold, you risk lumps, and lumps ruin the harmony of the filling.
Also, when you are folding in the whipped topping and the final heavy cream topping, patience is your friend. Use a rubber spatula and cut down the middle, then scrape along the bottom and fold over. This keeps the air trapped inside, which is what gives you that light, mousse-like texture we’re aiming for. If you whip too aggressively, you deflate all that beautiful volume. A little care here ensures your oreo pie is the star of the show. You can find some great related ideas over at Joy Food Sunshine, but these folding techniques are what I’ve perfected in my own kitchen.
For great simple snack recipes to keep you going between big meals, check out what I put together on simple snack recipes.
Serving Suggestions for Your Simple Oreo Dessert
Once your gorgeous, chilled oreo pie is ready, presentation matters! Since this dessert is so rich and chocolatey, I love pairing it with something bright to cut through that sweetness. Fresh raspberries or sliced strawberries look stunning sprinkled right over the freshly whipped cream topping we make.
For an adult gathering, this pie is absolutely heavenly alongside a small cup of rich, dark coffee. If you want another stunning pairing recipe, I’ve poured a lot of love into my New Orleans Iced Coffee Creme Brulee, which has similar complementary notes! A simple dusting of cocoa powder right before serving also looks incredibly professional.
Storage and Making Ahead Tips for the Oreo Pie
Since this is a spectacular oreo pie that relies so heavily on that cold, fluffy texture, storage is pretty straightforward. You should absolutely make this ahead! It needs that minimum of four hours to set up properly, so I often make it the morning before a party or dinner.
Once it’s fully set and topped with that fresh whipped cream, cover it loosely with plastic wrap—don’t press it directly onto the whipped topping, though, or you’ll get condensation marks. It stays great in the fridge for about three days. Any longer and the crust starts to soften a bit too much for my liking. Unfortunately, I don’t recommend freezing this one after it’s assembled; the texture of the cream cheese and whipped topping doesn’t quite bounce back right after thawing.
For tips on storing other treats you bake, check out some advice linked from Build Your Bite, but for this pie, the fridge is your best friend. Enjoy that easy prep!
Frequently Asked Questions About This Oreo Pie
It’s totally normal to have a few questions when customizing a recipe, especially when it’s as much of a crowd-pleaser as this oreo pie! Since this is designed as a quick ‘No Chill Dessert,’ we want to make sure any tweaks still result in that perfect, simple texture. I’ve gathered the questions I get asked most often after people try this recipe for the first time.
Can I use a baked crust instead of a no-bake Oreo Pie crust?
You absolutely *could* bake the crust if you wanted to, but honestly, why bother? The whole beauty of this recipe is that it’s totally No Chill Dessert friendly, meaning you just mix the crumbs and butter and freeze it while you prep the filling. Baking it just adds an extra step and about 10 minutes of time that you don’t need! Keep it cold, keep it simple, and skip the oven entirely.
How do I make this a Chocolate Oreo Pie variation?
If you want to lean harder into that deep chocolate profile—and who wouldn’t?—making it a true Chocolate Oreo Pie is super easy. Just follow the directions in Step 3, but swap out the regular instant pudding mix for the chocolate flavor, and use cold chocolate milk instead of regular milk. That guarantees a richer, darker filling layer!
If you’re looking for other easy recipes to start your day before tackling dessert, I keep my favorites available on my easy breakfast recipes page.
Estimated Nutritional Data for One Slice of Oreo Pie
I always like to give everyone a heads-up on what’s in their slice, even though this is purely for general information. Since this oreo pie is assembled from different components—crust, cream cheese layer, pudding layer, and whipped topping—the exact numbers can swing a little based on your specific brands of Oreos or whipped topping. Remember, this is a symphony of indulgence, so we aren’t aiming for diet food here!
These figures are based on an 8-serving yield. I always say, judge by the happy faces around the table, not the calories!
- Serving Size: 1 slice
- Calories: 450
- Sugar: 35g
- Sodium: 310mg
- Fat: 28g
- Saturated Fat: 15g
- Carbohydrates: 48g
- Protein: 5g
Please keep in mind that these nutritional estimates are based on the ingredients listed above and should be treated as a general guideline only. They can vary slightly based on the specific products you purchase. Treat this delicious no-bake dessert as the wonderful celebration it is!
PrintEasy No Bake Oreo Cream Pie

Make this creamy, dreamy No Bake Oreo Pie. It uses few ingredients and sets quickly, making it a perfect, simple dessert for any gathering or weeknight treat.
- Prep Time: 25 min
- Cook Time: 0 min
- Total Time: 4 hr 25 min
- Yield: 8 servings 1x
- Category: Dessert
- Method: No Bake
- Cuisine: American
- Diet: Vegetarian
Ingredients
- 1 package (14.3 oz) Oreo cookies, finely crushed (about 3 cups crumbs)
- 6 tablespoons unsalted butter, melted
- 1 package (8 oz) cream cheese, softened
- 1 cup powdered sugar
- 1 teaspoon vanilla extract
- 1 container (8 oz) frozen whipped topping (like Cool Whip), thawed
- 1 package (3.4 oz) instant chocolate or vanilla pudding mix
- 1 1/2 cups cold milk (use chocolate milk for chocolate filling)
- 1 cup heavy cream, cold
- 1/4 cup granulated sugar
Instructions
- Prepare the crust: Combine the finely crushed Oreo cookies and melted butter in a bowl. Press the mixture firmly into the bottom and up the sides of a 9-inch pie plate. Place the crust in the freezer while you prepare the filling.
- Make the cream cheese layer: In a large bowl, beat the softened cream cheese until smooth. Gradually beat in the powdered sugar and vanilla extract until fully combined. Gently fold in half of the thawed whipped topping until just mixed. Spread this mixture evenly over the chilled Oreo crust.
- Prepare the pudding layer: In a separate medium bowl, whisk together the instant pudding mix and cold milk for about 2 minutes, until the mixture begins to thicken. Let it sit for 5 minutes. Gently fold the remaining half of the thawed whipped topping into the pudding mixture. Carefully spoon this filling over the cream cheese layer.
- Chill the pie: Cover the pie loosely with plastic wrap and refrigerate for at least 4 hours, or until the filling is firm. This step is crucial for a clean slice.
- Make the whipped topping: In a chilled bowl, beat the cold heavy cream and granulated sugar with an electric mixer until stiff peaks form.
- Assemble and serve: Once the pie is set, top it with the freshly whipped cream. Sprinkle the remaining Oreo cookie crumbs over the top for decoration. Slice and serve immediately, or return to the refrigerator until ready to serve.
Notes
- For a richer chocolate flavor, use chocolate instant pudding mix and cold chocolate milk in step 3.
- If you want a thicker, more indulgent pie, consider adding a layer of chocolate ganache between the cream cheese layer and the pudding layer.
- This pie tastes best when served cold, straight from the refrigerator.
Nutrition
- Serving Size: 1 slice
- Calories: 450
- Sugar: 35g
- Sodium: 310mg
- Fat: 28g
- Saturated Fat: 15g
- Unsaturated Fat: 13g
- Trans Fat: 0.5g
- Carbohydrates: 48g
- Fiber: 1g
- Protein: 5g
- Cholesterol: 35mg