
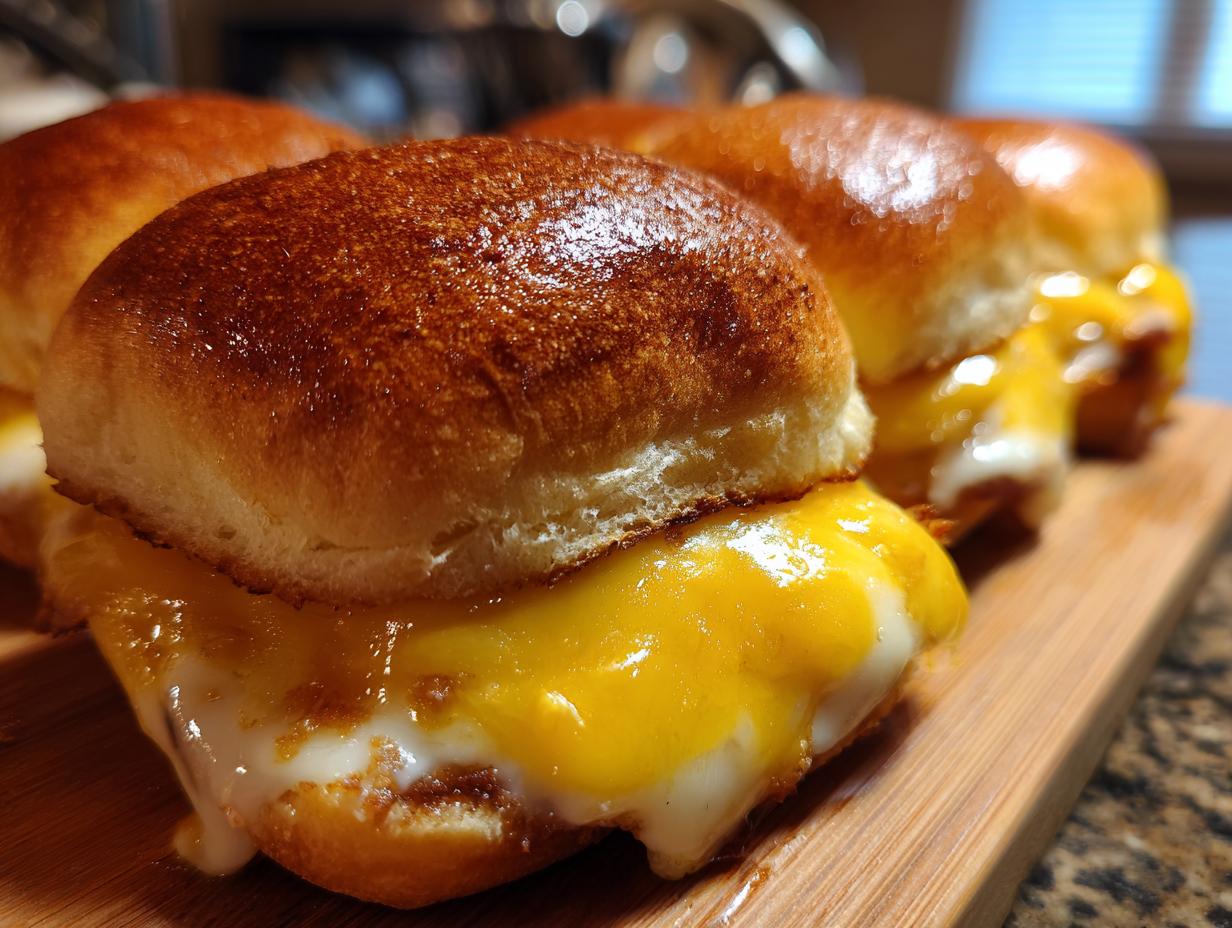
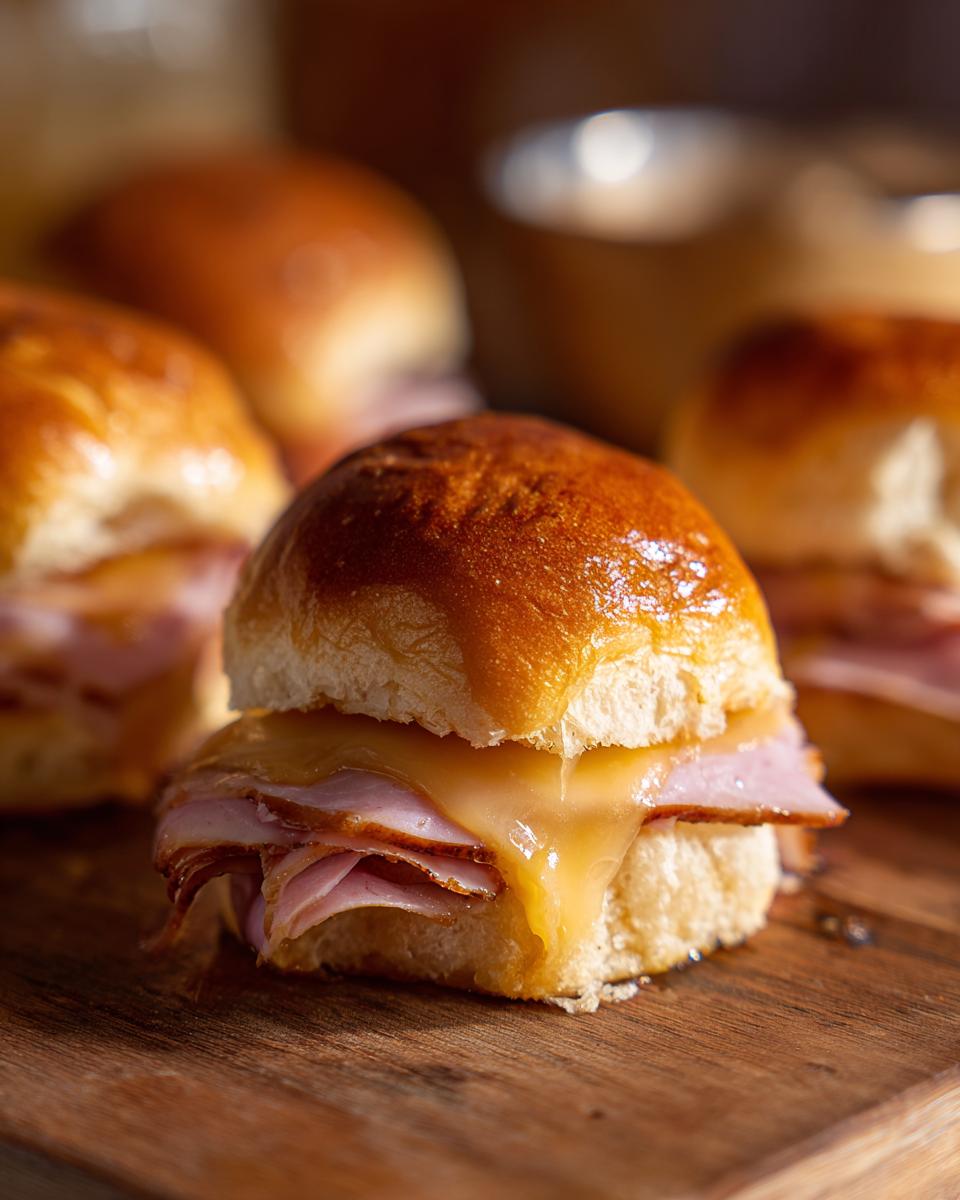
Oh my goodness, you HAVE to try these Ham and Cheese Sliders! Seriously, they’re like little pockets of pure joy baked up on those sweet Hawaiian rolls. I’m talking the perfect combo of a little sweet from the rolls, savory ham, melty Swiss cheese, all tied together with this incredible buttery mustard glaze. It’s the kind of food that just makes people happy and brings everyone to the table, just like my buddy Michael Carter talks about on the Delish Symphony About page where he shares his philosophy. He knows how to make simple, accessible food taste absolutely amazing, and these sliders are proof! They’re my absolute go-to when I need something easy but guaranteed to be a massive hit at any party. Trust me, one bite and you’ll see why.
- Why You'll Love These Ham and Cheese Sliders
- Ingredients for Perfect Ham and Cheese Sliders
- How to Make Ham and Cheese Sliders: Step-by-Step
- Tips for Making the Best Ham and Cheese Sliders
- Make-Ahead and Storage for Party Sandwiches
- Variations for Your Ham and Cheese Sliders
- Frequently Asked Questions About Ham and Cheese Sliders
- Nutritional Information for Ham and Cheese Sliders
- Share Your Ham and Cheese Slider Creations!
Why You’ll Love These Ham and Cheese Sliders
You’re going to be obsessed with these sliders, trust me! Here’s why:
- Super Easy to Make: Seriously, you can whip these up in no time, even if you’re not a kitchen whiz.
- Always a Crowd-Pleaser: Who doesn’t love ooey-gooey cheese and savory ham on sweet rolls? Everyone devours them!
- Make-Ahead Magic: Assemble them ahead of time for parties or tailgates and just bake them when you’re ready. Talk about stress-free!
- Unbeatable Flavor: That buttery, slightly tangy glaze on top? It’s the secret ingredient that takes these from good to absolutely incredible.
Ingredients for Perfect Ham and Cheese Sliders
Okay, let’s talk about what makes these little guys sing! It’s really all about good ingredients that come together just right. You don’t need anything fancy, just the good stuff!
- 1 (12-count) package Hawaiian rolls – These are the secret to that perfect blend of sweet and savory. So fluffy!
- 12 slices deli ham – Get your favorite kind! I love a good honey ham, but whatever ticks your box works great.
- 12 slices Swiss cheese – Swiss is just classic with ham, right? It gets so melty and delicious.
- 1/2 cup (1 stick) unsalted butter – This is for that amazing glaze on top. Melted, of course!
- 1 tablespoon Dijon mustard – This gives the glaze a little kick and makes it super flavorful.
- 1 teaspoon Worcestershire sauce – Just a splash for a little depth of flavor.
- 1/2 teaspoon garlic powder – Because, garlic!
- 1/4 teaspoon onion powder – Another little flavor booster that really makes a difference.
- Salt and black pepper to taste – Just a pinch to finish the glaze off perfectly.
How to Make Ham and Cheese Sliders: Step-by-Step
Alright, buckle up, because making these amazing ham and cheese sliders is honestly the easiest part! It feels fancy, but really, it’s just a few simple steps to gooey, cheesy perfection. We’re gonna make these bad boys shine!
Preparing the Hawaiian Roll Sliders
First things first, hop on over and preheat your oven to 350°F (175°C). While it’s doing its thing, grab your package of Hawaiian rolls. You’ll want to slice that whole block of rolls in half horizontally – like you’re giving them a little haircut. Be brave! Next, layer half the ham right onto the bottom half of your rolls, followed by half the Swiss cheese. Pop the rest of the ham and cheese on top of that. Then, just place the top halves of the rolls right back on, like you’re tucking them in!
Crafting the Buttery Mustard Glaze
Now for the magic sauce! Grab a small saucepan and melt that glorious butter over medium heat. Once it’s all liquid gold, whisk in the Dijon mustard – that’s what gives it that yummy tang! Then, add in your Worcestershire sauce (just a little bit for depth!), the garlic powder, and the onion powder. Give it all a good whisk for like, a minute, just until everything is happy and combined. A little pinch of salt and pepper to taste, and you’ve got yourself a glaze that is going to make these sliders sing!
Baking and Serving Your Baked Sliders
Time to bring it all together! Gently, and I mean gently, pour that buttery glaze all over the tops of the sliders. Try to get it on all those rolls! Then, cover the pan really well with foil. We want all that steam to work its magic and melt that cheese to perfection. Pop them in the oven for about 15-20 minutes. You want them hot through and the cheese super melty. For the ultimate pull-apart experience, use a serrated knife to carefully cut through the whole thing. It’ll slice like a dream and make serving SO easy!

Tips for Making the Best Ham and Cheese Sliders
Alright, let’s talk about making these sliders absolutely legendary! I’ve made these more times than I can count, and I’ve picked up a few little tricks that really make them shine. It’s mostly about paying attention to a couple of key details, and honestly, it’s not complicated at all!
First off, ingredient quality really does matter here. For the ham? Go for something good quality, like a honey-baked or smoked deli ham. It makes a HUGE difference in flavor compared to the really thin, watery stuff. And the cheese! While Swiss is classic, don’t be afraid to mix it up. I’ve used sharp cheddar, provolone, or even a nice Monterey Jack, and they were all fantastic. For the glaze, make sure your butter isn’t boiling hot when you add the Dijon; you just want it melted and warm so it blends in smoothly without cooking the mustard weirdly. And for the love of all that is cheesy, don’t skip that Worcestershire sauce! It adds this amazing little depth that you just can’t pinpoint but makes everything taste so much better.

Make-Ahead and Storage for Party Sandwiches
Okay, here’s the best part about these awesome ham and cheese sliders: you can totally prep them ahead of time! This is a lifesaver when you’re hosting or heading to a potluck. Just follow the assembly steps (up to placing the top halves of the rolls on), cover them tightly with plastic wrap, and pop them in the fridge. They’ll be good for up to 24 hours. When you’re ready to bake, you might need to add a couple of extra minutes to the baking time since they’ll be chilled. Just keep an eye on that cheese getting all melty and bubbly!
Got leftovers? Lucky you! Let them cool a bit, then store any extras in an airtight container. You can reheat them in a low oven (around 300°F or 150°C) for about 10 minutes until they’re warm and gooey again.
Variations for Your Ham and Cheese Sliders
You know, part of the fun of these sliders is that they’re just a *starting point* for deliciousness! If you’re feeling adventurous, or just want to mix things up, here are a few ways I love to switch ’em up. Don’t be afraid to play around!
For the cheese lovers out there, swap out the Swiss for some sharp cheddar, creamy Monterey Jack, or even a slice of provolone. If you’re tired of ham, try turkey or roast beef – they’re surprisingly good in here! And for a little something extra, maybe a sprinkle of finely chopped pickles or a few thin slices of red onion under the cheese? So good! And while Hawaiian rolls are my absolute favorite for that sweet-tart thing, I’ve even seen people use brioche rolls with great results.

Frequently Asked Questions About Ham and Cheese Sliders
Got questions about these ridiculously easy and delicious ham and cheese sliders? I’ve got you covered! These little guys are so popular, I get asked about them all the time. Let’s dive in!
Can I use a different type of bread for these sliders?
Absolutely! While Hawaiian rolls are my absolute favorite because of that touch of sweetness that just *works* with the ham and cheese, feel free to try other soft rolls. Brioche rolls or even slider buns would be delicious too! Just make sure they’re soft enough to slice easily.
How do I prevent the rolls from getting soggy?
This is a super common worry, but honestly, these sliders are pretty forgiving! The key is not to over-soak them with the glaze. Pour it evenly, but don’t let them sit in a puddle of butter. Also, if you’re assembling them ahead of time, keep them covered tightly in the fridge. Baking them covered for most of the time helps too, trapping the steam inside the rolls, which keeps them moist but not soggy. If you like them a little crispier on top, just pop the foil off for the last 5 minutes of baking!
Are these sliders good for game day?
Are you kidding me? These sliders were practically *made* for game day! They’re hands-off once they’re in the oven, super easy to eat while you’re cheering on your team, and everyone absolutely devours them. Plus, the make-ahead part means you’re not stuck in the kitchen when the kickoff is happening. Total game day game-changer, if you ask me!
Can I add other ingredients to these sliders?
For sure! Get creative! A lot of people love adding a thin slice of pickle under the cheese, or even some caramelized onions. Some folks even add a different deli meat like turkey or roast beef. Just make sure whatever you add is relatively thin so the sliders still stack nicely and bake evenly.
Nutritional Information for Ham and Cheese Sliders
Alright, let’s talk about what’s going into these little flavor bombs! Keep in mind, these numbers are just an estimate, you know? They can totally change depending on the exact brands you use and, of course, how much of that glorious glaze you slather on top. But for one slider, you’re generally looking at around 350 calories, about 18g of fat (with 8g being saturated), and a good 15g of protein to keep you going. Perfect for game day or any party!
Share Your Ham and Cheese Slider Creations!
Alright, now that you’ve (hopefully!) made these amazing ham and cheese sliders, I’d absolutely LOVE to hear all about it! Did you make them for a party, game day, or just a Tuesday night (no judgment here!)? Let me know in the comments below – your feedback is super helpful! And if you snapped some pics of your glorious slider creations, tag us on social media. We’re always looking for inspiration and it just makes my day to see your delicious masterpieces! If you have any questions or just want to share your thoughts, you can always reach out via our contact page too!
PrintHam and Cheese Sliders

Easy ham and cheese sliders baked on Hawaiian rolls with a buttery mustard glaze. Perfect for parties, tailgates, or any gathering.
- Prep Time: 15 min
- Cook Time: 20 min
- Total Time: 35 min
- Yield: 12 sliders 1x
- Category: Appetizer
- Method: Baking
- Cuisine: American
- Diet: Vegetarian
Ingredients
- 1 (12-count) package Hawaiian rolls
- 12 slices deli ham
- 12 slices Swiss cheese
- 1/2 cup (1 stick) unsalted butter
- 1 tablespoon Dijon mustard
- 1 teaspoon Worcestershire sauce
- 1/2 teaspoon garlic powder
- 1/4 teaspoon onion powder
- Salt and black pepper to taste
Instructions
- Preheat your oven to 350°F (175°C).
- Slice the Hawaiian rolls in half horizontally.
- Layer 6 slices of ham and 6 slices of Swiss cheese on the bottom halves of the rolls.
- Top with the remaining 6 slices of ham and 6 slices of Swiss cheese.
- Place the top halves of the rolls over the cheese and ham.
- In a small saucepan, melt the butter over medium heat.
- Whisk in the Dijon mustard, Worcestershire sauce, garlic powder, onion powder, salt, and pepper. Cook for 1 minute until combined.
- Pour the butter mixture evenly over the tops of the sliders.
- Cover the sliders tightly with foil.
- Bake for 15-20 minutes, or until the cheese is melted and the rolls are heated through.
- For easy slicing, use a serrated knife to cut through the sliders.
Notes
- You can assemble these sliders ahead of time and refrigerate them for up to 24 hours before baking.
- For a crispier top, remove the foil during the last 5 minutes of baking.
- Add other deli meats or cheeses as desired.
Nutrition
- Serving Size: 1 slider
- Calories: 350
- Sugar: 6g
- Sodium: 800mg
- Fat: 18g
- Saturated Fat: 8g
- Unsaturated Fat: 10g
- Trans Fat: 0g
- Carbohydrates: 30g
- Fiber: 1g
- Protein: 15g
- Cholesterol: 50mg