
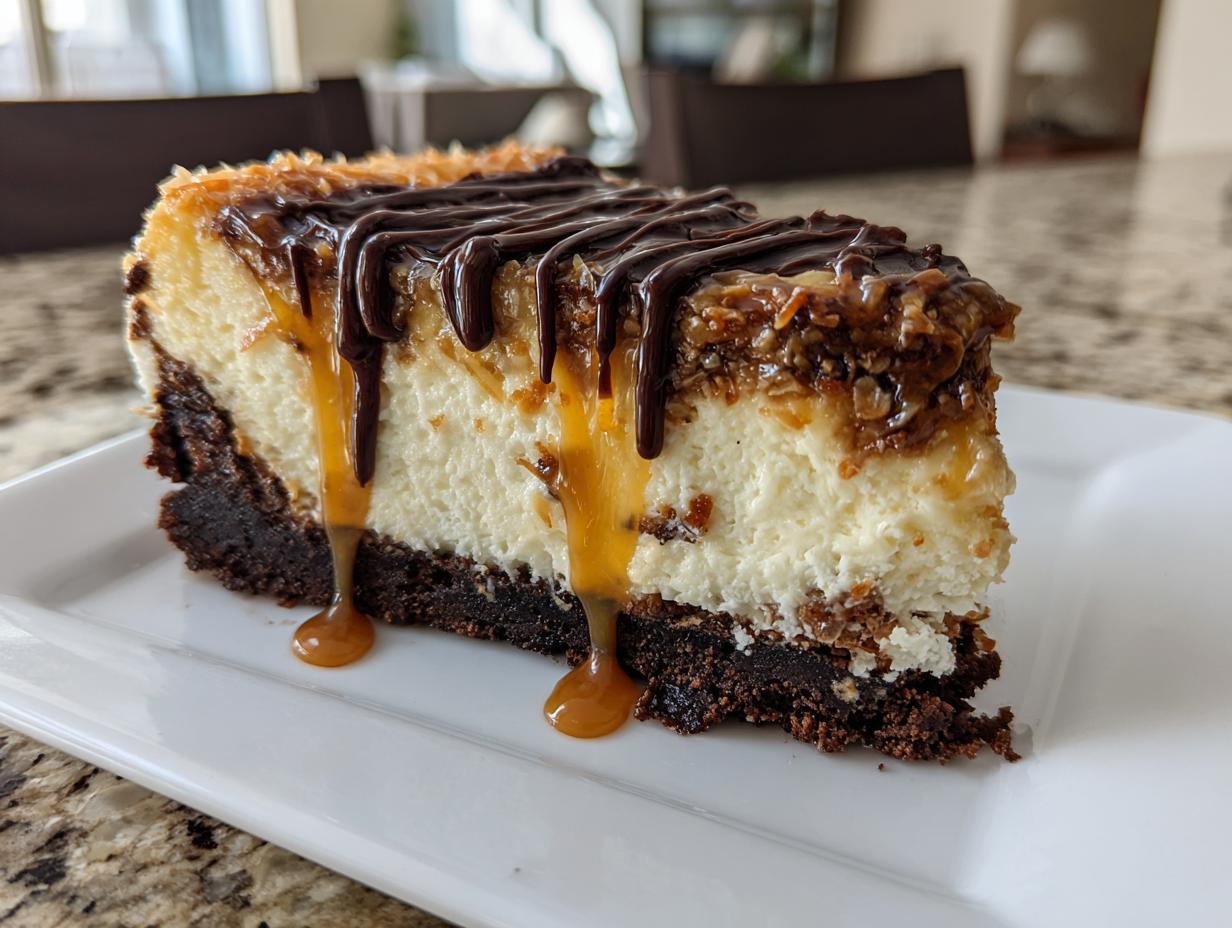
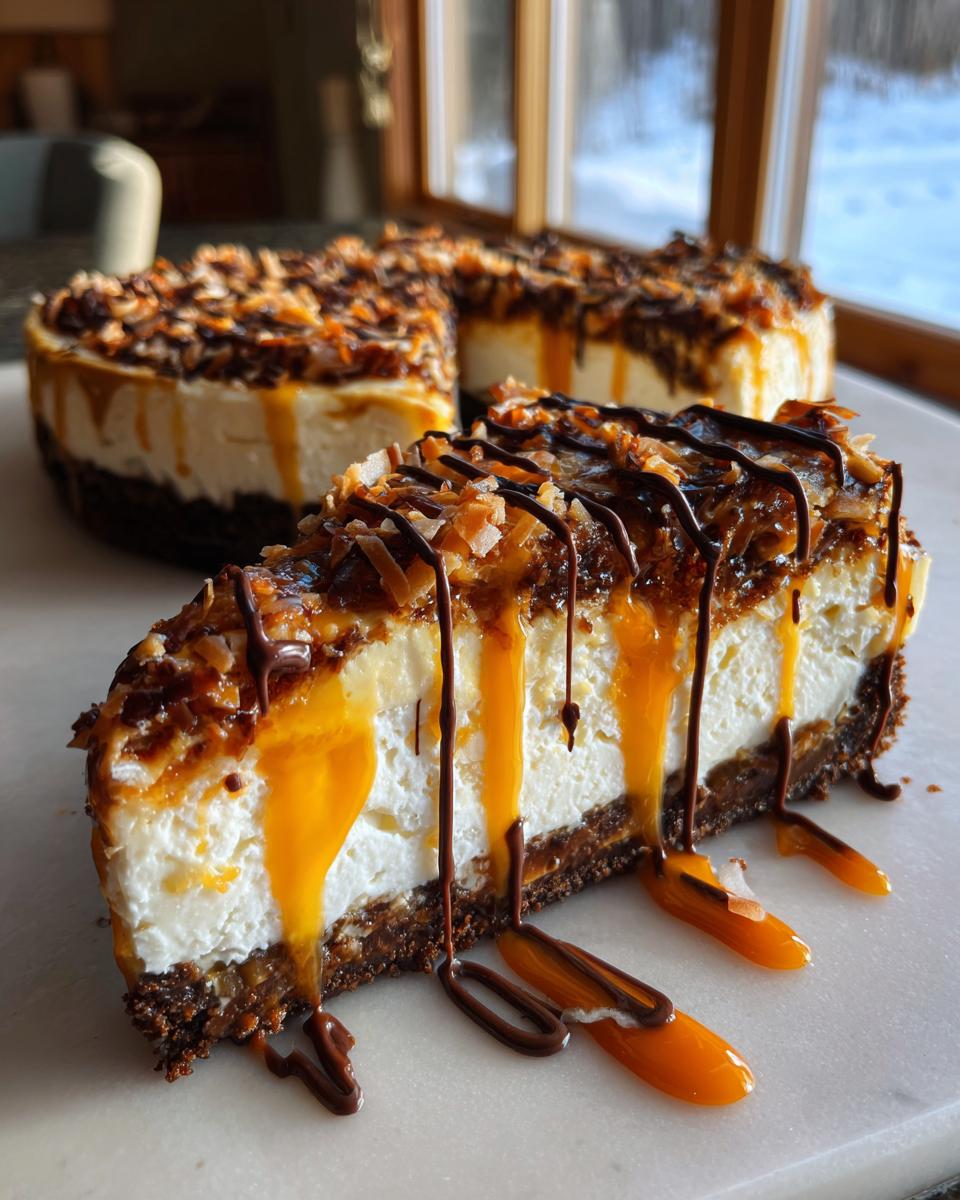
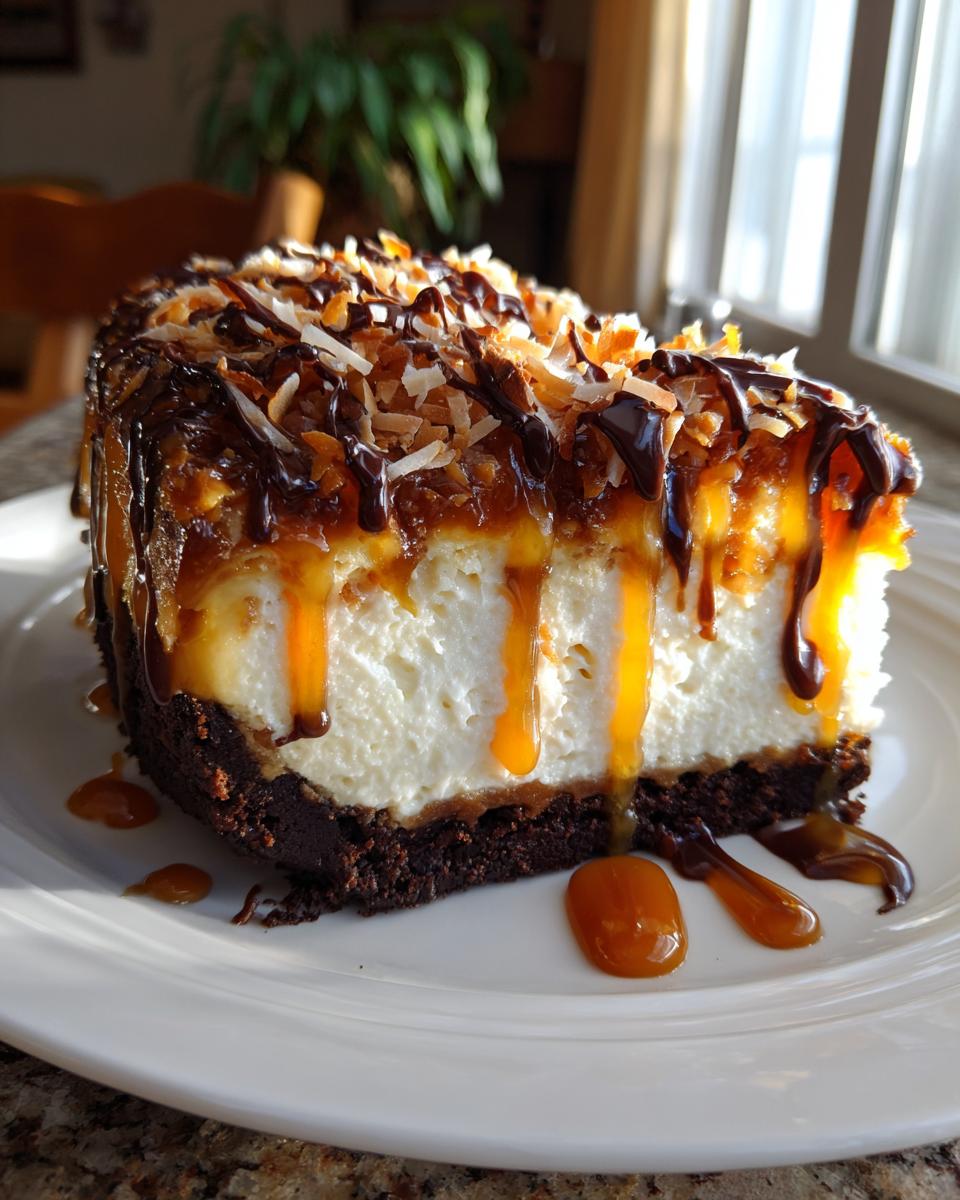
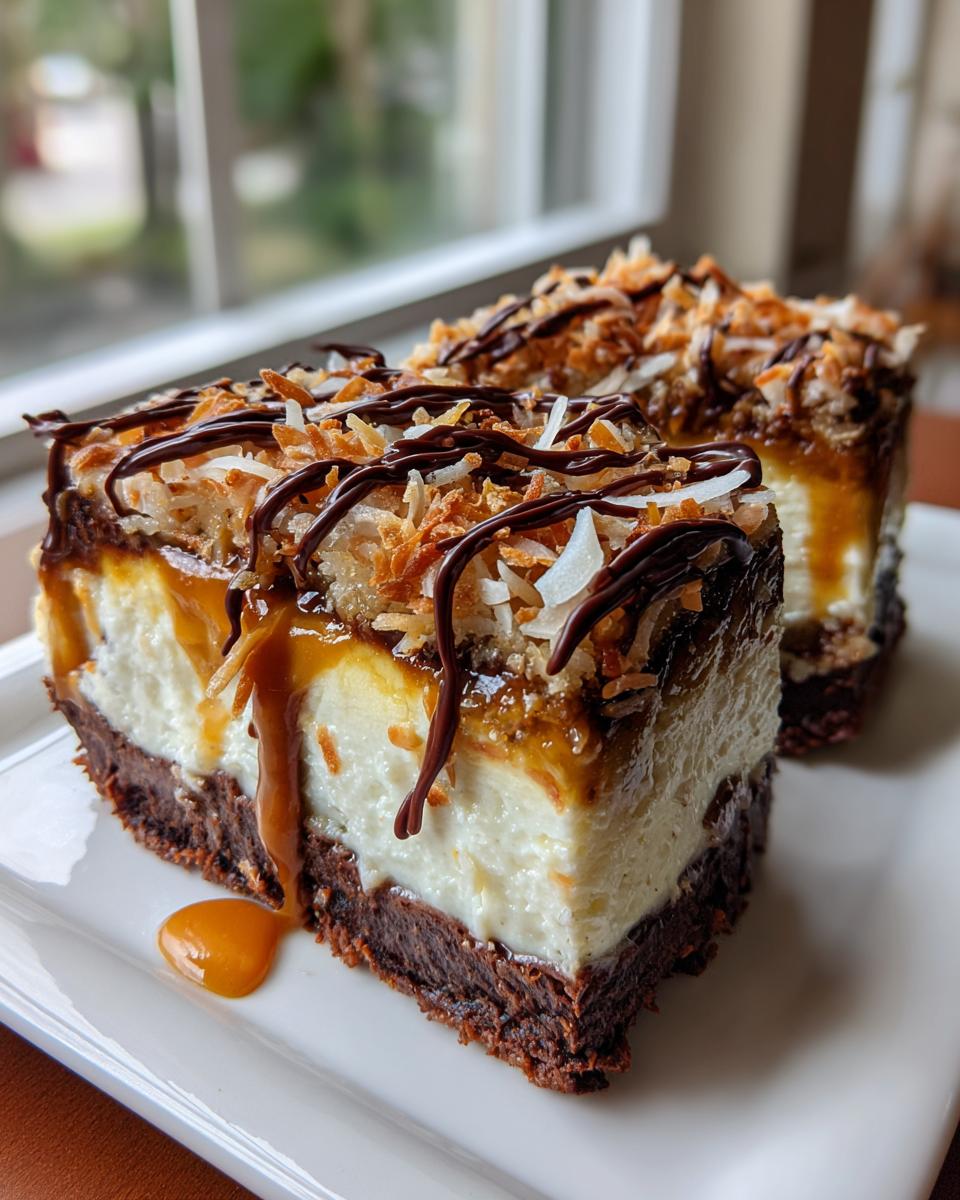
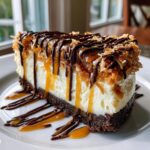
Sometimes, we just need a dessert that completely pulls out all the stops, right? We need something decadent, layered, and unapologetically sweet. That’s exactly what we are making today! I’m thrilled to share my recipe for the ultimate indulgence: the **Samoa Cheesecake**. This isn’t just any cheesecake; it’s the complex harmony of your favorite Girl Scout cookie—that amazing toasted coconut, the gooey caramel, and that little hint of dark chocolate—all sitting atop the creamiest cheesecake base imaginable. It takes a little TLC, but trust me, Michael Carter designed this recipe to be a foolproof way for you to create a breathtaking showstopper right in your home kitchen. If you’re looking for more recipes that hit those sweet, indulgent notes, be sure to check out my full collection of delicious dessert recipes. It’s ready to become your new favorite centerpiece for any celebration!
- Why This Decadent Samoa Cheesecake Recipe is a Showstopper
- Gathering Ingredients for Your Samoa Cheesecake
- Step-by-Step Instructions for the Baked Samoa Cheesecake
- Tips for the Perfect Samoa Cheesecake Texture
- Variations on the Classic Samoa Cheesecake
- Storing and Serving Your Caramel Coconut Cheesecake
- Frequently Asked Questions About Samoa Dessert
- Estimated Nutritional Breakdown for This Samoa Cheesecake Recipe
- Share Your Samoa Dessert Creations
Why This Decadent Samoa Cheesecake Recipe is a Showstopper
You need a dessert that looks like it took days of effort but actually followed a straightforward plan. That’s where this **Decadent Cheesecake Recipe** shines! It’s the best of both worlds, baby.
Here’s why I know you are going to love making this:
- Flavor Fusion: We nail that perfect sweet-and-salty balance, blending rich cream cheese with bold caramel and toasted coconut.
- Texture Contrast: That ultra-smooth, creamy filling meets a satisfyingly crunchy chocolate crust and chewy toasted topping. It’s a textural party!
- Visual Appeal: Honestly, this is one of the best Showstopper Desserts for Parties you can put out. Drizzled chocolate and golden caramel just look incredible when you slice into it.
- Reliability: I’ve worked out the kinks, especially with the water bath, so you get that flawless, crack-free surface every single time.
Gathering Ingredients for Your Samoa Cheesecake
Okay, now for the fun part: assembling our team of ingredients! Remember, with a truly Decadent Cheesecake Recipe like this, quality matters, especially in the dairy department. You absolutely must use full-fat, softened cream cheese here. Don’t try to sneak in any light cream cheese; we need that luxurious texture, and that only comes from the real deal!
For the Chocolate Cookie Crust
We want that classic, dark, satisfying base that echoes the bottom of the cookie. Get these simple elements ready:
- One and a half cups of chocolate wafer crumbs—that’s usually about 30 cookies, finely crushed.
- A quarter cup of granulated sugar.
- Six tablespoons of unsalted butter, melted down until smooth.
For the Creamy Cheesecake Filling
This is where the magic happens, so make sure that cream cheese and those three large eggs have been sitting out on the counter for at least an hour. Room temperature is non-negotiable, my friends, or you’ll get lumps instead of a smooth symphony!
- Three (8 ounce) packages of softened cream cheese.
- One and a half cups of granulated sugar.
- One teaspoon of pure vanilla extract—none of that imitation stuff!
- A quarter teaspoon of salt to balance everything out.
- Three large eggs, added one at a time.
- Half a cup of heavy cream.
For the Caramel Coconut Topping and Drizzle
This is the Samoas signature flair. We divide that caramel sauce—half goes into the layering, and half stays out for the gorgeous drizzle on top. Be sure your coconut is nice and toasted!
- One cup of caramel sauce, divided (half for swirling, half for topping).
- One cup of sweetened flaked coconut, toasted until golden brown.
- One half cup of semi-sweet chocolate chips.
- One tablespoon of coconut oil, which helps make that chocolate drizzle silky smooth.
Step-by-Step Instructions for the Baked Samoa Cheesecake
Alright, listen close, because this baking process is what separates a good cheesecake from a spectacular one. Don’t panic about the water bath; it’s just our insurance policy against cracks. We’re aiming for that rich, creamy texture that makes this **Samoa Cheesecake** so famous. And when you’re done, make sure you go check out my method for classic apple crisp recipe—it uses a similar gentle baking philosophy!
Preparing the Crust and Preheating
First things first, let’s get that oven humming at 325 degrees Fahrenheit. You need to wrap the bottom and sides of your 9-inch springform pan super tight in heavy-duty aluminum foil. Seriously, double wrap it! We don’t want any rogue water seeping in during the bath.
Now, mix up those chocolate wafer crumbs with the quarter cup of sugar and the melted butter until everything looks like damp sand. Press it down firmly into the bottom of that prepared pan. We’re going to bake this crust for just 10 minutes until it sets up nicely. Let it cool while you focus on the filling.
Mixing the Creamy Cheesecake Batter
I know those ingredients were sitting out at room temperature, so now we mix! Start by whipping that softened cream cheese with the 1 1/2 cups of sugar, your vanilla extract, and the salt until it’s perfectly smooth—scrape those sides down!
Next, this is important: beat in the eggs one at a time. You want each egg just barely incorporated before you add the next one. If you beat too long here, you introduce too much air, and that leads to cracks later. Finally, gently mix in the heavy cream until the batter looks uniform—stop mixing as soon as that happens, okay?
Baking the Samoa Cheesecake in a Water Bath
Time for the gentle bake! Set your foil-wrapped springform pan inside a larger roasting pan. Carefully pour hot water into that larger pan until it comes about halfway up the sides of the cheesecake pan. This water bath keeps the heat even and humid.
Bake this gorgeous thing for 60 to 75 minutes. You’re looking for the edges to be firm, but the very center should still have a tiny wobble, like Jell-O. When those 75 minutes are up, turn the oven OFF, crack the door open just a bit, and let the cheesecake hang out in that warm environment for a full hour. This slow cooling prevents that dramatic temperature shock that causes cracking. After an hour, take it out of the water bath and let it finish cooling on the rack.

Applying the Caramel Coconut Topping
Now comes the waiting game! You HAVE to chill this thing for at least 6 hours, but honestly, if you can resist the urge and let it rest overnight, that’s when the texture really solidifies. Perfection takes patience!
Once it’s chilled, sprinkle over that toasted coconut topping. Drizzle half of your saved caramel sauce right over that. For the final touch, melt the chocolate chips with that tablespoon of coconut oil—the oil keeps it from seizing up and makes it weep down the sides beautifully! Drizzle that sweet, smooth chocolate over everything. Once you release the sides of the pan, it’s ready to serve cold!
Tips for the Perfect Samoa Cheesecake Texture
Look, I know cheesecake sounds fussy, but getting that incredible, melt-in-your-mouth texture—the secret to all the Best Cheesecake Recipes—really just comes down to temperature control and being gentle.
The absolute number one tip for preventing cracks? That water bath we used! It keeps the humidity high, so the cheesecake bakes evenly without drying out the edges too fast. Pair that with the slow cool-down inside the turned-off oven, and you’re golden.
Also, remember what I said about the ingredients? If your cream cheese is cold or your eggs are straight from the fridge, your batter will be lumpy, no matter how long you mix it. Give those dairy and egg items a solid hour on the counter before you even think about turning the mixer on. That ensures a silky smooth filling before we even worry about the caramel swirl!
Variations on the Classic Samoa Cheesecake
While I absolutely stand by this baked version—it gives you that perfect firm, creamy middle for the caramel to swirl into—I know sometimes you need an option that skips the oven altogether. We all have those emergency dessert nights, right? Don’t worry, we can spin this **Samoa Cheesecake** into something equally delicious.
If you look at the notes on the recipe card, I included a little secret for making a No Bake Cheesecake Variations option. This is perfect for summer or when you just don’t want the oven on! For the no-bake version, you skip the eggs and heavy cream entirely. Instead, once your chocolate crust is set, you fold in about a cup of whipped topping (Cool Whip works great here) into your cream cheese mixture. It chills up beautifully without baking!
You can also play around with the foundation of the whole thing. If you aren’t feeling the chocolate cookie wafer foundation, feel free to substitute those crumbs for graham cracker crumbs. Just use the same amount of butter and sugar! It gives you a slightly lighter base that lets the coconut and caramel flavors really dominate.
And for the topping? Feel free to swap out semi-sweet chips for dark chocolate if you like a sharper contrast against all that sweetness. Maybe even add a tiny pinch of sea salt right onto the final chocolate drizzle for an extra salty-sweet punch. It’s your symphony, so feel free to conduct it your way!
Storing and Serving Your Caramel Coconut Cheesecake
Making a beautiful, layered dessert like this amazing Caramel Coconut Cheesecake is an achievement, and you want to make sure you enjoy it perfectly later on! The absolute best way to serve this is cold, straight from the fridge. Cheesecake textures are designed to be dense, creamy, and cool, so resist the urge to let it sit out on the counter for too long.
When it comes to storage, keeping it covered is the name of the game. Since we have that lovely sticky topping of caramel and chocolate, we definitely want to protect it from drying out or picking up any weird fridge smells. I usually use the springform ring for the first day or so—just remove the outer ring and cover the top edge with plastic wrap or aluminum foil that you tent slightly so it doesn’t stick to the beautiful drizzle.
For longer storage, like if you are making this ahead for a massive holiday gathering, you can tuck it into an airtight container. It keeps beautifully in the refrigerator for up to five days. Seriously, the longer it sits and chills, that creamy coconut flavor just deepens!
Now, here’s the big warning: cheesecake does not reheat well at all. The texture will just turn soupy and sad. So, always serve this cold. If you must bring it to room temperature for easier slicing—which I totally recommend for cleaner cuts by the way—let it sit out for just 15 to 20 minutes before you run that warm knife around the edge. Enjoy those ridiculously Creamy Coconut Desserts!
Frequently Asked Questions About Samoa Dessert
It’s totally normal to have questions when you’re tackling a showstopper like this **Samoa Dessert**! Baking something this decadent sometimes feels a little intimidating, but I promise, once you get the rhythm down, it’s just like any other **Chocolate Caramel Dessert**. I’ve gathered the questions I get asked most often when people make this for the first time.
Can I make this a No Bake Samoa Cheesecake?
Yes, you absolutely can dive into the No Bake Cheesecake Variations pool with this one! Remember what I put in the recipe notes? You can skip all the baking steps entirely. If you choose the no-bake route, you nix the eggs and the heavy cream. Instead, once your chocolate crust is firm from a quick chill, you mix up your sugar, cream cheese, and vanilla, and then you gently fold in about a cup of whipped topping—like Cool Whip—to give it that necessary lightness. It won’t have the same density as the baked version, but it sets up beautifully in the fridge. Total chill time is about 8 hours, though!
What is the best way to toast coconut for the topping?
Toasting coconut is one of those things where you have to be present—it goes from perfect to burnt charcoal in about three seconds flat! When I make my Toasted Coconut Topping, I use a dry skillet, no oil needed, over medium heat. Sprinkle the sweetened flaked coconut in a thin layer and just keep it moving. You need continuous stirring, like you’re stirring a roux, until you see those beautiful, uneven golden-brown edges pop up. Pull it off the heat immediately once it smells nutty and looks mostly golden; residual heat will finish the job.
How far in advance can I prepare this Layered Cheesecake?
This is a fantastic question when you are planning for big gatherings! Since this is a true **Layered Cheesecake**, timing the moisture is key. The cheesecake itself? It needs that full chill time, so making the baked part a day ahead is actually perfect, maybe even better! It firms up wonderfully overnight.
However, for the best visual effect on that gorgeous chocolate drizzle, hold off on the final toppings. I would have the whole base chilled and ready to go. Then, about an hour before serving, sprinkle on your toasted coconut, drizzle the caramel, and melt your chocolate for that final drizzle. If you add the chocolate too early, it can sometimes bloom or get a little dull in the fridge. Keep the topping fresh, and your **Samoa Cheesecake** will look like it came straight from a bakery case!
Estimated Nutritional Breakdown for This Samoa Cheesecake Recipe
Now, let’s talk numbers. I always keep things real with you—this is a rich, luxurious, showstopper dessert, not a light snack, so the nutritional count reflects that decadence! I’ve calculated the estimates based on the ingredients listed above, but please take these figures with a small grain of salt.
Remember, every single thing varies; the brand of chocolate chips you use, how thick your caramel drizzle ends up being, or if you used slightly different cookie crumbs can shift these numbers. This is just a guide for the average slice based on standard measurements.
- Serving Size: 1 slice
- Calories: 550
- Fat: 35g (with 20g being saturated fat)
- Total Carbohydrates: 55g
- Sugar: 45g (That’s where all the Samoa flavor lives!)
- Protein: 8g
- Cholesterol: 110mg
- Sodium: 320mg
I want to be super clear that because this Samoa Cheesecake depends heavily on homemade components like caramel sauce if you choose that route, these are just solid estimates. They are meant to help keep you informed, not stress you out! Enjoy this slice of bliss without worrying too much about the details; that’s what special occasion desserts are for!
Share Your Samoa Dessert Creations
Whew, we made it! We turned a classic cookie into a towering, creamy, incredibly decadent **Samoa Cheesecake**. I truly hope that as you were pulling this masterpiece out of the fridge, smelling that coconut and caramel, you felt like you composed a little part of your own flavorful life symphony. That’s the goal here at Delish Symphony, after all!
Now I really, really want to see what you cooked up! Did the layering look just like mine? Did your crust hold firm? Don’t be shy!
When you get a chance, please come back and leave me a rating. If this dessert earned its spot on your table, please give it five stars—it helps other home cooks like you find this reliable recipe. And if you hit a little snag, or maybe you tried a fun variation (like adding a swirl of peanut butter—ooh, maybe next time!), leave a comment below telling me how it went. I read every single one!
Tag me on social media if you snap a picture of this gorgeous **Samoa Dessert**! Seeing your successes out there in the wild makes all the testing and tweaking worth it. It proves that simple, honest passion from the kitchen can create absolute showstoppers. If you ever need something else to share with your people, you can always reach out to me directly via the contact page.
Happy baking, and let’s keep making wonderful things together!
PrintDecadent Baked Samoa Cheesecake with Chocolate Crust
Create a showstopping dessert that merges creamy cheesecake with the beloved flavors of toasted coconut, caramel, and chocolate drizzle, inspired by the classic Samoa cookie.
- Prep Time: 30 min
- Cook Time: 75 min
- Total Time: 145 min
- Yield: 12 servings 1x
- Category: Dessert
- Method: Baking
- Cuisine: American
- Diet: Vegetarian
Ingredients
- 1 1/2 cups chocolate wafer crumbs (about 30 cookies)
- 1/4 cup granulated sugar
- 6 tablespoons unsalted butter, melted
- 3 (8 ounce) packages cream cheese, softened
- 1 1/2 cups granulated sugar
- 1 teaspoon vanilla extract
- 1/4 teaspoon salt
- 3 large eggs
- 1/2 cup heavy cream
- 1 cup caramel sauce, divided (store-bought or homemade)
- 1 cup sweetened flaked coconut, toasted
- 1/2 cup semi-sweet chocolate chips
- 1 tablespoon coconut oil
Instructions
- Preheat your oven to 325 degrees Fahrenheit. Wrap the outside bottom of a 9-inch springform pan tightly with heavy-duty aluminum foil.
- Prepare the crust: In a medium bowl, combine the chocolate wafer crumbs and 1/4 cup sugar. Pour in the melted butter and mix until the crumbs are evenly moistened. Press the mixture firmly and evenly into the bottom of the prepared springform pan. Bake for 10 minutes. Let the crust cool while you prepare the filling.
- Prepare the cheesecake filling: In a large bowl, use an electric mixer to beat the softened cream cheese, 1 1/2 cups sugar, vanilla extract, and salt until the mixture is smooth and creamy. Scrape down the sides of the bowl as needed.
- Beat in the eggs one at a time, mixing just until each egg is incorporated. Do not overmix. Gently mix in the heavy cream until just combined.
- Pour half of the cheesecake batter over the cooled crust. Drizzle 1/2 cup of the caramel sauce over the batter. Pour the remaining batter over the caramel layer.
- Bake the cheesecake in a water bath: Place the foil-wrapped springform pan into a larger roasting pan. Carefully pour hot water into the roasting pan until the water reaches about halfway up the sides of the springform pan.
- Bake for 60 to 75 minutes, or until the edges are set but the center still has a slight jiggle.
- Turn off the oven, crack the oven door open slightly, and allow the cheesecake to cool slowly in the oven for 1 hour. This prevents cracking.
- Remove the cheesecake from the water bath and let it cool completely on a wire rack. Once cool, cover and chill in the refrigerator for at least 6 hours, or preferably overnight.
- Prepare the topping: Once chilled, sprinkle the toasted coconut evenly over the top of the cheesecake. Drizzle the remaining 1/2 cup caramel sauce over the coconut layer.
- Make the chocolate drizzle: In a small microwave-safe bowl, combine the chocolate chips and coconut oil. Microwave in 30-second intervals, stirring between each, until smooth. Drizzle the melted chocolate over the caramel layer.
- Carefully run a thin knife around the edge of the cheesecake before releasing the springform side. Slice and serve cold.
Notes
- For the best texture, ensure your cream cheese and eggs are at room temperature before mixing the filling.
- Toast the coconut in a dry skillet over medium heat, stirring constantly, until golden brown. Watch closely as it burns quickly.
- If you prefer a no-bake version, omit the eggs and heavy cream, and use 1 cup of whipped topping folded in at the end. Chill for 8 hours before topping.
Nutrition
- Serving Size: 1 slice
- Calories: 550
- Sugar: 45g
- Sodium: 320mg
- Fat: 35g
- Saturated Fat: 20g
- Unsaturated Fat: 15g
- Trans Fat: 0.5g
- Carbohydrates: 55g
- Fiber: 2g
- Protein: 8g
- Cholesterol: 110mg